 |
| Classic Performance Products Trailing Arm Conversion
Kit |
| CPP's New '63-87 Chevy Trailing Arm Conversion |
| By Grant Peterson |
|
|
|
There are two reasons so many trucks throughout the years
were designed with a traditional parallel leaf spring rear suspension: It's
simple and cheap. It works really well from a manufacturing and utilitarian
standpoint and has stood the test of time throughout the life of the automobile,
but what if you get tired of being treated like dice in a Yatzee cup?
Cheap and simple don't usually add up to a good ride, and
unless you're carrying a load in your truck, it rides, well, like a truck.
GM used a trailing arm and coil spring rear suspension setup on light-duty
trucks from '67-72, but switched back to parallel leaves in '73, most likely
due to cost. If you have driven a truck with trailing arms, it's obvious
there's something missing: the rough ride. Classic Performance Products,
aka CPP, has been offering owners of stock trailing arm-equipped Chevy and
GMC trucks their upgraded tubular version of GM's original trailing arm
design for a few years now and just finished a kit to convert the other
'63-87 1/2-ton shortbed GM trucks with parallel leaf springs to well-mannered
trailing arms. One of the biggest drawbacks to a parallel leaf setup is
the amount of lateral or side-to-side slop they allow. |
Like a four-link setup, trailing arms utilize a Panhard bar
(Trac Bar) to keep the rearend from moving laterally and should do so as
long as they're installed properly. Another disadvantage to leaf springs
is spring wrap both under acceleration and deceleration, which puts quite
a bit of stress on the drivetrain and suspension. Trailing arms are much
like ladder bars, which have been used in drag racing and street rods for
many years and help keep the power to the ground where it belongs and the
pinion pointing where it should. Also, thanks to the coil springs used with
trailing arms, it is easy to adjust or totally change the ride height in
the rear end without the hassle of messing with leaf springs. CPP has six
different coil spring heights as well as three lowering blocks available
to use with a stock truck or any one of their trailing arm kits. CPP put
together their Chevy Trailing Arm Conversion kit using their tried-and-true,
TIG-welded, quarter-inch-wall DOM tubular trailing arms; CNC-bent, TIG-welded,
quarter-inch steel trailing arm crossmember; C-notch/frame reinforcement
sections; adjustable Trac Bar; shocks; coil springs; and all necessary heavy-duty
Grade 8 fine-thread hardware. |
The kit isn't for the novice-most major chassis alterations
aren't. But with that being said, all the welding is done on the rear axle
housing and not on the truck's frame, so a novice could do much of the work
and finish with help from a skilled friend or shop. As always, CPP has knowledgeable
people answering their tech line who happen to be in the same building where
the kit was designed and built should you have any questions.
Our subject for this install is a smog-equipped '79 Chevy
Heavy Half shortbed pickup that rode like a buckboard despite being a clean
original truck. After the swap it sailed smoothly down our rough, overcrowded
roads. The difference in the truck's ride is like night and day with the
CPP Trailing Arm Conversion compared to the stock parallel leaf springs.
From crossing the first set of railroad tracks leaving The Muffler Man to
jumping on the freeway, the '79 won't be rattling anyone else's fillings
out. Follow along and see what your kidneys could soon be thanking you for. |
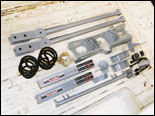 |
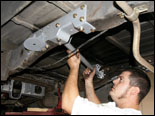
| Here's the meat and potatoes of CPP's new Trailing Arm Conversion
kit for '63-87 Chevy and GMC trucks. |
|
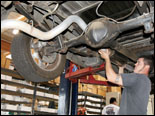 |
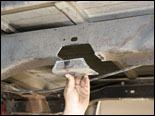
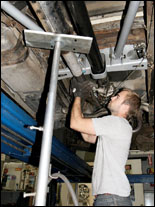
| One of the first things you need to do to start disassembling
the stock parallel leaf spring suspension is to remove the exhaust system.
Our subject for this story is a '79 Chevy Heavy Half C-10 that rode like
a locomotive before the swap. |
|
 |
| On some of the later C-10s it may be common to have dual gas
tanks, and if yours is so equipped, the solenoid that switches between tanks
needs to be temporarily removed from the side of the frame to make room
for the new trailing arm crossmember. |
|
 |
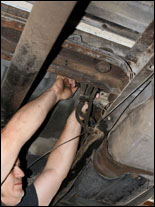
| The emergency brake cables need to be disconnected, and the
tabs riveted to the bottom of each framerail need to be removed and swapped
side for side. |
|
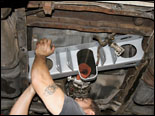 |
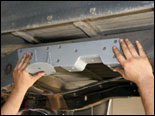
| CPP'S beefy new CNC-bent trailing arm crossmember goes in
just forward of the rear cab-mount crossmember. The CPP crossmember went
in easier when we started with the passenger side, which also meant the
catalytic converter had to be removed. Because of variations in automotive
frames from every manufacturer, a rubber mallet may help get the new crossmember
in position. |
|
 |
| While the CPP crossmember locates off of stock holes in the
frame, a few more need to be drilled to give the crossmember enough mounting
points to make it structural. |
|
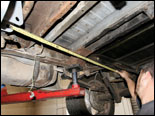 |
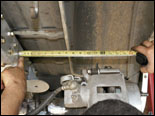
| Once the trailing arm crossmember is bolted in place, everything
needs to be checked to ensure the crossmember is square in the frame. Before
dismantling the suspension, measure and write down the wheelbase and ride
height. |
|
 |
| Everything checked out, so Jeff got started pulling the rearend,
shocks, and leaf springs. |
|
 |
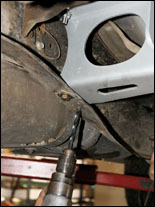
| CPP made this robust piece out of quarter-inch steel for the
kit that combines the upper coil spring mount, C-notch, frame reinforcement,
and Panhard/Trac Bar mount. |
|
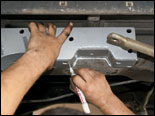 |
| The piece locates off the holes that once held the stock bumpstops,
but the C-notch needs to be cut out before the piece will fit in place.
Jeff uses the new piece as a template for the C-notch. |
|
 |
| Once removed, the holes from the bumpstop should still be
on either side of the C-notch. Also, while there are C-notch kits out there
with a bigger notch, the CPP-designed one in this kit stops the highest
point of the stock rearend just before it would hit the bottom of the bed
floor. |
|
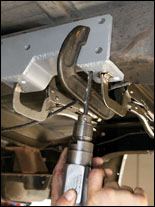 |
| With the piece securely clamped in place every which way,
the old bumpstop holes were drilled out to 7/16-inch to accommodate the
fine-thread Grade 8 hardware CPP provides. |
|
 |
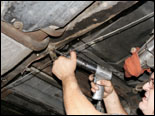
| Jeff got comfy with the drill for a while and transferred
all the holes in the reinforcement plates to the frame, then tightened down
all its bolts, except for the three on each side that hold the shock crossmember
in place. |
|
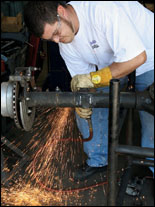 |
| Next, cut the stock leaf spring pads and shock mounts off
the rearend housing and ground the remnants smooth. Remember to wear your
safety attire! |
|
 |
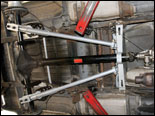
| Now CPP's tubular trailing arms can be hung from the trailing
arm crossmember. CPP has recently revised their tubular trailing arms by
adding longer reinforcement plates and doubling the tubing wall thickness
from 1/8-1/4-inch-wall DOM tubing. This came about when a customer installed
them in a turbo diesel-powered truck with 1,400 lb-ft of torque and was
starting to bend the old ones, so even if you have an older set, they'll
probably stand up to more power than most will ever dream of having. |
|
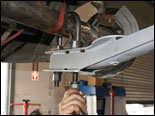 |
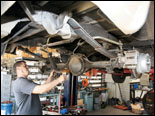
| With the rearend housing tubes ground smooth and cleaned up,
it was hoisted back up in place where the new U-bolts and trailing arm pads
were installed. Just snug the U-bolts down for now. |
|
 |
| The new coil springs were installed with all the provided
hardware. CPP has six different heights of coil springs and three lowering
blocks to give plenty of ride height options. The '79 got the 3-inch drop
springs and no lowering blocks for now. |
|
 |
| With the U-bolts still barely snug, Jeff carefully checks
to make sure the rearend is centered in the truck from side to side. |
|
 |
| With the rearend centered and set at ride height, the pinion
angle can now be set. The motor's crankshaft centerline was checked at the
transmission's tailshaft and was determined to be -6.2 degrees, so the pinion
angle was set at the same degree reading but slopping up or positive. Now
the U-bolts can be tightened down. |
|
 |
| Double-check the pinion angle and make sure the rearend is
still centered before tack welding the trailing arm pads to the rearend. |
|
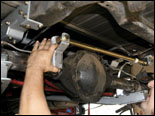 |
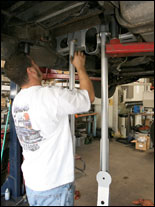
| CPP includes one of their adjustable Trac Bars and mounting
brackets in the kit. With the rearend still sitting at ride height, Jeff
test-fits the Trac Bar before welding its mounting bracket to the rearend. |
|
 |
| To mount the shock brackets, Jeff took the coils out, bottomed
the rearend, and installed the shocks so they still had about 1 inch of
travel left before welding the lower shock brackets to the rearend. This
will prevent blowing out the shocks in case they bottom out while on the
road. From here all that's left is to reattach the emergency brake cables,
resecure the brake lines to the frame, and reroute the exhaust. Looks good,
huh? The old leaf spring mounts can come off whenever you feel like getting
cozy with an air hammer. |
|
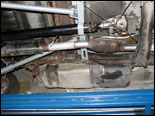 |
| While unable to change the location of the catalytic converter
and run the exhaust through CPP's preplanned holes, The Muffler Man turned
the muffler on its side and snaked the rest out between the driveshaft and
the driver-side trailing arm and retained the original tailpipe location. |
|
 |
| CPP designed the trailing arm crossmember with big 3 1/2x5-inch
holes in each side to run the exhaust high off the ground, but unfortunately
the '79 needs to meet the smog standards here in California and had to retain
the stock single exhaust complete with a catalytic converter, which as you
may have guessed threw a small wrench in the works, but those with a non-smog
truck with dual exhaust will love it. We took the truck to The Muffler Man
here in Placentia, CA, to have Josh work some magic. |
|
|

