 |
| Classic Performance Products |
| 1968 Ford F-100 - Pioneering Power With Ford
Racing's Newest Crate Motor |
| By Grant Peterson |
|
|
|
| It's a lonely road when you're leading the pack, one that
can be rough at times but rewarding when it's all said and done. It's getting
harder to do something new to these old trucks nowadays, with so many people
building more and more of them all the time. But every once in a while,
new ground is broken, and once again it happens here in CLASSIC TRUCKS!
Going into the project, I knew the '67-72 F-100s still had plenty of uncharted
territory to cover, and that they could be built to rival the monstrously
popular Chevys of the same vintage, which was my first goal. |
The second goal was to keep the Bumpside Ford-powered, which
was tough for me because I've never favored Ford motors for whatever reason,
but I was determined to figure something out. Instead of going with a tried
and true Ford 302, 351, 460, etc., I thought I'd find something that would
yield a decent mix of power AND economy in terms of mileage, preferably
with a double-digit mpg figure that starts with a "2" instead
of a single digit. |
That immediately excluded most if not all of the aforementioned
engines, and with the newer GM motors producing decent mileage when put
in older trucks and cars, there had to be something in Ford's catalog to
put up a fight. After talking with a few F-100 owners last show season who
had newer "modular" Ford V-8s in their trucks coupled with success
and satisfaction, some even pushing 26 mpg on the highway with a five-speed,
I knew I'd found my candidate. But where should I start, since I'm like
the majority of you reading this who consider understanding modern EFI motors
much like deciphering hieroglyphics? |
 |
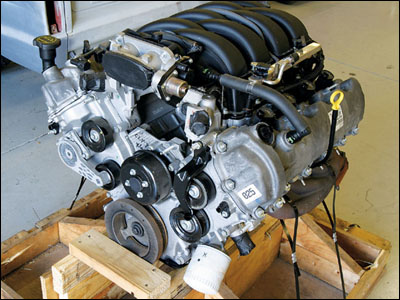
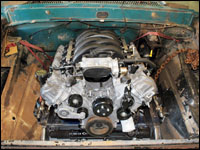
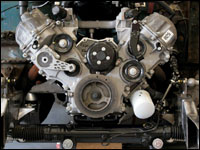
| Here it is, my first crate engine and an '05-07 Ford Mustang
GT motor from Ford Racing Performance Parts (FRPP). FRPP is working with
us on this groundbreaking install to put together everything a customer
would need to make this all-aluminum 4.6L SOHC three-valve V-8 run in their
own project, but first we need to start at the beginning. While FRPP is
working on the prototype "street rod" wiring harness, I'll get
started actually installing the motor into the '68. |
|
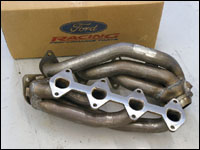 |
| The three-valve production crate motors will ship with Mustang
tubular shorty headers like these that are a direct replacement for the
stock cast manifolds, saving 10 pounds. |
|
 |
| The motors will also come with valve covers available in blue
or black wrinkle finish, or silver or chrome powdercoated, but I'll wait
to put these babies on until later so I don't scratch 'em. |
|
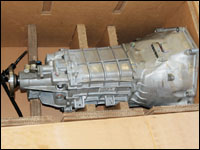 |
| In keeping with the Mustang theme, I'll also be using the
matching Mustang GT Tremec TR-3650 five-speed trans from FRPP, and of course
they sell automatics and other Tremec transmissions depending on what you
need. |
|
 |
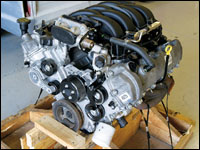
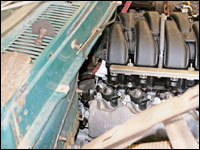
| Even though most think people these motors are really wide,
it fit quite nicely in the '68's engine bay! The width of the modular V-8s
are their biggest dimension, and the 4.6L SOHC motor is 25 5/8 inches, which
is actually half an inch narrower than the 460, while a 351 comes in at
21 inches wide. |
|
 |
| The sides of the engine and its exhaust manifolds clear the
inner fender panels with ease... |
|
 |
| ...and don't interfere with the steering at this point either,
which is nice. |
|
 |
| I set the motor back against the firewall as much as I could
while leaving a small gap, which tucked it up under the lip of the cowl
nicely. The 4.6L SOHC motor is relatively short, and fully dressed it measures
28 inches long, which is 4 inches shorter than the 460 and just half an
inch longer than the 302/351 measured from the bellhousing to the water
pump snout. A complete three-valve 4.6L engine tips the scales at a mere
420 pounds. |
|
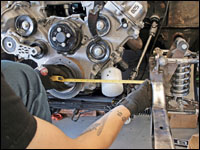 |
| Once I had the motor and trans in the ballpark of where they
needed to be in the frame, it was time to get out the tape measure and levels
to make sure it was centered in the frame and level side to side with the
frame. Being that the engine is fuel injected, the crankshaft angle isn't
as critical as a carbureted setup, so I was more concerned with clearing
the front crossmember and floors, which would probably be a slam dunk if
I hadn't kicked the front of my frame up 2 inches, but I'll have to do some
tranny tunnel work by the looks of it, which is part of the price you pay
to be low. |
|
 |
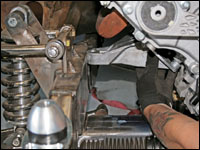
| I was waiting for the rest of the accessories like the A/C
compressor and starter to show up, so instead of just making my own motor
mounts, I went down to the local Ford dealership and bought these stock
Mustang mounts. At this time there are still no alternatives, and I wanted
to make sure the passenger-side mount would clear the starter and A/C compressor. |
|
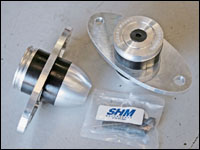 |
| Sean Hyland Motorsport is a well-known company in the world
of modular Ford engines and literally has written a book about them. They
offer these trick Prothane Bullet Mounts that replace the stock hydra-mounts
that come standard in the '05-07 Mustangs to cushion between the motor mount
and frame. Plus, it looked like they would be somewhat easy to adapt to
my frame. |
|
 |
| Unfortunately, nothing is ever easy, and when I went to install
the Ford motor mount on the engine, my frame was just too narrow by about
1 3/4 inches on each side, but the matter was again compounded by the additional
frame kickup. I would guess that these would work in many cases, just not
mine at this point. |
|
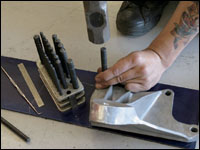 |
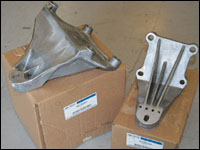
| So what was I to do? Make my own I guess, but at least I had
the stock ones for reference. I traced the shapes of their bases onto some
3/16-inch cold-rolled steel plate and used transfer punches to mark the
holes in the appropriate spots, which made the job easier. |
|
 |
| I also needed to make provisions for the Bullet Mounts from
Sean Hyland to connect to the frame, so out of the same 3/16-inch plate
I made this simple yet effective bracket that I'll weld to the inside of
the framerails. |
|
 |
| Again, basing the motor mounts I was making off the stock
pieces gave me the approximate location for the Bullet Mounts. With the
motor mount base plates cut out and bolted to the engine, I could start
making templates for the rest of the pieces. |
|
 |
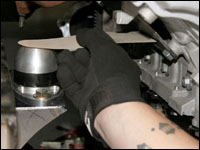
| I made the motor mount's bottom piece level to the ground,
which was also level with its mounting location on the Bullet Mounts, so
they wouldn't be in a bind, and I tacked it to the base plate. Next came
the vertical pieces, which were just trial and error to get the right size
and shape template. Paper makes this job easier. |
|
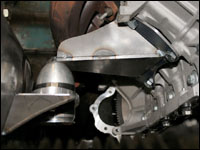 |
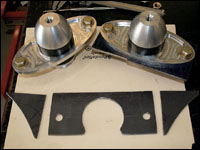
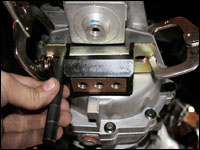
| With the passenger-side mounts complete and ready for final
welding, this is what I ended up with. Don't forget to use metric bolts
going into the block and the top hole of the Bullet Mount, not SAE. |
|
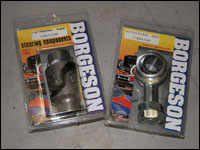 |
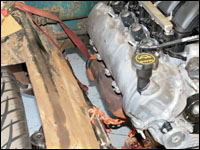
| Depending on what type of steering you have in your truck,
things could get tricky for a minute or two. Anticipating this possibility
when I connected the ididit column to the rack-and-pinion, I ordered an
extra U-joint and a rod end bearing from Borgeson to support the double-D
shaft when an additional U-joint is added. Because space is limited here,
we'll touch on this later. |
|
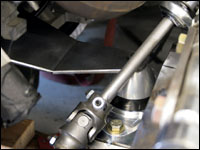 |
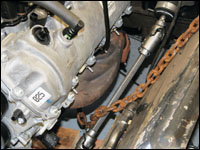
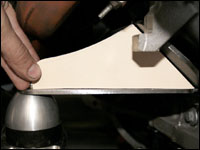
| In a frame that hasn't been kicked up in the front, the driver-side
motor mount would most likely be easier to make than what I was up against
due to some steering interference overcome with the extra parts from Borgeson.
In solving that interference, I had to place the Bullet Mount lower in the
frame and about an inch farther back than the right side, not only making
a little more distance to cover with the motor mount, but also adding a
few more angles to it. You can see the angled bottom piece of the motor
mount here spanning from its base plate to the Bullet Mount. |
|
 |
| Once I was comfortable with the motor mounts' shape, I got
out the Miller Dynasty 200 DX TIG welder and made sure they would never
come apart. Not too bad, if I say so myself. If you don't feel confident
in your fabrication skills to do a job like this, find a quality shop to
do it for you-you don't want to skimp in this department. |
|
 |
| Here's the view from the front with the finished motor mounts.
Maybe before they get painted or plated I'll drill some holes in them to
shave a little weight, and, of course, to make 'em look cool. Let's crawl
underneath the truck to see what's gotta happen to mount the transmission
into the frame. |
|
 |
| As fate would have it, the Tremec TR-3650 has a unique tranny
mount since it's made specifically for the Mustang, and I wanted to add
a bit of universality to how it mounts, so I picked up a Prothane GM (I
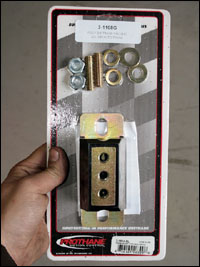
know...) automatic tranny mount from Classic Performance Products. |
|
 |
| A stock GM rubber mount is a bit too wide to fit in this spot
on the tranny just ahead of the stock mount, which is why I got the urethane
mount from CPP. After centering the mount on the tranny and adding small
spacers on each side to clear a rib on the bottom of the tranny, I transferred
and drilled mounting holes in this flange that's open above on each side.
This would make incorporating a tranny crossmember much easier. |
|
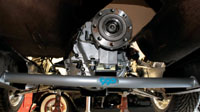 |
| After making rough measurements of what I needed, I also picked
up one of CPP's universal tubular tranny crossmembers while I was there,
which went in nicely. They make parts for lots of applications and should
be able to get you what you're after. You may notice the unusual flange
on the yoke in the tranny. The late-model TR-3650 doesn't use a slip yoke,
nor can you change it over to one, so a slip joint in the driveshaft is
needed. |
|
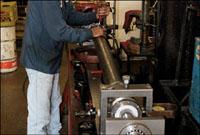 |
| I took my driveshaft questions and measurements to our friendly
neighbors at O.C. Driveline here in Placentia, CA, who are used to doing
custom driveshafts with all the hot rods and such running around SoCal.
Ray got started on my driveshaft, and soon after they had it ready to go
and balanced to 5,200 rpm, which is fine for most street applications. |
|
 |
| Here's the finished driveshaft from O.C. Driveline complete
with the slip joint and the Spicer (PN 2-2-1379) front yoke to go to the
Tremec TR-3650 five-speed from Ford Racing Performance Parts. Now that the
drivetrain from FRPP is firmly mounted in the '68, I'll be able to sleep
a bit better at night. Stay tuned for next month's installment of the Bumpside
Build-Off as we continue to blaze new trails! |
|
|

