 |
| Classic Performance Products |
| Tube Bending - Basic Tubing Tutorial - Part
1: The Art Of Bending |
| By Rob Fortier |
|
|
|
Ever since we launched the Do-It-Yourself column earlier
this year, I've been on a mission-literally hellbent on learning things
that I should have already known how to do by now. While I don't imagine
I'll be a world-renowned metal shaper, custom painter, or professional specialist
at any one particular trade, I do intend on broadening my basic skills that
apply to assembly, repair, and general upkeep of my cars and trucks.
Lately, I've encountered a number of instances where, had
I been just a little bit more proficient in the art of tube bending-not
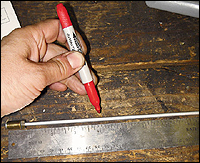
to mention better equipped tool-wise-I would have been able to finish the
task at hand much easier-and much better. |
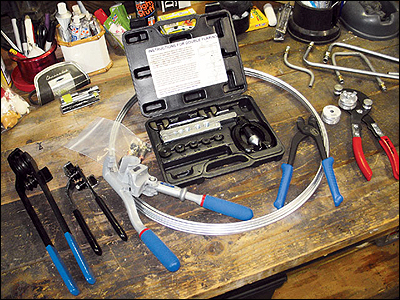
So, instead of hemming and hawing about it, I went out and
purchased the tools I needed (available from CPP). For practice, I obtained
a random variety of preset lengths and diameters of brake line as well as
a 25-foot bulk roll. Now, it was all up to me to perfect the trade-or just
learn to make nice bends without kinks, or better yet, bends that aren't
too short! To be super honest, the real thing that got me hot on the tubing
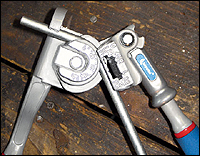
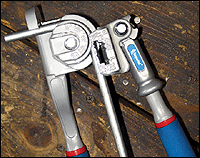
kick was the sudden breaking of my one and only tube bender. I was smack-dab
in the middle of a plumbing job that required a multitude of bends in 5/16
tubing when my cast bender decided it'd had enough. As I've been learning
quite a bit lately, you usually get what you pay for, and when it comes
to specialty tools, it pays to step up for the good stuff. |
So, with that in mind, I went online and found the good stuff-no
more cheap parts store throwaways for me. For someone who'll only be doing
occasional bending, a good general-purpose bender should definitely suffice.
However, if you're prone to bending more than just a brake line or two every
now and then, you might want to consider a variety of benders. For clean,
basic bends, the "rolling" type of tool can't be beat. They can
form bends by hand or while secured in a bench vise. For more intricate
bends, a "multi" type bender is a definite must. Beyond that,
make sure your toolbox is equipped with a good tubing cutter (I have both
a set of minis as well as a large set with a built-in deburring tip), and
it wouldn't hurt to have a set of forming pliers-you know, just in case
you're off a tad bit on a bend or two. |
 |
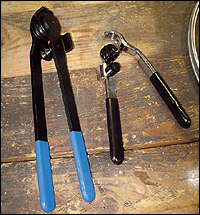
| 1. Up until recently, my tool collection did include a set
of tubing benders, but they were of the generic "cheapie" variety.
Well, not any longer-lesson learned the hard way. Unless you use a crescent
wrench on every nut and bolt you remove or tighten, you'll want to consider
more than one tool for your bending needs, or, at the very least, a good
set of multi-purpose benders. |
|
 |
| 2. For occasional use, these general-purpose tubing benders
are great, and very economical. With reversible guide wheels, you can bend
the four popular sizes of tubing. |
|
 |
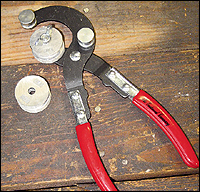
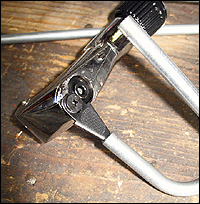
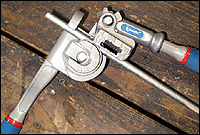
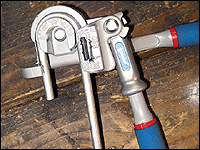
| 3. If you want to get serious and not mess around, you gotta
have a pair of triple-head benders. With its adjustable bending arm, you
get more leverage control, allowing you to make flawless bends. Plus, with
its indexed head, you can guarantee your bends will start-and end-exactly
where you want them to. |
|
 |
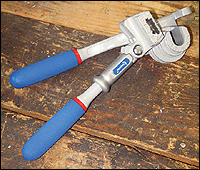
| 4. For nice, clean bends up to 180 degrees (down to a 1-inch
radius), rolling-type benders are the ticket. The smaller pair is great
for 3/16-1/4-inch tubing; the larger pair will easily handle larger tubing. |
|
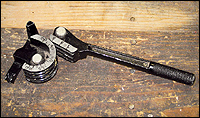 |
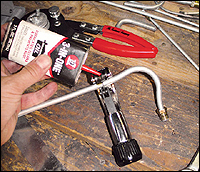
| 5. Here's what lead me to embark on my quest to improve my
tube bending skills. I know many of you have the same exact tool. It served
its purpose for quite some time, but when I decided to get serious, it threw
in the towel. |
|
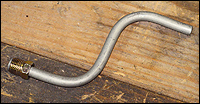 |
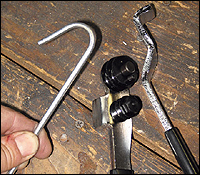
| 6. This is the kind of bend I wanted to make on a consistent
basis... |
|
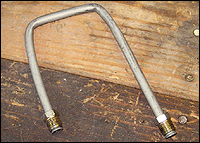 |
| 7. ...not this. Kinks are not a welcome addition to any plumbing
I do. |
|
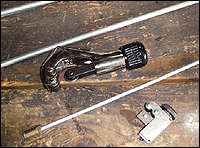 |
| 8. Beyond having a good set of benders, another must for getting
the job done right is having a good tubing cutter-no hacksaws here! |
|
 |
| 9. The smaller cutters are good for, well, smaller tubing
(they can and probably will cut through larger tubing, but it's very time
consuming and quite detrimental to the blade). Since neither type are that
expensive, it doesn't hurt to have both-but you can get by with just the
larger cutters. |
|
 |
| 10. Here's a good way to ensure the longevity of your cutter's
blade; a little dab goes a long way. Plus, lubing can help make a cleaner
cut, too. |
|
 |
| 11. While less crucial to the bending aspect, when it comes
time to flare tubing ends, it is very important to clean the surfaces inside
and out. Furthermore, having an even cut is vital to obtaining functional
flares. |
|
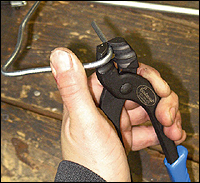 |
| 12. Wrapping up our tool rundown, forming pliers such as these
can come in real handy, especially when you're just starting out. Oftentimes,
your bend may fall short or even go a little further than intended-with
these, you can carefully tweak the tube where you want it to go. |
|
 |
| 13. I actually became more proficient with the rolling benders,
quite to my surprise. It may be due to their ease of operation, which can
be attributed somewhat to the removable bending arm. |
|
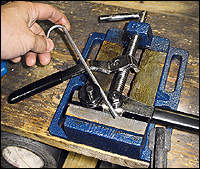 |
| 14. Sometimes, it's easier to plot out your bend (length and
radius) from wherever the tubing will route, and then perform the bending
with the tool mounted in a vise, as shown. This way, you're not fumbling
around with three things at once. |
|
 |
| 15. Having the bender solid-mounted can be quite helpful,
but if you're dealing with multiple bends in one line, it could also become
a hindrance, at which point you'd be better off doing it the conventional
way. |
|
 |
| 16. For me, one of the hardest things to get comfortable with
was formulating-or in my case, guestimating-bends. Not knowing how to compensate
or allow tubing length for particular bends can and will end up creating
a nice scrap bin of tubing before long. |
|
 |
| 17. Measure twice, bend once. Sounds easy, but not really.
The key with a rolling bender is learning where to measure and how to apply
it. |
|
 |
| 18. Since I went through quite a bit of tubing trying to learn
how and where to measure, I often found it easier to perform particular
bends "on site." And if for some reason I still fell short, I
had my forming pliers to back me up. |
|
 |
| 19. The adjustable benders are cool, but they take some time
getting used to. No matter what type of bend or tubing you're doing, always
start with the adjustable arm in the fully up position. |
|
 |
| 20. Next, lock the tubing in the jaw guide and flip the arm
down parallel with the tubing. |
|
 |
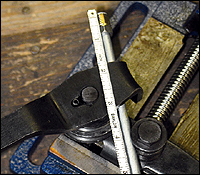
| 21. Conveniently marked on the guide are degree points from
45 to 180. This would be a standard 45-degree bend. |
|
 |
| 22. A 90-degree bend. |
|
 |
| 23. And finally, a complete 180-degree bend. |
|
 |
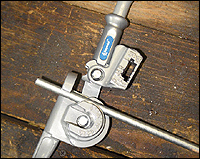
| 24. To help aid in plotting the bending points, the adjustable
arm on the triple-head bender is also marked. To utilize this, first measure
where you want the bend to originate. |
|
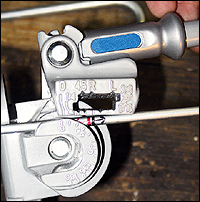 |
| 25. Looking at the tubing straight on, if the bend will be
going to the right, line your measurement up with the R; if it's to the
left, line it up with the L. This way, you can avoid making a nice bend,
only to find out you missed it by that much and have to start all over again. |
|
 |
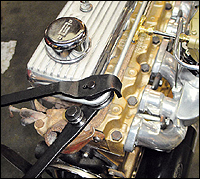
| 26. Equipped with my new arsenal of tubing tools, I was able
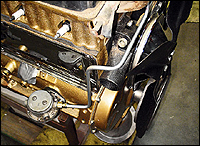
to complete the job my old tubing bender failed to. Beyond creating a flowing
fuel hard line on my 235, I'll have no reason not to replumb the brakes
on my '53 the right way. |
|
 |
| 27. In Part two, we'll go over the basics of flaring and the
various fittings. |
| |
| Go
to Part Two |
| |
|
|

