| This Mustang brake kit is designed to provide a substantial
improvement in stopping power as compared to the original 9" brakes.
All of the required work to install this kit is just bolt on. |
| Please take some time to review these instructions and drawings
before beginning the installation to make the job go smooth and easy. |
| 1. |
Remove all of the old components including: rotors, calipers,
caliper brackets and dust shields |
| 2. |
Clean all mounting surfaces on the spindle. |
| 3. |
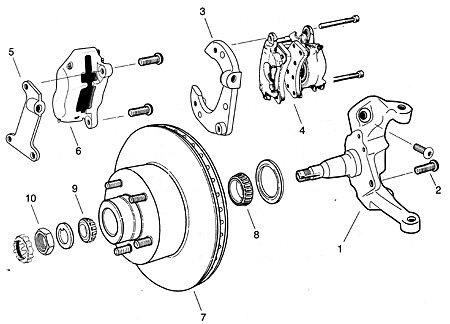
Bolt the ductile iron or optional aluminum caliper brackets
to the spindle. Note that the caliper bracket faces away from the steering
arm (see drawing). Please use loctite on the mounting bolts. |
| 4. |
Pack inner and outer bearings with hi-temp disc brake grease
and install inner bearing and grease seal in rotor. |
| 5. |
Install the new rotor on spindle, followed by outer bearing,
keyed washer, spindle nut, spindle nut cage, cotter pin and dust cap. |
| 6. |
Next step is to install calipers. Make sure that bleeder screws
are facing up. |
| 7. |
Install new flex brake lines with new copper sealing washers
on both sides of the 10mm x 1.50 banjo fittings. Make sure there is enough
clearance and slack in the brake lines, especially under full left and right
turns. |
| 8. |
Bleed the brakes and check to make sure that the rotors are
not dragging excessively (a slight drag is preferred). By this time, the
pedal should be relatively firm. |
| 9. |
If there is excessive drag, check the following: |
|
FREEPLAY - make sure there is sufficient freeplay in the master
cylinder pushrod, there should be approximately 1/16". |
|
RESIDUAL VALVE - check to be sure there is no more than a
2 psi residual pressure valve on the front brakes (including the one built-into
the master cylinder). |
|
ALIGNMENT - caliper must be square to and centered on the
rotor. |