- Classic Performance
Rear Disc Braking
- For '63-87 Chevy Trucks
-
|
If Chevy trucks have even the slightest downfall worth
noting, it's their lack of quality brakes. Although we as enthusiasts consider
trucks as the primary vehicle of interest, it seems as though GM does not.
until just recently, no light-duty Chevy truck came from the factory with
four-wheel disc brakes. And before 1971, none of the GM truck line had disc
brakes at all. This seems even stranger when you consider that trucks are
heavy and often times extreme braking power is required to stop, especially
when towing a trailer or driving a loaded truck. As consumers began latching
onto the older Chevys, the need for improved braking became a reality. If
you dump ten grand into a classic truck, you definitely want it to stop
on demand. Prior to 1971, all Chevy trucks came equipped with traditional
drum brakes, forcing enthusiasts to seek out aftermarket disc brake conversion
kits designed to work specifically with older trucks. This lack of factory
brake options and performance was the founding force for Classic Performance
Products, who have created a power disc brake line for nearly every popular
model of Chevy car or truck, as well as most Ford applications, When dealing
with classic Chevys, more particularly, those from the 60s to the 80s, there
ore many unique applications which can be applied depending on the truck
and the owner's specifications. Power brakes, disc/drum applications and
bolt patterns are all elements that play a role in choosing the appropriate
kit. The bottom line is that Classic Performance Products has developed
disc brake kits, both power and manual, that will work with five-and six-lug
trucks. This gives just about every classic Chevy truck owner the opportunity
to upgrade their antiquated brake system with a more modem application.
New on the list of kits from C.P.P. is a very impressive rear disc brake
kit for classic Chevys that truly completes their brake line (no pun intended).
Due to the increased popularity of four-wheel disc brakes, consumers have
been looking for a kit that would complement front disc brake conversions.
The great thing is that the rear disc brake kit is very simple in its application.
|
The reason being, most people with classic Chevys from
the 60s and later convert their front drums to discs with one of the many
different kits available. Some choose a five-lug pattern for the front,
then convert the factory rear end to a five-lug pattern to match.
Others choose a six-lug disc brake kit that allows them to retain the use
of the factory six-lug rear. But now, all that is out the window because
Classic Performance Products' new rear disc brake kit is virtually universal
for Chevy trucks from '63 to '87. The only difference is the requirement
for either five-or six-lug bolt patterns in the rear rotors. In essence,
the only roll the front disc brake setup determines is the bolt pattern,
which generates two distinct kits that focus solely upon the bolt pattern
of choice. The kit is very easy to install. We stopped by Classic
Performance Products to document the Installation process on a '75 Chevy
truck. This particular kit we are about to show you is for the '71-87 Chevy
trucks because it has a five-lug bolt pattern. If the truck had a six-lug
disc conversion, then obviously they would have installed the same kit,
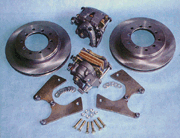
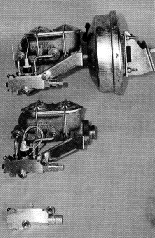
but with six-lug disc brakes, The basic rear disc brake kit comes with two
vented rotors, two caliper brackets, grade eight hardware, and stainless
steel caliper washers. It is designed to be used with '80-85 Cadillac Seville
rear calipers with parking brakes or '78-83 Chevelle, Monte Carlo, Malibu,
etc. front calipers. The choice is solely up to you whether you want the
parking brake feature or not. The installation begins by first removing
the rear end differential, followed by the C-clips that hold the axles in
place. The axles have to be removed in order to remove the brake backing
plates from the axle flanges. Once the axles and drum backing plates are
removed, a metal brake line-mounting tab is welded onto the rear of the
housing 4.5 inches from the end. The Classic Performance technicians revealed
that there are several different ways to mate the brake lines, but this
is by far the easiest and best looking,
|
When using the optional braided brake line kit, the factory
3/16" lines are cut and flared to fit onto an adapter which in turn
fits into the tab. The braided brake line is then tightened onto the fitting,
and later in the assembly, attached to the new caliper. This method allows
for flexibility in the line, a necessity when removing the caliper to change
the brake pads. The custom-made caliper bracket is designed to mount directly
to the backside at the axle flanges of the rear end using the provided hardware.
The axles are then reinstalled and the rotors placed over the wheel studs.
One important fact worth noting is that in some cases, the axle flange may
contact the rotor, requiring that the flange be turned a little. This can
be done with a hand grinder or machine shop lathe. Of equal importance is
to make sure the rotor mounting surface is clean and free of debris that
might make the rotor "wobble." After checking the clearance the
calipers are bolted to the brackets and the brake lines installed. If you
are using the Cadillac calipers with parking brakes, you have two options.
One is to shorten the end cable length at the stock parking brake cable
so that it can be installed onto the cailper and still force the caliper
piston to create pressure. The other option is to just get a new cable from
C.P.P, that connects to your existing cable and fits fight onto the caliper.
Either way, having a parking brake with four-wheel disc brakes is definitely
a benefit. As you can see, this is a very cool upgrade that not only can
improve your truck's brake performance, but adds great looks, too. One thing
to note before diving into the detailed installation process is that, like
converting your front brakes to discs, you have to at least change your
proportioning valve to one that allows for increased rear brake pressure.
Conventional drum brake pressure is about 30 percent. Disc brakes take more
pressure to work property. It really all depends an what kind of brake system
your truck currently has. When ordering your rear disc brake kit, make sure
to tell them what kind of system you currently have, and they will round
up the components to make it work correctly.
|
Ugly as a bucket of rusted bolts, drum brakes
leave nothing to the imagination and even less to performance
braking. After the following steps, that will all change.
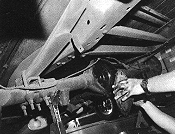
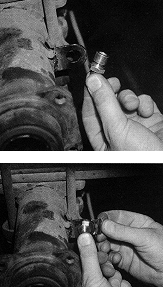
The first steps are to secure the truck on sturdy stands, then remove the differential cover.
The locking pin and C-clips are removed to free the axles.
(Tip: to release the clips, push slightly inward on the axles and the clips
will practically fall right out.)
|
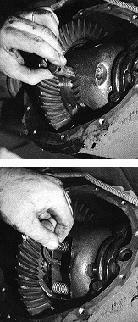
Clips removed, the axles can now be removed from the rear
end housing.
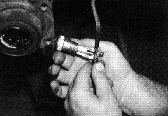
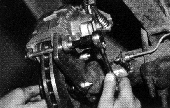
The drum brake assembly is one complete unit with the
backing plate attached to the axle flange. To remove
it, the parking brake cable must tirst be removed.
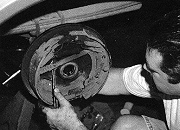
There are four bolts visible from either side which mount
the backing plate to the axle flange. Remove all four and set the backing
plate aside-forever.
|
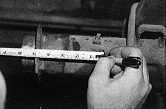
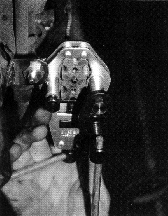
Before installing the disc brakes, the brake
line routing should be settled first. There are several
different methods for accomplishing this, but by far the best looking and
performing is the optional braided line kit which comes with a tab that
must be welded to the rear at the housing. Simply measure
4.5 inches from the inside of the axle flange and mark
the distance. This is where the tab will be welded
on.
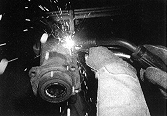
Clean the mounting area up then weld the tab on a 90-degree
angle, square with the rear end and horizontal to the ground.
An adapter fitting, that is standard female on the stock
brake line side and A/N on the braided hose side, is then inserted into
the mounting hole of the tab and secure.
|
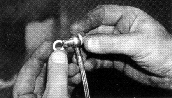
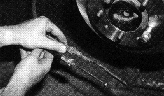
The new location of the tab allows for accurate
judgement of where the stock brake line should be cut. The idea is to create
a clean look without excessive bends.
After sliding a flare nut over the line, the end is double flared in standard brake
line fashion.
|
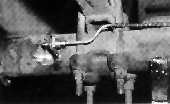
With a little creativity, the factory brake line can be modified to look good and fit nicely into the adapter
as shown.
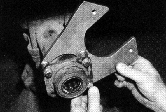
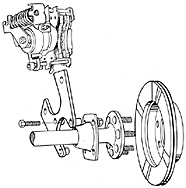
The heart and soul of this kit is the custom-made caliper
mounting bracket which mounts to the rear side of the
axle flange using the provided grade eight hardware.
Once the bracket is installed, the axles can be inserted back into the housing and secured.
|
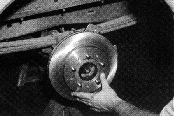
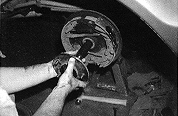
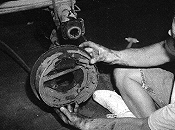
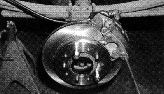
The new brake rotor simply fits over the wheel studs as shown. It is important to note
that the mounting surface of the axle must be clean
to keep the rotor from wobbling as it turns. In addition, on some year models
the rotor may contact the axle flange slightly. If so, a hand grinder or
machine shop lathe can be used to turn down the contact points to create
free rotation. Also, with the rotor secured to the axle, make sure the bracket
and rotor are parallel. If not, the pads will wear unevenly and braking
quality will suffer.
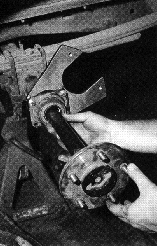
After temporarily securing the rotor to the
axle with the wheel nuts, the caliper is installed.
Make sure the bleeder valve is at the top.
|
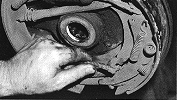
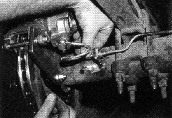
The caliper mounts to the bracket via standard caliper
hardware and should be tightened to manufacturer specifications.
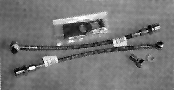
Completion of the brake line system is done with on optional
braided brake line kit, the same one that included the mounting tab from
step 10. The braided lines provide excellent flexibility and feature a dash
three female fitting which attaches to the adapter.
It is important to make sure the special washers are installed
on either side of the caliper line fitting to ensure a tight seal.
|
Position the hose as shown to keep it from coming in contact
with the wheel or road debris, then tighten each end.
The last step is the installation of the parking brake
cable, if you are using the Cadillac calipers. You have two options. One
is to shorten the end of the stock cable so that it fits into the leverage
arm of the caliper. The other (highly recommended) is the optional new parking
brake cable which attaches to the stock parking brake cable inside the frame
and is the proper length for this particular application.
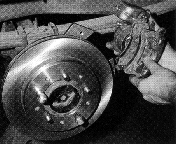
And there you have it, a great way to add disc brakes
to the rear of your '63-87 Chevy truck, bolstering stopping performance
as well as creating a custom look often seen through the airy openings of
many aftermarket wheels.
|
It you decide this is the kit for you. Make sure to note
your current brake system configuration and inform Classic Performance Products
of what kind you have. There are three different options you will have after
installing the rear disc brakes. Each depends on your brake system. The
end result is that you will need either a new proportioning valve, new master
cylinder and prop valve or the whole power brake upgrade assembly.
|
|
| Classic Performance Products 378 E Orangethorpe
Ave., Placentia CA 92870 Tech Line 714-522-2000 |
 |
TECH
| BOOKS | SUSPENSION
| BRAKES | STEERING | CONTACT
US | HOT PRODUCTS |

|
| © Classic Performance Products. This "website"
and all contents are property of Classic Performance Products.
Prices subject to change without notice. Not responsible for
errors or omissions. Please note that kits & prices
may vary between certain applications. |
|
|
|
|
|
|
|