| Sway Bar and Shock Installation |
| 1955-1957 Chevy Car |
| Courtesy of Danchuk Manufacturing |
|
Do you want your car to handle 100% better around corners?
This is one of the best upgrades you can do to your car.
There are many great upgrades for your classic Chevy, but going around the
corners and not feeling your car lean is an awesome feeling. Here's how
to install your upgrade. Please read all instructions that come with your
products and this install article before you start.
First of all, there are some things to consider before you tackle this on
your car. The ride you get from this upgrade will stiffen up the suspension
a bit, but the handling of your car will be just incredible. |
Second of all, if you have tailpipes on your car, you might
have to cut them off to mount the sway bar on the rear. Take a look at this
article and see if your pipes might be in the way before you start. This
will just be an added expense if you have a muffler shop rebend more tailpipes
to go around your swaybar. Third, when running a high performance shock,
you should consider putting in a shock support across your frame for the
rear. These shocks could possibly push through your trunk floor later. Your
trunk floor was designed to handle low buck gas shocks or stock nongas shocks. |
Other than that, I would consider having another person help
you hold things while you mark your holes. I did this by myself and it probably
took me an extra hour or two, just because I was fighting holding things
up and trying to make marks at the same time.
Also, you may lube the main sway bar bushings with the grease as you assemble
them. This will eliminate squeaks that may come from the bars moving up
and down. |
|
Tools:
Portable Mig Welder, sawzall or hacksaw with fine tooth
(for tailpipes and shock x-member) Jack and Jack Stands Hand Drill
3/8" Drill Bit
1/2" 9/16" 11/16" 3/4"Wrenches
1/2", 9/16", 3/4" Sockets 9/16" Deep Socket
3/16" Allen Wrench.
(if using Bilstein Shocks)
Center Punch
Small Rat Tail File |
 |
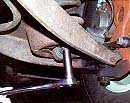
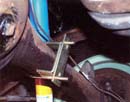
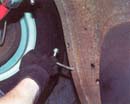
| Open the hood of your car and remove the 9/16" nut located
on the top of the shock stud sticking through your frame. Do this for both
sides. |
|
 |
| Jack the car up (use safety jack stands) or use a car lift,
and remove the lower shock bolts with your 1/2" or 9/16" socket. |
|
 |
The shock will come out from the bottom after both bolts are
out.
Take your new shocks, install new hardware and bushings on the top half,
and install from the bottom. Then stick the upper stud through the upper
hole on the frame. You can see the hole from the bottom as you're sticking
the shock through the lower control arm. Secure the lower shock with your
old bolts, or if your old bolts are rusting and you want new ones, use a
grade 5 or 8 bolt. Use nothing less, as the shock could shear the bolt head
off later on.
Lower the car and install the other half of the new rubber bushings on top
and secure with the new hardware that came with the shock. As the car is
on the ground in its natural position, take your front sway bar and assemble
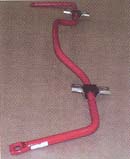
all the end links and main bushings onto your sway bar first. |
|
 |
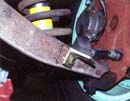
| Then take your bar and use your helper to help hold it underneath
the front en. Position the bar so the angle - brackets are located on the
front of the A-arms. With the bar centered on the car and the mid-section
turned down, mark your holes on the A-Arms and on the frame. |
|
 |
| Take your 3/8" drill bit and drill out your A- Arms and
your frame. |
|
 |
| Disassemble the end links and mount the angle iron bracket
to the A-Arms with the 3/8" bolt and put the washer and nut on from
behind. Tighten with your 9/16" wrench and socket. Feed the square
u-bolt through the frame. Put a nut on one end of the u-bolt just so you
don't lose it in the frame. If you are slightly off after you have drilled
your holes and the u-bolts don't fit, take your small rat tail file and
elongate one of the holes so your u-bolt will slide into your holes. |
|
 |
| Remember, the car must be in the natural position on the ground
or the jack stands must be under the A-Arms. Now that the brackets are in
and the u-bolts in place, its time to assemble your sway bar to your car
by first installing it to the frame brackets. Snug up the 9/16" nuts
to these brackets, but don't tighten .them up yet. Then move the sway bar
up to assemble the end links to your A-Arms, using a 1/2" socket and
wrench. Next, snug everything up. Lower the car down if you have it on jack
stands, and then have someone bounce on the car just to make sure everything
clears. When all is good, take your tools and tighten up the frame brackets
and end links. You don't have to over tighten the end links. Tighten them
up until they begin to bulge. Finished result is shown in photo above. |
|
 |
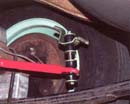
| Open trunk lid and pull back the trunk mat to expose your
upper shock mounts. |
|
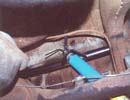 |
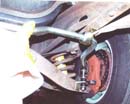
Take your 9/16" wrench and take off the nut and bushings
from the shock stud sticking
through your trunk. If shock stud turns, hold the end of the stud with some
pliers while you loosen the nut. Now jack the car up and place jack stands
under the rear end or leaf spring plates. Remove the lower shock nuts with
your 3/4" wrench or socket and remove the shock. If you have tailpipes,
and are going to weld in a shock support, this would be a good time to cut
them off for now with a sawzall or hacksaw, if you think clearance problems
are going to arise. Open the new shocks and assemble the upper bushings
and washers to the shock. At
this time, you should inspect your upper shock holes to see if there are
any stress cracks in the sheet metal. If you are going to run the high performance
Bilstein shocks, you really should mount a shock support to your frame.
This will save any future damage to your trunk area from the shocks blowing
through your sheet metal. For this install, we welded in a shock. There
are 3 different types to choose from, and, they are also available for the
wagons. Now " I" mount the shocks by putting the upper stud through
the hole first, then assemble it to the leaf spring plate second. Tighten
all nuts, and for the upper one you will have to hold the, stud with your
3/16" Allen wrench while you tighten the nut. |
|
 |
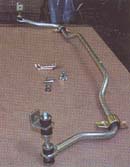
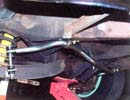
| Now take your rear sway bar and layout all the parts on a
table. Install main body bushings to sway bar, you may use grease to lube
the bushings to the sway bar. Next, take your sway bar, u-bolts, slotted
plate, c-channel iron, and nuts and place them under the rear where you
will be installing it. (Note: the sway bar ends will be facing towards the
rear of the car.) |
|
 |
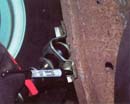
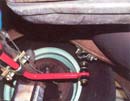
| Take the u-bolt, c-channel iron, slotted plate, and install
them to the rear end housing. For the drivers side, the u-bolt will go between
the axle vent and the rubber axle stop. For the passenger side, the u-bolt
will be going between the brake line junction block and the axle rubber
bumper. The u-bolts will go under the steel brake lines. |
|
 |
| With your helper, take the sway bar and place it up to the
rear end with the center bar dip facing downward. Take your 9/16" nuts
and snug them down with your 9/16" deep socket so it will hold the
sway bar on the rear end. Do not tighten yet, just snug. |
|
 |
| Now take your end links and assemble them to the ends of the
sway bar. Tighten up the nuts with your 1/2" wrench and socket so that
the bushings just start to bulge. Do not over tighten. No need for the bushings
to bulge extra heavy. |
|
 |
| Move the sway bar up so that the end link brackets are touching
the frame and mark your holes with a pen on both sides. After marking holes,
pull sway bar back down so you can drill your holes. |
|
|
|
 |
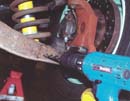
| Take your center punch and mark your hole to be drilled. With
the 3/8" drill bit, drill your holes. Line up square u-bolt to the
holes to see if the u-bolt will go through. If you are off a bit, take your
rat tail file and elongate one hole so that the u-bolt will slide through
easily. |
|
 |
Put one of the nuts on a u-bolt and feed it through the frame
till it comes out the other hole. Repeat this for the other side.
Now assemble the sway bar to your frame, u-bolts sticking out, and tighten
them with your 9/16" wrench or socket.
After you're all finished with the assembly to your car, lower the car back
down so that it is sitting in the natural position on the ground. Jump up
and down on the car bumper to work your sway bar in. Now go back underneath
the car and tighten up your rear end main bushings to the sway bar using
your 9/16" deep socket. |
|
 |
| Your end result should look like this. If you had to cut your
tail pipes. . . now you can take your car to the muffler shop to have them
re-routed. Test drive your car and you will be amazed at the handling of
your new suspension upgrade. |
|
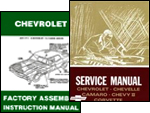 |
| It's always best to have shop and assembly manuals on hand
to make sure your installation is correct and to make the project as easy
as possible. We recommend factory manuals, available at Greg's
Automotive |
|
|
|
| Classic Performance Products 378 E Orangethorpe
Ave., Placentia CA 92870 Tech Line 714-522-2000 |
 |
TECH
| BOOKS | SUSPENSION
| BRAKES | STEERING | CONTACT
US | HOT PRODUCTS |

|
| © Classic Performance Products. This "website"
and all contents are property of Classic Performance Products.
Prices subject to change without notice. Not responsible for
errors or omissions. Please note that kits & prices
may vary between certain applications. |
|
|
|
|
|
|
|