| Classic Performance Products |
| Eliminating Strut Rods with Tubular Control
Arms |
| By Rob Fortier |
|
|
 |
|
| You know, a lot of people question why anyone would use a
stock-style Mustang II setup, strut rods and all, in a '50s car. While a
stock MII frontend isn't really perfectly suited for heavier cars (look
at what they were originally under!), there was a time when the aftermarket
lacked modern MII kits suitable for beefier applications. In those days,
many a car saw a stock IFS transplant, including the crossmember (that's
a whole 'nother topic we need not get into quite yet). Why? For some, it
was economical and convenient, albeit a lot of work. And the benefits were,
well, beneficial. The most com mon car to receive such a swap '49-54 Chevys.
If you've ever seen such a situation, then you know that the stock MII cross-
member isn't the easiest to work with when it comes to upgrading to "strutless"
tubular control arms (main factor being its two-piece sheetmetal composition).
As head scratching as it may seem, it is possible to do, and we're here
to prove it. What we've got is a completely stock MII frontend, from the
puny 9-inch disc brakes to the equally as small lower control arms with
forward protruding strut rods. |
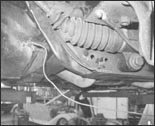
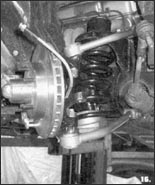
The stock crossmember was welded in place (albeit very nicely
done) so that to get the car to sit low, the coils had to be short, which
resulted in an unfavorable control arm angle (pointing way up). The drastic
angle contributed to early ball joint failure, with it only a matter of
time before the tie rods were next to go. This situation was also due to
the fact that the stock MII spindles were in use. To completely solve the
solution, we called up Classic Performance Products to see what they thought.
After going over the situation, we all agreed that Heidt's tubular control
arms (the wider, strut rod eliminating type), 2-inch dropped spindles, a
medium-weight coil spring, and a pair of Bilstein tuned shocks would sufficiently
handle the situation. To improve braking, the tiny discs and rotors would
be swapped out with CPP's 11-inch disc brake kit, more than enough to bring
this old Bow Tie to a nice, safe stop. The power rack-and-pinion would remain
in use, but new tie rod ends would be installed to complete the new frontend
package. |
The actual installation would entail slight modification of
the stock cross-member, and that can vary to a degree based on how each
individual (stock) crossmember has been welded to a Chevy frame. In this
case, clearance had to be made for both mounting and travel of the lower
control arms; this was done quite easily with a die grinder. Any "weak"
appearing areas on the stamped crossmember were welded up solid to add strength.
The remainder is all bolt-on duties, with slight rerouting of the brake
lines if necessary. Being that disc brakes were already in use, a Mustang
dual-chamber master cylinder was used, as well, which would be more than
sufficient for the larger disc upgrade. (Later on, vacuum power may be added.)
Obviously, if you're starting out with a bone-stock GM front suspension,
you can avoid this situation altogether by using any of a number of aftermarket
crossmember and IFS .kits..including those offered by CPP. We just realize
that there are "antiquated" IFS swap jobs out there looking for
a little attention like ours did. |
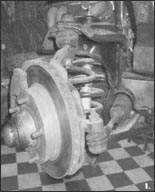 |
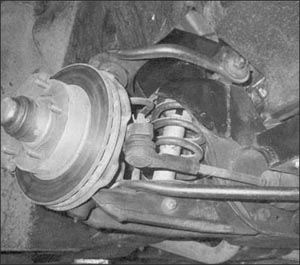
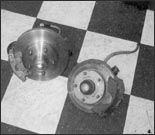
| Okay, here's what we "were" dealing with a completely
stock Mustang II frontend, from rotor to rotor, including the cross- member.
While the strut rods definitely aid in adding strength and stability to
the lower control arms, they can be eliminated, but it's not just a simple
bolt-together swap...we'll show you. |
|
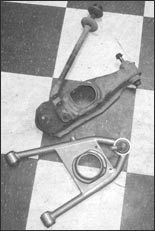 |
| As you can see, the Classic Performance lower control arms
feature a wider pivot point. |
|
 |
| With the accompanying weld-in pivot bolt tubing, you can run
the heavier-duty A-arms sans strut rods. Both upper and lower control arms
come complete with new-style ball joints, as well. |
|
 |
| CPP's upgrade kit also includes their "assembled"
!!-inch disc brake package. You don't just get rotors, bearings, calipers,
etc. that you have to put together-CPP mounts the rotors on 2-inch dropped
spindles with the calipers and braided stainless (DOT) flex lines all ready
to go. (The package will work without the control upgrade, as well.) |
|
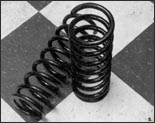 |
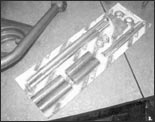
| Completing the kit are new coil springs and Bilstein tuned
shocks. |
|
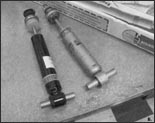 |
| Notice the length difference between the new and old shocks-using
a 2-inch dropped spindle required that we run a slightly taller coil to
compensate. |
|
 |
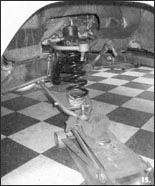
| Obviously, the first order of business was to completely disassemble
the old frontend. No matter what, when dealing with relieving spring tension,
a coil under pressure needs a compressor tool to remove-ours were cut so
small that they fell out, but not everybody is so lucky. |
|
 |
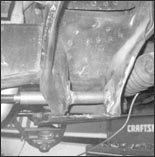
| This is why it's not a bolt-together conversion-first, you've
got to make clearance on the stock crossmember for lower control arm travel
(fronts ide lip). |
|
 |
| Then whack the forward strut rod mounts off. That's the easy
part. |
|
 |
| Next, since the new lower control arm pivot bolts are larger
than the stock Mil ones, you have to enlarge the hole in which they will
reside. It's ot this point that you can take advantage of making sure your
cross member is square and make adjustments if necessary (unless you did
the earlier work and are 100 percent sure all's straight!). |
|
 |
| Using the lower control arm as on alignment guide, set it
in place in the crossmember with the support tubes installed. After you're
sure you've clearanced the crossmember enough for full travel (and reinforced
any part of the cross member deemed necessary), tack-weld the tubes in place. |
|
 |
| Remove the lower control arm, but replace the pivot bolt,
after which you can complete the welding of the tubes. You may have trouble
getting to the very backside of the tube between the crossmember, so make
sure to get well-penetrated welds as far as the tip will reach. |
|
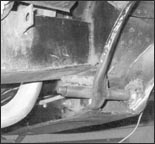 |
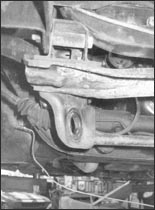
| Rear tube gusset plates are provided with the kit-use them!
If too small for your application, make new ones, but be sure to reinforce
the rear pivot tube. Eliminating the strut rods adds more stress to the
cross member, so you want to make every effort possible to beef things up! |
|
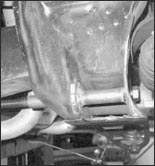 |
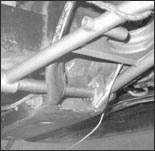
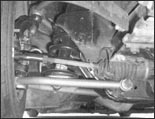
| Notice towards the front of the cross- member just how much
of the lip was trimmed off for clearance-that too weakened things, so the
two pieces of sheetmetal were welded together. |
|
 |
| Once the "hard" part was done, it was simply a matter
of installing the new components. |
|
 |
| While you'll rely on the alignment shop to get your frontend
truly dialed in, try and get the toe and camber as close as possible when
buttoning everything up. (If you marked the position of the old tie rod
ends, your toe-in should be really close.) |
|
 |
| Don't forget the grease and cotter pins! Both 45- and 90-degree
zerk fittings are supplied in the kit, but cpp also tossed in Heidt's chrome-
plated ball joint covers, which were screwed on after the grease job. |
|
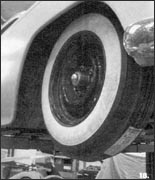 |
| Finally, we swapped out the G-78 bias-plies for a new set
of BFGoodrich 5ilvertowns from Coker. The 640-15S may be a tad on the skinny
side (as far as actual tread width is concerned), but it's the owner's preferred
tire- besides, this isn't the type of car requiring a performance-oriented
tire! |
|
 |
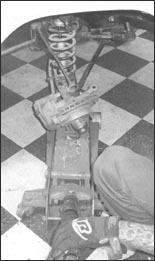
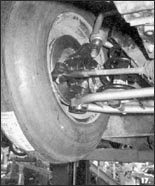
| With all the weight on the car, the prior control arms pointed
toward the heavens; our new CPP conversion gives us the proper parallel
with the cross member. Early ball joint and/or tie rod failure is no longer
a concern, plus we have 100-percent better ride characteristics now. |
|
|
|

