 |
| Classic Performance Products |
| Front End Rebuild - Straight As An Arrow |
| By Johnny Hunkins |
|
|
|
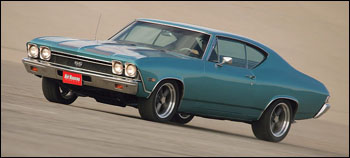
A Chevelle shouldn't drive all over the road without your
input. A front-end rebuild kit and tubular control arms from CPP are just
the ticket to going straight again.
GM's 1964-1972 mid-size A-body is arguably the most prolific musclecar ever
built. Its various forms include, but are not limited to, Chevelle, Malibu,
Skylark, Cutlass, Lemans, Tempest, 442, and GTO. Literally millions were
built in a nine-year period, and many of them, like our '68 Malibu, are
still kicking around. If you are one of the lucky few to have bought a completely
restored example, congratulations-you know how operate a checkbook. The
rest of us have to deal with components and mechanical systems that are
in some cases topping 43 years old. Suspensions, in particular, are problematic
in that their wear is not always apparent from a cursory visual inspection.Such
was the case when we bought our '68. What looked and felt OK in a quick
sneak-peak and a slow test drive before we handed over the cash, turned
out to be a bad gig. We want to get our Chevelle project car into the 11s
at the drags, but that will have to wait while we perform some serious remedial
action. |
This thing was handling horribly, jinking and juking randomly
over the smallest ruts and seams. In a nutshell, it could drive neither
straight nor safely at 60 mph on the interstate, so we were not about to
stuff over 600 hp under the hood and run 120 mph at the drags. We needed
a fix, we needed it fast, and we did not want to pay a fortune for it. What
we found was Classic Performance Products (CPP), and their reasonably-priced
line of quality A-body suspension components and rebuild parts. We opted
for CPP's Totally Tubular control arm kit, a larger 1 1/8-inch diameter
front sway bar kit, front KYB shocks, and stiffer big-block lowering springs.
Once we got the Chevelle on the lift, we were in for a big surprise-we found
out the steering linkage was completely shot. Since CPP also offers steering
components, we replaced those as well, bringing our total parts bill to
$1,229 (see complete breakdown in the sidebar). The end result is that we
not only fixed the problem we had, but we made our Chevelle handle much
better than it ever did when it was new. (We can only imagine how it will
feel when we tackle the rear suspension.) |
We are now one step closer to hitting the track in mind-bending
fury. Soon, we will be replacing the glass 8.2-inch 10-bolt rear with a
9-inch Crate rearend from Currie. After that, we will be screwing together
a 468-inch solid roller big-block that will make at least 600 hp on pump
gas. Everything in between, including the cooling system, transmission,
fuel system, and rear suspension will have to be dealt with as well, so
let's get on with it!
Tools You'll Need
* hammer
* 3/8-inch ratchet
* 3/8-inch articulated swivel-head ratchet (big-blocks only)
* 1/2, 5/8, 7/16, 9/16, 3/4, 7/8 sockets
* 1/2, 9/16, 5/8, 11/16, 3/4, 7/8 wrenches
* 3/8-inch Allen driver
* cutting dikes
* high-speed cut-off wheel
* jack stands and floor jack (or a lift and a pole jack)
* large pry bar
* Snap-On shock socket, #A139 (recommended) |
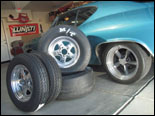 |
| Our story starts with the quest for 11-second time slips at
the drags. To get there, we plan to use these Mickey Thompson tires (28x10.5
ET Drag and 26x7.5 Sportsman front), mounted on Summit Star wheels (size
15x 8 and 15x4). The entire set cost $927.60 through Summit. With this rolling
stock, we figure we will be running about 120 mph through the traps. The
problem is that this 39-year-old Chevelle does not drive straight-or even
safely-at 60 mph. Like many other A-bodies of the same age, it needs remedial
suspension upgrading in the worst way. |
|
 |
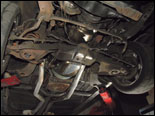
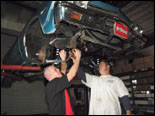
| To help us reach to our handling and performance goal without
going broke, we contacted the experts at Classic Performance Products. CPP
offers a ton of stuff for GM A-bodies, including suspension, chassis, brakes,
and steering. CPP also offers a broad line of products for F-body (Camaro/Firebird),
Nova, full-size GM, Mustang, and trucks. CPP's Jeff Wise is shown here helping
us with our installation at CPP's Anaheim, CA, R&D facility. |
|
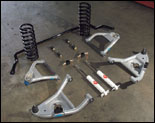 |
| The core of our Chevelle's suspension upgrade consists of
CPP's Totally Tubular control arm kit ($649), KYB front shocks ($39 each),
a thicker 1 1/8-inch sway bar kit ($149), and some much-needed big-block
springs ($95, pair), to replace our sagging small-block coils. This core
system costs $971, but could be broken down into two separate purchases
consisting of the control arms and springs ($744), and the sway bar kit
and shocks ($227). That is regular-guy money, and the improvement is dramatic. |
|
 |
| One of the biggest advantages of CPP's Totally Tubular control
arms is the patented Duralene (D-Spec) bushing. Self-lubricated and able
to withstand temps up to 400 degrees, they are silent, yet stronger than
polyurethane. The arms are TIG welded from DOM steel tubing and have integrated
sway bar mounts. The billet cross shafts on the CPP arms are a work of art,
too. Not only are they solid, but they support both ends of the bushing,
keeping them from binding so they can move freely. |
|
 |
| Our '68 Chevelle was like a beautiful old house-with a bad
infestation of termites. Beneath the nice veneer was a world of hurt that
we were going to fix pronto. Folks, this is as much an issue of safety as
it is performance. We do not want to entrust anyone's life, not even Steve
Dulcich's, to 39-year-old suspension pieces, and you shouldn't either. |
|
 |
| As our install proceeded, we realized we also needed to replace
the worn-out steering linkage (idler arm, inner and outer tie rods, adjusting
sleeves, center link), which ran an additional $258. The clincher was when
we turned the left-side wheel through approximately four degrees of arc
without the right-side wheel turning at all. |
|
 |
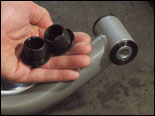
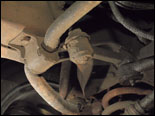
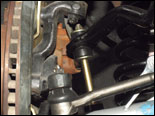
| This is what a worn-out control arm bushing looks like. We
could have opted to rebuild the control arms with CPP's PolyPlus front end
kit (upper and lower control arm bushings, upper and lower ball joints,
outer tie rod ends; $199), but we discovered cracks in some of the control
arms, so a rebuild was out of the question. If you decide to rebuild rather
than buy new, you will want to figure time and money for pressing out (or
burning out), the old bushings, sand blasting the arms, pressing in new
ball joints and bushings, and painting the arms. |
|
 |
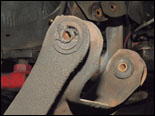
| The factory used press-in studs to mount the upper control
arms to the frame, but they face inward towards the engine. If you have
a big-block with headers, like we will, be sure to keep these studs from
interfering with primary pipes. When installing the upper arms, replace
the studs with 2 1/4-inch long 7/16x24 bolts, and turn them so the bolt
head faces the engine. This will gain you valuable header clearance when
it is needed later. It also helps to use an articulated (swivel-head) ratchet
due to the tight confines of a big-block engine bay. |
|
 |
| CPP's Totally Tubular control arms include all new bolts,
and the bushings and ball joints are already installed-if you have ever
done this before, you know it is a big time-saver. Note the new bump stops. |
|
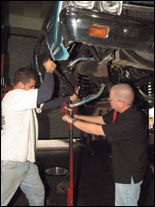 |
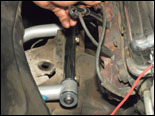
| Removing and installing front coil springs on any car is a
demanding operation; we recommend two sets of hands to make the job easier
and safer. Here, a pry bar is a useful tool to help seat the springs and
to keep coils from binding inside the framerail. The idea is to raise the
lower control arm while guiding the spring-and keeping it from popping out
in your face! |
|
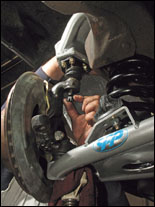 |
| Once the lower control arm is brought high enough by the pole
jack (or floor jack), you can reinstall the spindle and re-thread the ball
joint nuts. Note how the pole jack supports the lower control arm at the
very end, where it has the most leverage. |
|
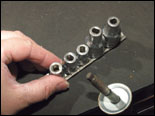 |
| When installing shock absorbers, you want to minimize damage
to the shaft. (You do not want it spinning wildly in the shock body when
you tighten the nut at the end of its travel.) We like Snap-On's shock absorber
sockets, and found the perfect fit for a GM A-body front shock in Snap-On
part No. A139. It is a slotted socket that fits perfectly on the end of
a shock's shaft. |
|
 |
| We could have kept our stock '68-'72 15/16-inch diameter sway
bar and just replaced the chassis bushings and end links. Stock replacement
frame bushings are available from CPP for $12 each (part No. FA988), and
a pair of rubber-bushed stock end links runs $14 (part No. K74). For $111
more, we opted for a thicker 1 1/8-inch CPP sway bar kit, since corner carving
is in the distant future. |
|
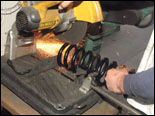 |
| After getting the Chevelle on the ground again, we noticed
the front ride height was about two inches too high, so we unbolted everything
(phew!), and cut a full coil off the top of both front springs. The improvement
in stance was worth all the trouble. CPP can pre-cut your springs on a special-order
basis, but cannot be responsible if it is the wrong height. G'head, blame
us if it's too short ... |
|
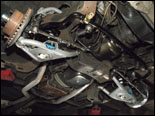 |
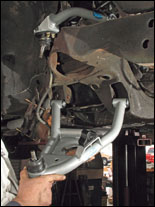
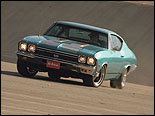
| Here is the finished product, consisting of CPP's Totally
Tubular control arm kit, sway bar kit, big-block springs, KYB front shocks,
and new steering linkage. In all, we spent $1,229. On a show car or restoration,
we could have cut the cost by around $500, by keeping the stock control
arms and sway bar (and just replace the bushings, balljoints, and endlinks).
The handling and steering would be much improved over the way it was, but
it would not be up to its current kick-ass level. Now we feel confident
to run 120 mph down the quarter mile. |
|
 |
| After getting a quality front-end alignment for the project
Chevelle, we noticed the added stability in a straight line-but what really
got out attention was how much more responsively it turned, And we have
not even addressed the rear suspension yet. Once we get the entire suspension
done, we will throw the Chevelle through the slalom and skidpad to see how
it stacks up against previous Chevelles we have tested. |
|
|
|

