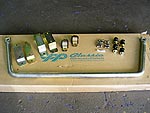
 CPP's front sway bar kit comes complete
with the frame mounts and bushings along with the complete end-link kit
and hardware. Pictured are both the short and tall frame mounts. Since we're
dealing with an airbagged truck, we weren't sure which combination of frame
mounts and end-link spacers would provide the most clearance from the other
components. CPP's front sway bar kit comes complete
with the frame mounts and bushings along with the complete end-link kit
and hardware. Pictured are both the short and tall frame mounts. Since we're
dealing with an airbagged truck, we weren't sure which combination of frame
mounts and end-link spacers would provide the most clearance from the other
components.
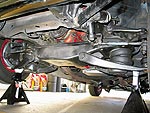 The truck was lifted up to ride height,
and then we jacked it up and placed jack stands under the lower control
arms. The truck was lifted up to ride height,
and then we jacked it up and placed jack stands under the lower control
arms.
|
|
Project Old School: In Control
Adding a Front Sway Bar to an Airbagged Ride
By Jeremy Cook
It's no secret that sway bars are extremely beneficial
to the handling capabilities of old trucks. It's also no secret that most
of the '63-72 GM products did not come with them as standard equipment.
Simply put, there is no easier or more cost effective way to improve upon
the handling of your classic truck.
Also referred to as a stabilizer bar or anti-roll bar,
a sway bar connects the left and right sides of a suspension together. During
cornering, the body tends to lean or fall over. This is what is commonly
referred to as body roll. Connected to each control arm, the pressure applied
from cornering twists the sway bar against the lean, causing a reaction
that produces a lifting force on the outside of the body and a downward
force on the inside of the body. This evens out the pressure generated by
a corner across both tires, which greatly improves handling by making more
traction available to the driver.
The Classic Performance Products' sway bar is stout to
say the least. Thicker than any of the stock units produced for these trucks,
it has an overall diameter of 1.25 inches, is constructed from high-carbon
steel, and comes gold/irridite plated. Using the stock holes in the control
arm, end links with urethane bushings are installed to position the sway
bar. Frame mounting brackets are also provided in the kit, and if they're
there, use the factory holes in the frame. From start to finish, it took
us about an hour to install the CPP sway bar kit. The install is a bit more
involved on Old School due to the airbagged suspension than it would be
on a standard coil-sprung truck. The reason is that you have to make sure
that the sway bar does not interfere with any of the suspension components
throughout the entire suspension cycle--which on this truck is over 8 inches.
So follow along and contact CPP about their front and rear sway bars for
almost any classic truck out there. |


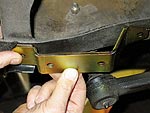 CPP's frame brackets are made to fit the
contour of the frame perfectly. Logical guys that we are, we started by
using the frame brackets intended for lowered trucks.
CPP's frame brackets are made to fit the
contour of the frame perfectly. Logical guys that we are, we started by
using the frame brackets intended for lowered trucks.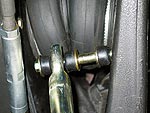 The first step is to install the sway
bar onto the control arms using the end-link hardware. This size spacer
is the norm for moderately lowered trucks.
The first step is to install the sway
bar onto the control arms using the end-link hardware. This size spacer
is the norm for moderately lowered trucks.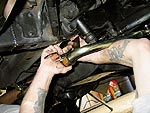 Next, the center bushings (with a bit
of the supplied grease) were spread over the bar. Then the clamps were bolted
to the frame mounts with the supplied hardware.
Next, the center bushings (with a bit
of the supplied grease) were spread over the bar. Then the clamps were bolted
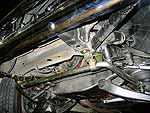
to the frame mounts with the supplied hardware.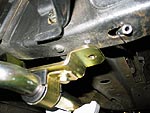 Now the mounts were held up against the
frame so it could be marked and drilled.
Now the mounts were held up against the
frame so it could be marked and drilled.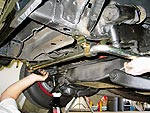 Before we even had all four bolts snugged
down, it became obvious that with this configuration, the sway bar would
hit the Pitman arm of the manual steering box before the truck was fully
aired down.
Before we even had all four bolts snugged
down, it became obvious that with this configuration, the sway bar would
hit the Pitman arm of the manual steering box before the truck was fully
aired down.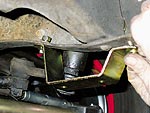 By using the taller frame mounts, hopefully
the sway bar would drop down enough to clear the steering. They were bolted
up using the same holes in the frame.
By using the taller frame mounts, hopefully
the sway bar would drop down enough to clear the steering. They were bolted
up using the same holes in the frame.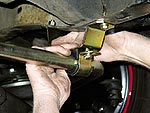 The sway bar was bolted up and rechecked.
There was now plenty of room between it and the steering.
The sway bar was bolted up and rechecked.
There was now plenty of room between it and the steering.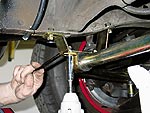 All eight bolts at this end were then
fully tightened down.
All eight bolts at this end were then
fully tightened down.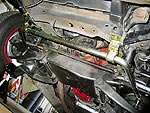 Here it is installed. We put the truck
back on the ground and cycled the suspension from fully raised to fully
lowered. There was no interference, but we did spot something that needed
a little preventative maintenance.
Here it is installed. We put the truck
back on the ground and cycled the suspension from fully raised to fully
lowered. There was no interference, but we did spot something that needed
a little preventative maintenance. The upper 'bag mount on the Air Lift kit
is made to cover the spring hat and hangs out about 1/4-inch on either side.
When dropping the truck down, the end of the sway bar just missed this extra
bit of metal. We decided to trim it back a little with the die grinder to
give it a bit more clearance.
The upper 'bag mount on the Air Lift kit
is made to cover the spring hat and hangs out about 1/4-inch on either side.
When dropping the truck down, the end of the sway bar just missed this extra
bit of metal. We decided to trim it back a little with the die grinder to
give it a bit more clearance. Just to be on the safe side, we pulled
the spacer out of the end link. Now with the airbag fully compressed, the
sway bar does not travel past the spring hat. Of course, changing the configuration
meant that we had to cycle the suspension again, but the change actually
yielded more clearance than before.
Just to be on the safe side, we pulled
the spacer out of the end link. Now with the airbag fully compressed, the
sway bar does not travel past the spring hat. Of course, changing the configuration
meant that we had to cycle the suspension again, but the change actually
yielded more clearance than before.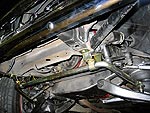 There you have it. Even with the changes
we were done in less than an hour. We didn't run Old School through the
slalom course or anything, but I will tell you that I can now take the freeway
onramp near the office at full speed without the tires squealing. Now that's
progress.
There you have it. Even with the changes
we were done in less than an hour. We didn't run Old School through the
slalom course or anything, but I will tell you that I can now take the freeway
onramp near the office at full speed without the tires squealing. Now that's
progress.