|
| Classic Performance Products makes it easy
to steer your |
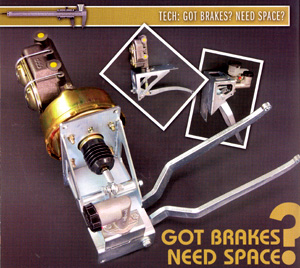
| Install a 90-degree under-dash swing pedal
and master cylinder assembly. |
| By Rich Boyd |
|
|
|
| The most common brake design in vintage vehicles is through
the floor with a brake pedal that is often positioned arkwardly. As builders
add larger tilt steering columns these vintage vehicles often have problems
when it comes time to connect steering linkage and modern exhaust components.
Especially when the builder wishes to locate the exhaust near the frame
rails. The swing pedals, master cylinder mounting assembly and optional
mounting brackets are zinc plated and a combination of 38-inch and 3/16-inch
steel. They are strong, strong enough for any street rod, street truck or
race car application! |
CPP has a variety of bracket assemblies for firewall mounting
with both single and double swing pedals for brake and clutch. These rugged
brake assemblies also offer through-the-firewall or 180-degree operation
and mounting possibilities. The bracket assemblies can be mounted on the
firewall with nuts and I bolts and a few drilled holes, or permantly welded
to the inside of the firewall. In this installation CPP chose to weld the
optional mounting bracket in this '56 Chevy pickup that will be equipped
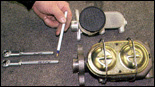
with an automatic transmission. Another excellent benefit of the firewall
mounted brackets and swing pedals is the ability to close the original pedal
holes in the toeboard. |
This helps prevent moisture, road noise and heat from entering
the cab or interior of your vehicle. As a result, besides improved braking
performance, you enjoy a more comfortable driving experience. Everyone can
use more room when it comes time to install modern exhaust, and. We all
know that heat is an enemy of brake fluid and power boosters. Therefore,
a better braking system and increased longevity is available with CPP's
rugged swing pedals and master cylinder assembly, and they're likely more
comfortable and space efficient. Follow along as we demonstrate how we created
a better braking system with Classic Performance Products universal brake
assembly. |
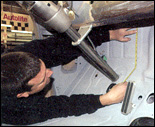 |
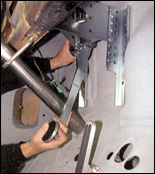
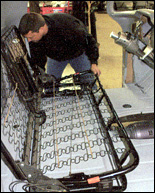
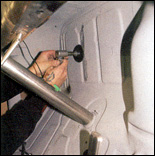
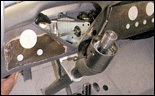
| 1..CPP had previously prepped the firewall and floorboard
of this 1956 Chevy pickup cab with gray primer. He began the brake pedal
and 90-degree underdash swing pedal and brake assembly installation by measuring
the available space behind the Flaming River steering column. |
|
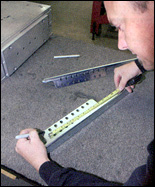 |
| 2..The side-to-side mounting brackets are long and can be
trimmed to fit. Next transfer the dimension to the bracket with a felt tip
marker. |
|
 |
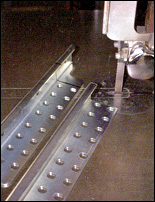
| 3..Then mark a 13-inch section of the bracket and trim both
ends on the band saw. |
|
 |
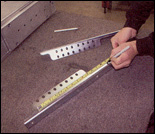
| 4..The band saw makes quick work of cutting the mounting brackets
to the exact length for this installation. A rotary cutoff tool will also
get the job done. Or you can make your own mounting brackets from angle
iron and save a few bucks, but spend more time fabricating them. |
|
 |
| 5..Both mounting brackets were cut to the same length. The
rows of holes are for the master cylinder and booster mounting bracket.
They should be 90 degrees from the firewall. The brackets also have mounting
holes if you decide to bolt the assembly to the firewall. |
|
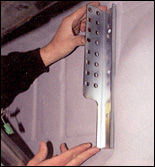 |
| 6..The trimmed mounting bracket was held in place to check
the length, and to see where it might be positioned against the firewall. |
|
 |
| 7..Next assemble the trimmed mounting brackets with the master
cylinder/booster bracket. Notice the clean zinc plating that protects the
surface. |
|
 |
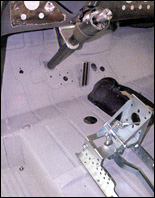
| 8..Here we point out the original brake pedal hole in the
toeboard. Next locate the new swing pedal as near the original brake pedal
position as possible. Later this hole (and clutch hole if you have one)
plus the smaller fastener holes around it will be filled to prevent heat,
noise and moisture from entering the cab. |
|
 |
| 9..With the unit partially assembled, it is held in place
to check the pedal position and the mounting surface on the inside af the
firewall behind the steering column. Obviously, having the steering column
mounted helps locate the best position for the bracket assembly. |
|
 |
| 10..With the tilt column in place we can determine how much
space is necessary between the column and swing pedal for the brake. If
this were a standard transmission application, the brake pedal and clutch
pedal would straddle the steering column on both sides. |
|
 |
| 11..This is the optimum position that CPP feels will allow
the driver to be comfortable and allow the bracket to mount securely to
the firewall. |
|
 |
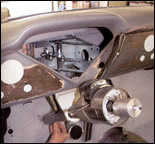
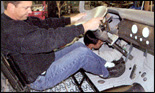
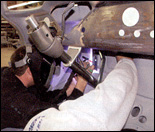
| 12..A peek through the instrument panel hole allows us to
easily inspect the location of the bracket. |
|
 |
| 13..However, before lighting the torch to begin welding, you'll
want to check the seating position and the brake pedal position. |
|
 |
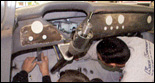
| 14..The correct positions are determined with the help of
a temporary aluminum steering wheel . |
|
 |
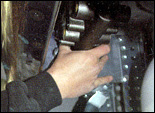
| 15..The pedal and master cylinder assembly is held in place
as checks are made to the pedal position from behind the wheel. |
|
 |
| 16..Once the driving position of the brake pedal is confirmed,
mark the exact location of the mounting brackets. |
|
 |
| 17..Since this unit will be welded in place, you'll need to
remove the primer on the firewall for a stronger and cleaner weld. |
|
 |
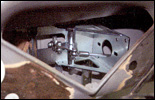
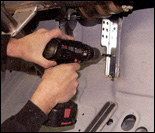
| 18..Now that the firewall surface is prepared to weld, the
mounting brackets are tack-welded in place with the unit partially assembled. |
|
 |
| 19..As was mentioned earlier, the mounting brackets can be
bolted to the firewall. Simpfy drill holes and attach the mounting brackets
with nuts, bolts and lock washers. |
|
 |
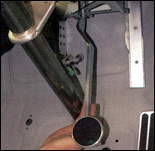
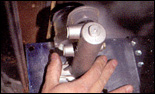
| 20..Next position the 8-inch dual master cylinder on the bracket
and inserts the pushrod. |
|
 |
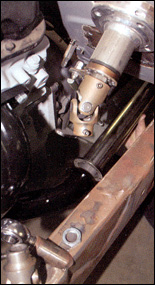
| 21..Once again we can view the overall position of the unit
now that it has this 8-inch Corvette dual master cylinder mounted. |
|
 |
| 22..If space, or lack of it, is a consideration, a 6-inch
master cylinder can be mounted for a drum/drum or disc/drum brake combination. |
|
 |
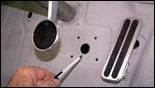
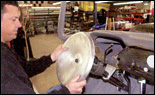
| 23..In this image we're able to see the 6-inch master cylinder
mounted under the dash through the instrument cluster opening, |
|
 |
| 24..Classic Performance Products has a variety of master cylinders
and boosters to fit your precise application. There's enough room under
the dash of this pickup to mount a GM type dual master cylinder and booster.
Parts are also available for an optional remote fill. |
|
 |
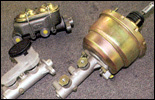
| 25..CPP stocks the parts necessary for many combinations.
Here we see the size difference between a Corvette dual master cylinder
and a more compact aluminum dual master cylinder. |
|
 |
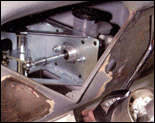
| 26..Yes, there is now plenty of space to plumb the large diameter
stainless steel exhaust. The exhaust will not have to be routed around the
through the floor pedals or a frame-mounted master cylinder. |
|
 |
| It's always best to have shop and assembly manuals on hand
to make sure your installation is correct and to make the project as easy
as possible. We recommend factory manuals, available at Greg's
Automotive |
|
|

