 |
| Classic Performance Products |
| 1956 Ford F100 Dual Master Power Brakes Install
|
| By John Gilbert |
|
|
|
There's "old-school engineering" as in the way
trucks came equipped from the factory over 50 years ago, and then there's
'80s old-school in the vein of classic trucks customized to conform to the
latest in '80s technology trends. In the 21st century, the task of upgrading
with the right products and getting them to work in the right way on a truck
outfitted with '80s trends is not all that hard-provided one knows the right
places to look.
A prime example to illustrate a classic '80s-style chassis
configuration is the '56 Ford F-100 rolling chassis I picked up for $800
from a guy who had moved on to what I believe is the ultimate solution when
it comes to upgrading a classic truck: buying a brand-new frame with 21st
century technology from one of today's custom chassis builders. |
That said, not everyone has the money or time to uproot their
'53-56 F-100's body, pluck the frame out from underneath it, and then go
to town. Returning the focus to my chassis, it's a good case in point because
the modifications were all done in the '80s and then the truck was hardly
driven. A quick glance at the suspension and brakes, and it's easy to find
room for improvement in the way things were engineered back when whoever
it was set it up. At the heart of the brake's hydraulics, the original '56
Ford single master cylinder is still in place, which presents two potential
problems. The first is: If there is a failure in a single system, there
will be a complete loss of hydraulic pressure-whereas a dual master cylinder
will retain half of its braking capabilities. The second problem, and it
can be equally disastrous when it comes to the truck's ability to stop,
is that disc brakes require a greater storage capacity (more volume) for
brake fluid than drum brakes. |
The fact that this is a four-wheel disc brake system makes
the possibility of a brake fluid-related failure with this chassis' brake
setup twice as likely. Digging deeper into the braking setup on this particular
chassis, another potential problem is the use of rear disc brake calipers
of an almost equal size to the Volare disc brakes up front. The odds are
good that the rears will lock up as soon as any kind of demand is placed
on them, but that's a problem we'll deal with in an upcoming issue. In this
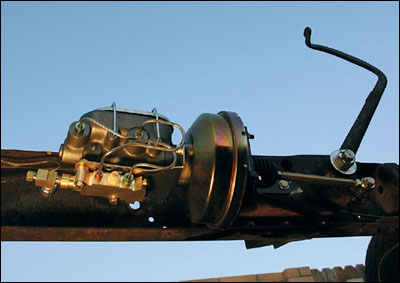
first installment, our focus is on eliminating the stock, un-boosted single
master cylinder with the stock clutch and brake pedal assembly, and replacing
it with Classic Performance Products' dual master cylinder/power-brake booster
kit, in conjunction with Classic Performance Products' '53-56 F-100 clutch-pedal
eliminator kit. |
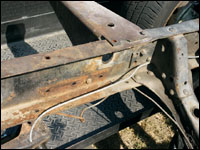 |
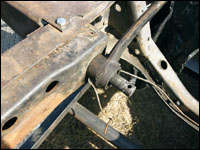
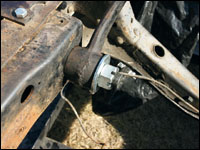
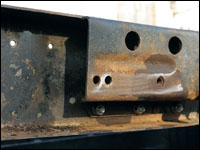
| We started with a '56 F-100 frame that was missing the stock,
single-brake master cylinder, with a clutch and brake-pedal assembly. Note
the 1-inch hole provided for the stock clutch pedal. |
|
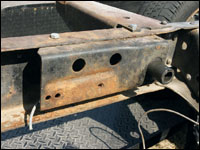 |
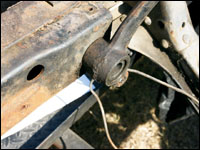
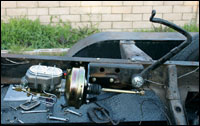
| To install Classic Performance Products' dual master cylinder/power
brake the first step was to reattach the stock Ford single master cylinder
mounting bracket. |
|
 |
| The stock Ford single-brake master cylinder mounts directly
to the side of the bracket, and uses a short pushrod connected to the stock
Ford brake pedal. |
|
 |
| With the stock Ford clutch pedal eliminated from the pedal
assembly, the shaft for the clutch linkage isn't needed. |
|
 |
| We removed the shaft, and left the Ford stock brake pedal
mounted on the stock master cylinder mount. |
|
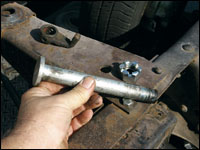 |
| CPP's clutch pedal eliminator kit consists of a special, hardened
7/8-inch shaft with a hole drilled for a cotter key, and a castellated nut. |
|
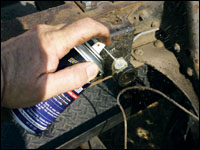 |
| Throughout assembly we used liberal amounts of Royal Purple's
Maxifilm on threaded hardware (nuts and bolts) and to lubricate moving parts
that were frozen from years of neglect. |
|
 |
| For mock-up purposes we mounted the stock Ford brake pedal
without installing the cotter key. |
|
 |
| Truly a "complete kit," CPP included all of the
special Grade 8 hardware that was necessary to mount the CPP dual master
cylinder and booster. The CPP mounting bracket attaches to the inner framerail
and stock Ford master cylinder bracket. |
|
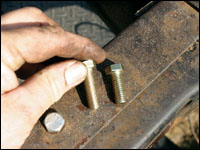 |
| We paid special attention to the fact that there are 3/8 fine
thread bolts, and 3/8 coarse thread bolts included in CPP's kit. |
|
 |
| To ensure that the CPP mounting bracket would properly line
up, we first double-checked to see that the stock Ford bracket was tightly
bolted flush to the frame and fully seated into place. |
|
 |
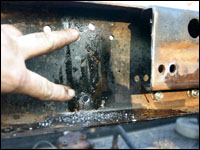
| The inner framerail was scraped clean, along with the mounting
surface on the stock Ford bracket. Note that one hole on the Ford master
cylinder bracket contains 3/8 fine threads-we used it to place our first
bolt and tack the CPP bracket into place. |
|
 |
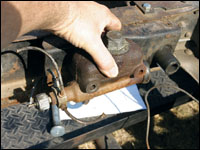
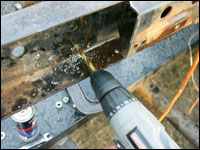
| A test fit of the CPP bracket revealed that years of use had
changed (bent) some of the original dimensions of the Ford chassis. Using
a body grinder, we ground off the front of the Ford bracket. |
|
 |
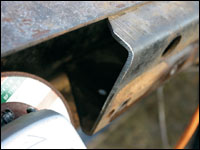
| This overhead shot illustrates how grinding the front of the
Ford bracket allowed the CPP bracket to sit flush against the Ford bracket
and inner framerail. |
|
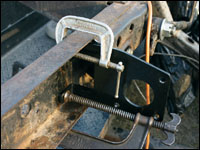 |
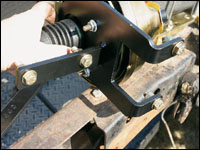
| Before drilling the two 3/8-inch holes required to mount the
CPP bracket to the frame, we used C-clamps and the CPP bracket as a drill
template. |
|
 |
| After the pilot marks were made, we withdrew the CPP bracket
away from the frame before drilling. This was to avoid accidentally "hogging-out"
the CPP bracket. |
|
 |
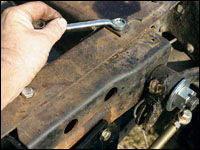
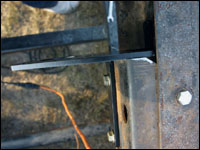
| These two were the only additional holes needed to mount the
CPP dual-master / brake-booster to the Ford F-100 chassis. |
|
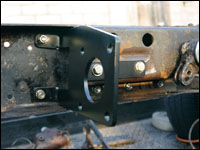 |
| The best procedure we found to easily bolt the CPP bracket
into place was to progressively tighten each of the bolts a little at a
time until all were completely tight. |
|
 |
| Notice how a slight bend in the framerail affects how the
bracket will fit. We straightened the rail, and then the CPP support bracket
bolted right up. |
|
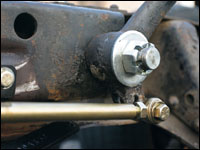 |
| The CPP pushrod was attached to the lower hole in the stock
Ford brake pedal using special Grade 8 hardware included in CPP's kit. |
|
 |
| Paying close attention to how well existing Ford holes, and
the CPP mounting bracket, lined up paid off with a real clean installation.
Now that we have the right dual master cylinder and power-brake booster
in place, we can move on to the right setup for the rear discs. |
|
|

