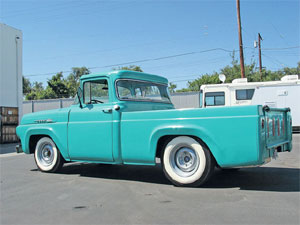
| Classic Performance Products |
| 1957-60 F-100 Power Steering |
| By Grant Peterson |
|
|
 |
|
If you've ever driven an old truck with manual steering and
tires wider than 6.00 x 16 bias-plies up front, you know where the term
"Armstrong power steering" comes from! Even when your bias-ply
tires run a little low on air, you gain a great deal of resistance you don't
need while trying to maneuver into a spot in the corner store's cozy parking
lot to buy a lotto ticket. let's not even get into doing this with radial
tires. Now you don't need a new truck to flip a U with ease
or parallel-park without taking a rest first. Classic Performance Products
has just the ticket for the '57~60 Ford F-100 crowd POWER STEERING! Believe
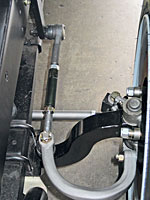
it or not, the cornerstone of their new kit is a compact, relatively 1ight
power steering box made by Toyota for only a few years. The Toyota box isn't
much bigger than the stock side-steer Gemmer box that came installed in
these
trucks from the factory. |
Four-wheel-drive enthusiasts have snatched this box up for
years because it easily adapts to confined spaces and it'll turn those big,
gnarly mud tires with ease. We might not be driving monster trucks, but
we need to turn our tires too, right? CPP thought so, and they are actually
manufacturing their own housings for these since they've become so scarce.
That way everyone can buy one, and CPP can come up with more applications
to use them in. The Toyota box is topped with a rag joint that attaches
directly to the DD shaft in our Ididit tilt column., No U-joints hooked
to a mess of snaking shafts, We ordered our column in a plain steel finish
that we painted black to match our black Lecarra '40 Ford 15-inch steering
wheel, but you can order them in chrome or polished to add some sparkle
to your interior. |
CPP makes things as painless as possible by including a p!ate
to fill the stock hole in the floor that also mounts the bottom column support,
a new drag link with tie rod ends, and a pitman arm. They have different
power steering hose kits depending on what power steering pump you are using.
Call them up and discuss your needs with them if you have questions.
This changeover does require some light fabrication, mostly drilling
holes and grinding of filling. There's no welding involved, So most people
should be all right, just follow CPP's careful instructions. The guys there
really know what's going on since they develop and manufacture most of the
parts they sell in-house. About the only thing we couldn't do at this point
is wire the ididit column since the truck is currently void of most of its
stock wiring, but that's another story literally. Read on for the gist of
what could be the reason you keep your truck and finally really enjoy it.
Then steer yourself in the right direction by calling CPP. |
 |
| A tasty spread of parts from CPP, ididit, and lecarra. CPP
supplies the power steering box, hose kit, pitman arm, drag link, and floor
plate/bottom column support, while the tilt column, knobs, and column drop
are from Ididit. lecarra makes the beautiful cut-down 15-inch '40 Ford steering
wheel and adapter for GM splined shafts. |
|
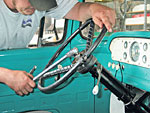 |
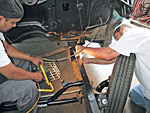
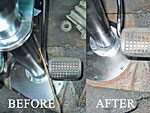
| 1..Jeff gets started on dismantling the "Armstrong"
steering. Don't forget a steering wheel puller, because no matter how tuff
you think you might be, you'll probably wind up hurting yourself one way
or the other and have to buy a puller anyway, so let's all work smarter,
not harder. |
|
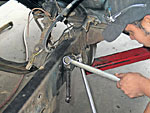 |
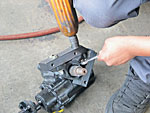
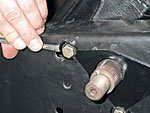
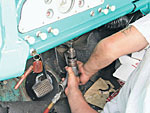
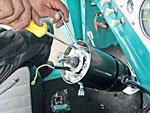
| 2..Once the wheel was off and the column drop unbolted, Abel
worked on removing the pitman arm. When the cross-bolt is out, the pitman
arm may come off by hand depending on how rusty it is. Ours wasn't bad,
but a puller could be used here, too. |
|
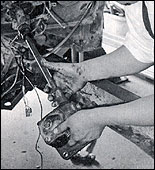 |
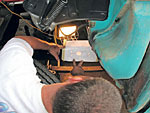
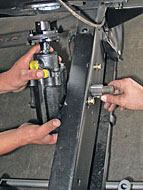
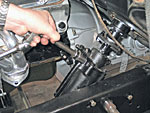
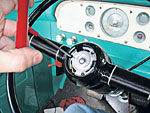
| 3..With the pitman arm off, the three bolts that secure the
steering box to the Irame were removed. The box can be wiggled out of its
home by pulling it toward the front of the truck until the steering shaft
is free of the column. |
|
 |
| 4..With the old box out and the frame cleaned up, it is time
to mark the one new hole you need to mount the Toyota power steering box.
Surprisingly, the two rearward original holes line up with the new box's
mount. CPP supplies a paper template with the new bolt pattern on it, 1
and with a light on the inside of the frame it's I easy to line up with
the two original holes like I Abel and Jeff are doing here. |
|
 |
| 5..The light shines through the holes in the frame so it's
a snap to get in the right spot. When it's right, tape it in place. |
|
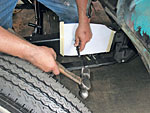 |
| 6..With a center or transfer punch, mark the center of the
new front hole according to the template and drill it out to 3/8 inch. |
|
 |
| 7..The pitman arm hole needs to be opened up just a hair.
You can do this with a drum sander or even a file if need be just check
that the box fits without any interference. |
|
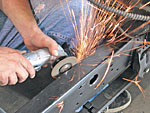 |
| 8..Who doesn't like getting the grinder out? The top edge
of the framerail above the pitman arm hole also needs a shave to clear
the new box. Again, keep trying until it fits. |
|
 |
| 9..Here's CPP's machined solid steel mount for the Toyota
box. It bolts to the box with the four provided bolts before going into
the frame. |
|
 |
| 10..The new box goes in pretty much just like the old one,
except you don't have to Jimmy a steering shaft back into place since the
Ididit column will go directly into the rag joint on the steering box. You
might also notice the Toyota box's diminutive size; that's why it works
so well, and why they're getting hard to find today. The 4x4 guys have been
scooping them up for years. CPP is working on manufacturing their own soon. |
|
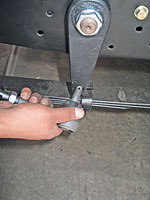 |
| 11..When the box is back in the chassis, the center of the
rotation had to be found so the pitman arm could be installed in the 6 o'clock
position, which would leave equal rotation to turn left or right. With that
taken care of, we put the impact gun on the pitman arm nut and installed
the new drag link. Don't forget to put the cotter pins in the castle nuts
after they're tightened down! |
|
 |
| 12..Everything worked out pretty nicely when it was all connected
to the steering arm, which was previously heated up and bent down the same
amount of drop the CPP dropped axle has to keep the steering geometry correct
and avoid bumpsteer. |
|
 |
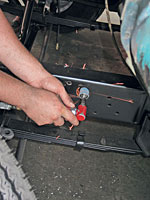
| 13..During the R&D process, CPP's engineer Danny Nix came
up with this doubler plate that also acts as a cage around the bolt heads
that hold the steering box to the frame, so this plate will go on before
the three bolts. Then just bed the tabs up when the bolts are tight to help
keep them in place. |
|
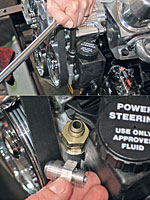 |
| 14..The Ford motor in the '50 is getting a Vintage Air Front
Runner serpentine belt system, which calls for a Type 2 GM power steering
pump. We had to pull the AN adapter fitting that goes to the high pressure
line and install one with 15mm threads so everything would jive. Talk to
CPP about what pump you're using since fittings and hose length can vary. |
|
 |
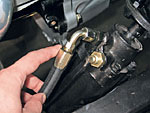
| 15..The high-pressure fitting on the steering box is the one
closest to the framerail. It takes the gold colored fitting, while the high-pressure
side takes the black-anodized one. The thread size for each is really close
and would be easy to mix up, so that's why they're color coded. |
|
 |
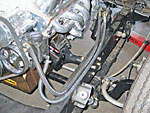
| 16..The high-pressure line goes on the box like so and was
directed to angle down along the frame for smooth, out-of-the-way routing. |
|
 |
| 17..The area around the high-pressure line going into the
power steering pump is really tight between the belt and the reservoir,
so take some care to clock it right when it's snugged down. The low pressure
line coming out of the reservoir is simply cut to length since all it needs
is a hose clamp to keep it secure. The Toyota box more than clears the Sanderson
headers on the Smeding 351 stroker motor, more than any of us expected,
which is great! |
|
 |
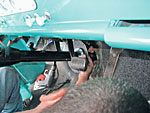
| 18..Back inside the cab, Jeff drills out the holes for the
ididit column drop. |
|
 |
| 19..CPP includes this plate to cover the factory hole in the
floor used to fit the column and shift linkage. The ididit support attaches
to the plate, supports the bottom of the column, and finishes off an often
awkward area. |
|
 |
| 20..Being that the ididit column is bigger in diameter, it
hits the brake pedal ever so much, which means the pedal needs to be removed
and bent in the vise enough to clear the column. Jeff also removed the clutch
pedal while he was at it since it won't be needed when the truck is back
on the road. |
|
 |
| 21..With the column supported by the column drop, the turn
signal lever was installed BEFORE the Lecarra '40 Ford steering wheel adapter.
If you don't do this now, you'll have to take the steering wheel and adapter
back off to do it like I did, smooth. |
|
 |
| 22..The Lecarra '40 Ford wheel goes on next and is attached
with three of the six button heads before the horn button retainer goes
in. Connect the horn button's wire before bolting it down. |
|
 |
| 23..The retainer is flipped over and installed like so with
the last three button heads. |
|
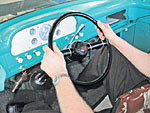 |
| 24..With the usual clockwise push-and-turn motion that horn
buttons require, the nice Ford script is just where it should be. Maneuvering
the F-100 is no sweat now thanks to CPP! |
|
 |
| It's always best to have shop and assembly manuals on hand
to make sure your installation is correct and to make the project as easy
as possible. We recommend factory manuals, available at Greg's
Automotive |
|
|
|

