 |
| |
| Classic Performance Products |
| Putting an F-100 in the Weeds Without IFS |
| By Damon Lee |
|
|
Stance and attitude go hand in hand
when you're talking about hot rod pickups. Or, put another way; nothing
says "farm truck" like an F -1 00 with its nose in the air and
a 6- inch gap between the fender and top of the tire! Achieving that perfect
nose-down stance has been a quest for Effie owners ever since the first
'53 rolled down the assembly line. Through the years rodders have used just
about any means available to get that desired look, from tweaked springs
and stretched axles to all manner of frame alterations and IFS conversions.
You'd have thought that a simpler solution would have come along by now,
and as a matter of fact, it has. We first got a peek at the new dropped
axle available from Classic Performance Parts last year at the F-l00 Supemationals. |
Right away we could tell it was a home- run product. After
all, who could argue with the idea of lowering your '53-56 F-l00 3 or 4
inches simply by swapping axles? And this wasn't some cobbled-together experiment
of a part, either. With a 2-inch seamless tubular steel center, CNC- machined
billet steel ends, and laser-cut spring pads, it appeared to be a stout
piece that was engineered to do the job properly: Home run,indeed! The installation
we're showing you here took place at Classic Performance Products with Jim
Ries 1956 F-100 acting as the guinea pig. CPP supplied 2- inch dropped springs,
as well as the 3-inch axle, making for a pretty substantial drop. The springs
also move the axle 1-1/2 inches forward to better center the wheels in the
fenders. |
In addition to the lowering, the F-100 was treated to a CPP
disc brake kit, new shocks, new shock mounts, plus fresh bushings and hardware;
pretty much a total frontal rehab. For the most part, swapping axles is
a fairly simple remove-and-replace procedure that can be accomplished using
basic tools (though more extreme measures may be needed to disassemble the
crusty old stuff). So with the formalities out of the way; let's watch Alan
Crouse put this Effie's nose where it belongs-in the dirt! |
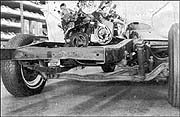 |
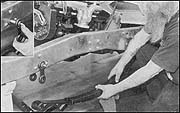
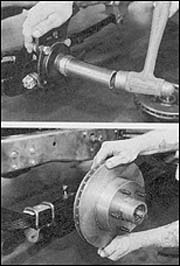
| Here's a look at the stock front underpinnings. Just your
basic, original, worn-out Ford stuff. Taking it all apart was a pretty straight-forward
endeavor, so we won't bore you with the details. |
|
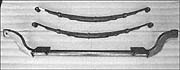 |
| Here are the primary parts that came from Mid Fifty, including
the dropped axle and a new pair of leaf springs designed to provide an additional
2 inches of lowering. |
|
 |
| The axle is a fabricated piece made from a 2-inch tubular
steel center section and GNG-machined steel ends. The ends actually slip
inside the tube several inches so they can be fish-welded, in addition to
being welded at the joint. The spring pads are laser cut and GNG-bent. |
|
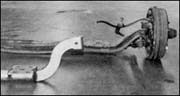 |
| A comparison of the new and old axles shows the height difference
between the two. |
|
 |
| In addition to their lower arch, these leaf springs are available
vlith repositioned locator pins to move the axle 1 1/2 inches forward, which
centers the wheels in the fender openings. |
|
 |
| Alan cleaned up the frame rails and installed new bushings
and hardware in the spring hangers before installing the springs. These
replacement parts are available from both Mid Fifty and CPP. |
|
 |
| The new axle bolted up without incident using fresh U-bolts
and shock plates. |
|
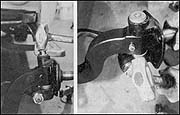 |
| New kingpins and bushings were used when installing the spindles.
These parts are also readily available through companies like CPP. Alan
made sure to align the notch in the kingpin with the location of the lock
pin. |
|
 |
| The CPP disc brake assembly is basically a bolt-on affair
that begins with the caliper brackets... |
|
 |
| ...then moves on to the installation of bearings and rotors.
A machined spacer is first driven on to the spindle to ensure proper fit.
Rotors are available with either Chevy or Ford bolt patterns. |
|
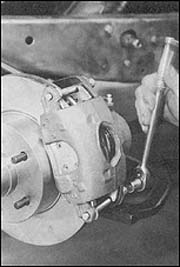 |
| Fresh calipers and pads completed the brake portion of the
install. |
|
|
 |
 |
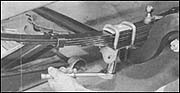
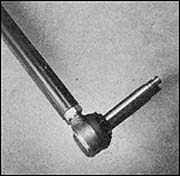
| With the spindles located higher (due to the dropped axle),
compensation is needed to link the tie rod to the steering arms. Several
styles of tie rod end spacers are available,and CPP just introduced these
tie rod ends with longer shafts that will also do the trick. A heavy-duty
Cpp tie rod was also used. |
|
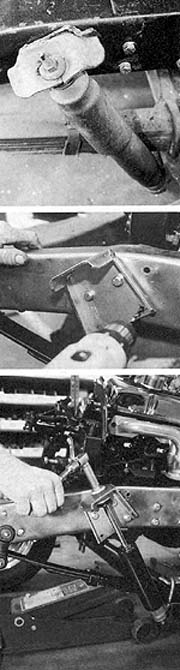 |
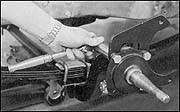
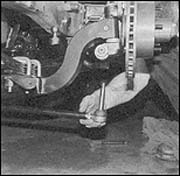
| The original shock mounts were trashed, so Alan got creative,
dug into the CPP parts bin, and came up with some repo Chevy-style mounts
that he thought would work. Two holes in the frame actually lined up with
each mount, so Alan just drilled a third to finish it off. The mount hangs
below the frame slightly, but could easily be trimmed off for a cleaner
appearance. New shocks from CPP bolted right up. |
|
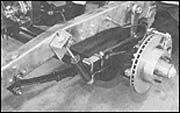 |
| Here's a look at the driver's side with everything assembled.
Naturally, it looks great since everything is shiny and new it'll be even
more impressive once the truck is on its wheels again. |
|
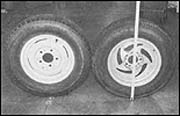 |
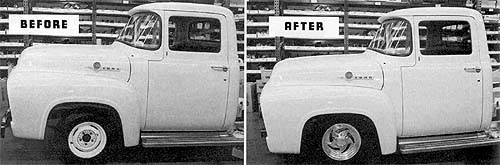
| To be fair, our test truck will be gaining a little lower
attitude from the wheel-and-tire combo. The original rollers measured in
at 28 inches overall diameter, while the new ones were a little smaller
at about 26.5 inches. |
|
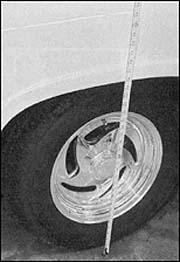 |
| The tape tells the tale. With sheetmetal back in place, ground-to-wheelwell
measurements went from 30.5 inches to about 25.5 inches-or a drop of about
5 inches. Granted, some of that came from the tire-and-wheel combo, but
remember, leaf springs tend to settle a little after a few hundred miles
of driving. |
|
 |
| We think the stance is right on target, especially considering
that it's achieved with bolt-on parts. |
|
|
|

