| Classic Performance Products |
| 1957-60 F-100 C-Notch Kit |
| By Grant Peterson |
|
|
| The old stink bug stance on the
primered Nova or Tri-Five running 3 1/2-inch Centerlines in your high school
parking lot belongs then and there, not on your classic truck. Obviously,
trucks have a heavy duty utilitarian lineage, but how many guys or gals
do you know who are more careful with their trucks than their mom's antique
dinning table. They take pride in the fact that nothing goes into, let alone
scratches, their truck's bed. That's all fine and dandy and to each his
own, but what's the point of seeing blue sky between the ground and the
bottom of your truck bed if you're not hauling anything. Time to get with
the program. Restorations have an excuse, and we're not building hay haulers
or rock crawlers here, so get your truck down to earth! Each truck necessitates
its own way of going about suspension modi!ications, but it's not rocket
science, and you don't need airbags to get your truck low while maintaining
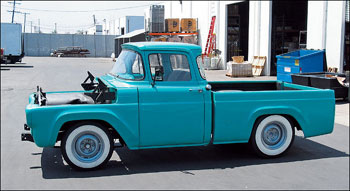
a decent ride quality. We have been following a '60 Ford F-100 that has
been undergoing a plethora of chassis mods in order to help bring it up
to today's standards without getting too wacky. last month we outlined what
it takes to lower a '57-60 F- 100 with a dropped axle from Classic Performance
Products in order for them to develop several kits for these Fords, which
are kinda out on their own as far as after-market upgrade parts are concerned. |
With the frontend nice and low, attention was turned to the
rear. All of the kits out there for '57-60s are actually for earlier trucks
and use a shorter leaf spring in the rear, which means the spring mounts
need to be moved.. which can lead to many problems, plus shorter springs
don't ride as smoothly as longer ones, it's physics. One of the easiest
ways to lower the rear of most trucks is to "flip" the rearend
to rest on top of the leaf springs. That automatically lowers it the width
of the axle tube (usually about 3 inches), plus the leaf spring pack, which
varies, but let's say at least 2 inches, so that's a modest 5 inches right
there! The only problem is that this usually eats most of the clearance
between the bottom of the frame and the top of the relocated axle tube,
which calls for a C-notch in the frame. This can be mild to wild depending
on your needs, and you've probably seen trucks at shows sans a bed floor
and tall Brooklyn Bridge looking notches or stepped frames so the owner
can lay said truck on the ground, literally. That's not for everyone, and
often a dab'll do ya. CPP's new kit comes with a C-notch package that will
give roughly 2 1/2 inches of extra frame clearance, which on a lowered or
custom truck, car, or hot rod is usually about all the suspension is gonna
travel anyway. |
Luckily, CPP got together with Deaver Spring to build the
new bolt-in replacement leafs that lower the truck about an inch, not to
mention they'll ride smoother than worn-out and fatigued stockers with button
sliders at the end of each leaf. CPP has gone to great lengths to make sure
this installation goes smoothly, and even include shorter shocks that bolt
into their stock locations. While all this work was going on the new Truetrac
Posi third member with a 3.00:1 gear showed up and was installed into the
Currie rearend while the bed was off. That Smeding Ford 392 small-block
will smoke both the skins now. Obviously, with the C-notch there is a decent
amount of fabrication involved that requires a certain skill level as well
as tools, but even if you hire a shop to do this, it's not too complicated
or time consuming. In fact, with the work being done by professionals, this
was started at 8:30 a.m., and the last picture was taken by 1 :00 p.m. the
same day.
So call classic Performance Products at 800-830-1724 to order everything
you need to get your late-'50s Ford down on the ground! Stay tuned for more
'57-60 F-100 tech. |
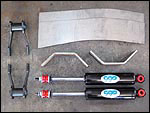 |
| 1.Here's the first part of the new '57-60 F-100 lowering kit
from Classic Performance Products (CPP) new rear shackles, shocks, and C-notch
plates. The shackles even come with new hardware even though it's not in
the picture, which will be a lifesaver since most of the original shackle
bolts are pretty gnarly by now. |
|
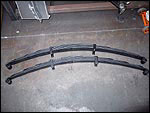 |
| 2.The new leaf springs are made for CPP by the specialists
at Deaver Spring and would have been a special, time consuming, not to mention
expensive job if you'd ordered a set before CPP and Deaver sat down and
figured out how to put these into production. |
|
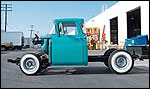 |
| 3. I know it doesn't look like much is even left of this '60
F-100, but if you've been following the work that's been going on, you know
we're starting to get somewhere. After the rearend is up to snuff,
the truck can start going back together. Let's roll 'er in and get started. |
|
 |
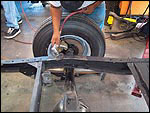
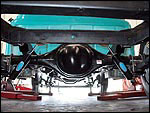
| 4. With the rearend sitting on top of the stock leaf springs
and the bed off, there's about 1 1/2 inches of clearance between the rearend
and the frame, which is how we'd like it to sit with the new springs installed
and the bed in place. As it is, this clearance disappears when the bed is
set back on the frame. The C-notch will give us that extra 2 1/2 inches
we need. |
|
 |
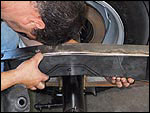
| 5. Prep for the C-notch boxing plates starts with a good cleaning
and grinding of paint on each framerail from the shock crossmember forward
about 18 inches. |
|
 |
| 6. The boxing plates basically butt up against the shock crossmember,
and the axle centerline is marked. |
|
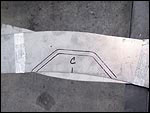 |
| 7. With the pre-bent notch plates, find their center and match
it up to the axle centerline, then trace their outline. Jeff decided to
move the centerline back about a quarter of an inch since the rearend moves
back slightly as the suspension is compressed. |
|
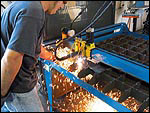 |
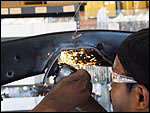
| 8. CPP has a few luxuries, like a CNC plasma cutter, but you
can cut the notch out of the boxing plate with the old gas axe, plasma cutter,
bandsaw, or even a grinder with a cut-off wheel. |
|
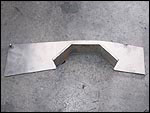 |
| 9. Just like butter! If you have jagged edges or slag from
the torch, it'll be easier to grind and smooth everything now than when
the plate is welded in the frame. |
|
 |
| 10. With the notch cut out of the boxing plate, it gets tacked
(or clamped) back in to make a reference for the cut on the outside and
bottom of the stock framerail. |
|
 |
| 11. Once marked for placement, break the tacks, move the boxing
plate to the outside of the frame, and trace your cutout for the notch.
Mark it well enough so you'll be able to see it while using the torch or
whatever method you'll use to cut it out. Now is a good time to remove the
truck's rearend and springs. |
|
 |
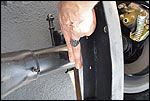
| 12. The acetylene torch is still a good way to do this as
long as you're careful and steady. Obviously, knowing how to use the cutting
torch properly makes a difference. Don't forget safety glasses, gloves,
and a hat, and keep a fire extinguisher handy. |
|
 |
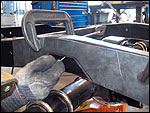
| 13. No matter how you choose to cut the notch, there will
probably be some amount of grinding involved. Take your time and fit the
bent C-notch plate into the frame nice and square; also, avoid leaving big
gaps to fill with weld. |
|
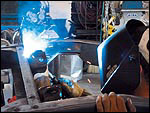 |
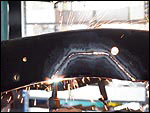
| 14. When it comes time to weld everything together, make sure
it gets done well with at least a 220-volt MIG welder, and skip around so
you don't put too much heat in one spot to minimize warpage. This is structural,
so don't be afraid to ask for help! |
|
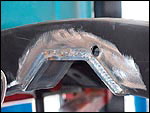 |
| 15. Finish results should look something like this, with a
nice uniform weld joining the pieces together. |
|
 |
| 16. On the road to reassembly! The new leaf springs bolt right
into a stock truck and feature these little sliders at the end of each leaf
for a much smoooother ride. |
|
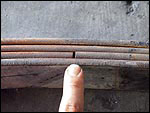 |
| 17. 50 years of use and fatigue can do this to what look like
normal robust leafs. This leaf isn't just cracked, it's busted, rendering
it pretty much useless compared to the rest of the pack. |
|
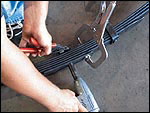 |
| 18. In a stock F-100 the rearend bolts to the bottom of the
leaf springs, and one of the easiest ways to lower this truck or almost
any truck is to "flip" the axle so it sits on top of the springs,
basically lowering it 5 to 6 inches right off the bat. To locate the axle
on top of the springs, the bolt that holds the leaf pack together has to
be installed from the bottom since it has a special round head. Simply clamp
the pack together and remove and reinstall the bolt the opposite way. |
|
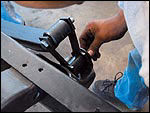 |
| 19. Since the front spring mount is stationary, only the rear
shackles are replaced. When doing this, make sure the top shackle bolt is
installed from the inside out so its head is toward the frame to avoid any
interference. |
|
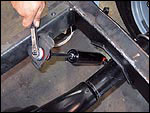 |
| 20. The beautiful thing about CPP's kit is that it allows
the springs and shocks to bolt back into their original locations-no fabrication.
With the truck about 6 to 7 inches lower, it just needs shorter shocks in
place of the stock ones. |
|
 |
| 21. To the unsuspecting eye everything looks just like it
oughtta, which is how it's supposed to be. During all of the excitement
of the build and the fact that the soon-to-be-installed Ford 392-inch Smeding
stroker motor is gonna be cooking out gobs of torque and horsepower, a Truetrac
Posi third member with a three-gear was installed to ensure both hides would
fry! |
|
|
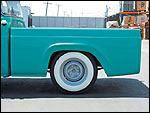
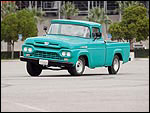
| 22. With the bed back on the rear end, the truck sits about
6 inches lower than it used to, and that's without the weight of the rear-mount
gas tank and fuel. Look how high the back of the '60 was stock, even during
a hard high-speed turn under full roll! Mucho better now. |
|
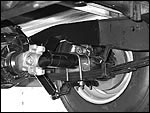 |
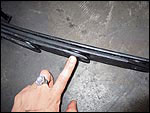
| 23. Here's a shot from underneath that shows the head room
gained from CPP's kit. What are you waiting for? Call CPP to stop those
nosebleeds. |
|
|

