Classic Performance Products 378 E Orangethorpe Ave., Placentia CA 92870

Nova ChevyII Subframe Install

Gettin' a Handle on It: '67 Chevy II/Nova Aftermarket Subframe Install Classic Performance Products' New First-Gen Nova Subframe Assembly

By Jim Rizzo Photography: Jim Rizzo

One of the many benefits we magazine guys enjoy is being at the forefront of new developments and products for the hobby. Sure, some may be mundane recreations or variations of existing products, but lots of them are actually exciting and extremely beneficial additions to the hobby that go a long way in increasing our enjoyment, safety, and performance. Classic Performance Products' new Mini Subframe Assembly for First-Gen Chevy IIs is one new product that's gonna put one heck of a smile on the faces of Nova aficionados.

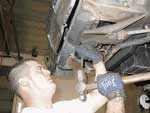
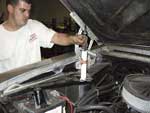
Perhaps the most noteworthy aspect of CPP's Mini Subframe is that it's an extremely installer-friendly bolt-in assembly that anyone with general mechanical aptitude can install on his or her own. Sure, you'll still have to hit the local alignment shop when you're done, but there's no need to enlist the aid of a professional rod shop--unless, of course, you prefer to write a check rather than turn a wrench. Let's take a look at what this cool new assembly consists of and how easy and straightforward its installation is.

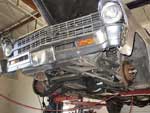
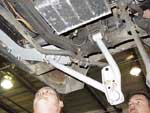
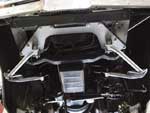
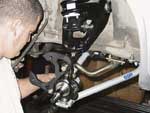
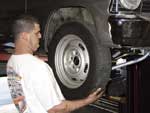
By eliminating the factory strut rods and adding adjustable forward control arm mounts, this kit adds stability, alignability, improved steering response, and over 2 inches of additional ground clearance for your early Nova. Plus, by eliminating the bind of the factory strut rods, you're finally able to achieve and maintain proper alignment without the use of a "Lock Out Plate," and as a bonus, gain a free-flowing up-and-down motion in the lower control arms. The result makes for distinctly improved ride quality and pleasingly positive feedback from the road. The Mini Subframe accommodates both the factory sway bar and aftermarket 1-inch-diameter 
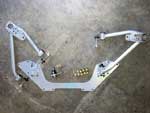
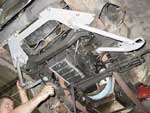
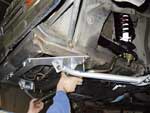
bars (1 1/8-inch bars will not work). The unique one-piece crossmember ties both framerails together by bolting in where the factory strut rod mounts were located, providing additional strength. The one-piece crossmember design adds a measly 2 pounds to the car after removing the heavy factory strut 
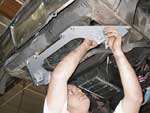
rods and bulky strut rod mounts. As we stated earlier, there is no cutting or welding required.

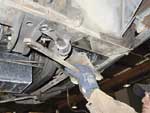
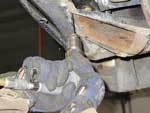
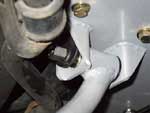
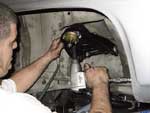
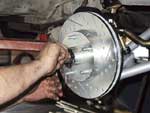
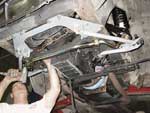
The rear of the tubular lower control arms mount in the factory location and the original camber adjustments are used, as well. The front of the lower control arms mount to the new crossmember and add a forward caster adjustment to guarantee a perfect, simple, and hassle-free alignment.

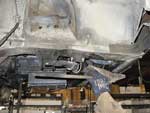
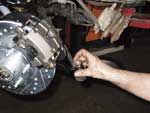
The Mini Subframe kit includes two one-piece 1 1/4-inch 0.120-wall DOM tubular lower control arms with CPP's premium ball joints, a simple bolt-in 1/4-inch-thick steel crossmember with forward mounting, four alignment cam kits, Grade-8 hardware, and CPP's low-friction, long-life bushings. The retail price for this kit at this point is under $350. They also offer a deluxe kit that comes complete with upper control arm bushings, upper ball joints, 1.5-inch-lowered coil springs, spring perches, and shocks for a measly $599. Take a look at the install shown here, and then check out CPP's Web site or give 'em a call for particulars. If you've got a First-Gen Nova, you'll be glad you did.


Nova ChevyII Subframe Install
This easy-to-install collection of components is CPP's new Mini Subframe kit. Dollar for dollar, it is perhaps one of the most beneficial upgrades available for the poor handling of a First-Gen Nova, and one of those "why didn't I think of that?" kinda products.

Nova ChevyII Subframe Install
For this installation, we used a '67 Chevy II that sported stock suspension, though it had received an aftermarket disc brake upgrade somewhere along the line. Since the Nova had some issues above and beyond those typical of a First-Gen, there were some repairs/upgrades done in addition to the Mini Subframe installation performed. The upper control arm bushings, new lowering coil springs, and a new set of CPP spindles, and disc brakes were included while they were at it.

A standard install begins with the removal of the lower ball joints from the spindles and the lower control arms from their pivot points. The next step is to center-punch the rivets holding the strut rod mounting brackets to the framehorns.

After removing the strut rod brackets, you may have to touch up the flats on the framehorns with a grinder to remove any ridges around the mounting holes that may interfere with the new crossmember fitting perfectly flush against the framehorns.

The new tubular lower control arms slide right into place. The rear pivots fit into the original control arm mounting flanges, and the fronts into the mounting flanges on the new crossmember.

Center-punching the rivets ensures that the drill bit is centered in the rivet heads and that the holes are uniform. Some may find that flattening the rivet heads a bit with a grinder prior to center-punching makes it easier to keep the drill bit in place.

With the rivets drilled out, the brackets removed, and the mounting surface prepped, it's then time to lift the new crossmember into place. CPP must have really done their homework because the mounting holes lined up perfectly.

CPP also supplies a new set of alignment cams and bolts for use at the rear control arm mounting point.

Another tip is to use as sharp a bit as you can--a brand-new one is by far the most preferable--and pay attention to the bottom tank of the radiator; you certainly don't want to run a bit up through the rivet and into your radiator.

CPP supplies the 7/16-14 Grade-8 bolts, nuts, and washers used to mount the crossmember.

For the initial install, it's best to set the adjusting cams in the neutral or centered position; the frontend shop will make final adjustments during the alignment phase.

Here you can see the crossmember and control arms in place. The CPP system is so at home and so much more logical a setup than the original design that it's a wonder GM engineers didn't figure this out in the beginning.

CPP includes a pair of their heavy-duty lower ball joints in the standard kit, but for the minimal additional investment we'd suggest the Deluxe kit that comes complete with upper control arm bushings, upper ball joints, 1.5-inch-lowered coil springs, spring perches, and shocks in addition to the main components. Heck, if you're doing the job, you might as well do it right and be done with it once and for all.

With the assembly in place and the upper control arms and coil springs installed, the next step is to drop in the heavy-duty shocks supplied in the Deluxe kit.

As we stated earlier, this subject Nova got the full treatment. In addition to the hot new Mini Subframe kit it, also received a fresh pair of CPP dropped spindles and disc brake setup.

With the addition of improved braking, the CPP system is an even more exciting upgrade.

With the system installed, the last steps are to reconnect the steering controls (and in this case the brake lines to the new calipers)...

...and the wheels and tires. After a quick trip to your local frontend shop, it'll be time to hit the road and enjoy your Nova like you never have before.

The Mini Subframe kit is designed to accept a sway bar, as well...

...The Mini Subframe accommodates both the factory sway bar and aftermarket 1-inch-diameter bars (1 1/8-inch bars will not work) to get the maximum performance from your new setup.

It's always best to have shop and assembly manuals on hand to make sure your installation is correct and to make the project as easy as possible. We recommend factory manuals, available at Greg's Automotive

 HOME ORDER TECH  BOOKS STEERING BRAKES SUSPENSION POLICIES