 |
| Classic Performance Products |
| 1971 Camaro Brake Upgrade |
| By Steven Rupp |
|
|
|
| Monster brakes are all the rage these days. Rotors big enough
to block out the sun mounted inside rims that look like they belong on a
covered wagon from the Old West are showing up on more and more hot rods.
But some gearheads actually like their 15 inch rollers, or don't have the
coin to blow on a set of dubs. This isn't to say they don't want their Camaros
to have killer braking; they just want to take a more reasonable approach
to getting it done. |
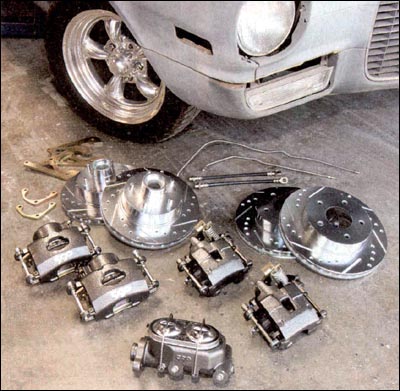
Thanks to Classic Performance Products (CPP), guys can now
have their cake and eat it, too. Killer-looking binders that will stop hard
and easily fit inside 15-inch hoops are just a day of wrenching away. To
see how easy or hard-these parts would go on, we decided to graft a set
onto a buddy's '71 Camaro. It's your typical project car, and the owner,
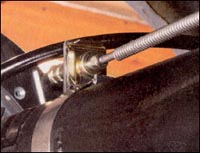
Jon Lindstrom, just bought a new set of shiny 15-inch wheels. |
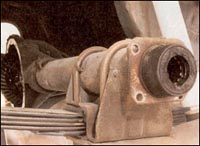
The Camaro still wore its original brakes, and to say they
were ugly would be an affront to the word. Besides being cosmetically challenged,
they were also mechanically worn out. and the rear drums were starting to
act up. The drums would be updated to a disc brake arrangement, while the
fronts would be overhauled with a CPP direct replacement kit. |
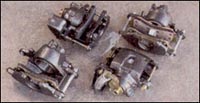 |
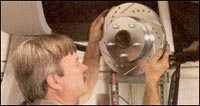
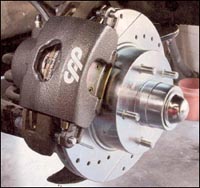
| 1. The heart of any brake system is the calipers. CPP offers
brand new units in a variety of finishes. We opted for the powderpaint at
$50 a pair, but you can get them chromed as well. The fronts have the same
huge 2 15/16 inch piston as the factory units, and when combined with the
right master cylinder and good pads, they offer exceptional performance. |
|
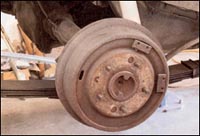 |
| 2. While drum brakes do get the job done, they aren't the
best looking behind a sweet wheel. They also lag in perfonnance when compared
to modem disc brakes, especially after repeated hard stops. The rear disc
convernion kit from CPP ran $599, and we upgraded the caliper finish for
$50 and the rotorn for another $75. Everything needed for the conversion
was in the kit, including brake lines, e-brake cables, hardware, and gaskets
for 10- or 12-bolt differential covers. |
|
 |
| 3. There's no way around it, if you want to ditch the drums,
then you need to pull the axles. We yanked the cover off the old U-bolt,
dropped the pin, and pulled the Clips. This allowed us to slide the axles
from the housing. |
|
 |
| 4. With the axles removed, we took the easy route and just
severed the old e-brake cable with a cutoff wheel. Since the CPP kit came
with new rear e-brake cables, this was the fastest way to get the old junk
off. CPP provided new brake hard lines, so we removed the old ones as well. |
|
 |
| 5. We then removed the four bolts that held the old drum assembly
to the axle flange and were rewarded with a clean slate to start installing
our new parts. We also took a moment to inspect the axle bearings for wear. |
|
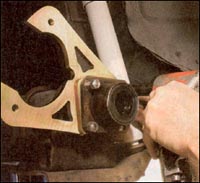 |
| 6. The first step in installing the new CPP brake system was
attaching the caliper bracket to the axle flange as shown. We made sure
to use the lock nuts provided in the kit. |
| |
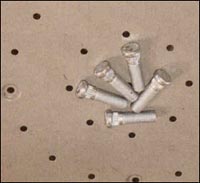 |
| 7. Since the rotor hats are about 1/8 inch thicker than the
old drums, CPP supplied slightly longer 7/16 inch wheel studs. We used a
press to install these in the old axles, but we could have used a vise and
a hammer to get it done as well. |
|
 |
| 8. With the new studs installed in the axles, were installed
them into the housing and then put on the sparkl ing zinc-washed rotors.
They are directional, so we were careful to put them on the correctside. |
|
 |
| 9. With two old 7/16 inch nuts holding the rotor in place,
we then bolted the new caliper to the CPP bracket. CPP included shims in
case the caliper didn't line up with the rotor, but in our case it was dead
on. |
|
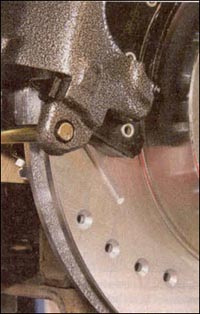 |
| 10. While the powdercoating and zinc washing did set us back
a few bucks, there's no denying how killer it looks. Best of all, the new
parts will keep looking great for a long time. The slots, like the venting,
help to cool the rotors as well as provide a space for heat and gas to escape,
thus improving braking performance. The slots help clean the area between
the pad and the rotor surface. The holes are mostly for looks, and the zinc
coating will keep rust out of the equation. |
|
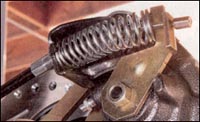 |
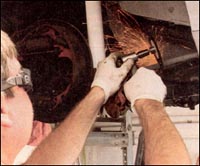
| 11. With the caliper installed, we connected the new e-brake
cable and ran it back to the rest of the system. It was extremely hard to
get the Clip on to secure the cable to the caliper, but we got it done after
a flurry of curse words. On the otherside, we figured out that it was easier
to do with the caliper off the car. |
|
 |
| 12. In an effort to make this install something you could
easily do in your driveway, CPP includes these cool little brackets for
the brake lines. By using the supplied band clamps, you don't have to do
any welding during the install. Sweet! |
|
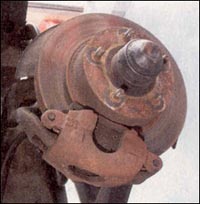 |
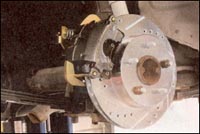
| 13. With the rear system installed, we moved to the front
brakes, which still worked, but looked like hell. With lindstrom's new billet
wheels, the brakes ugliness was only accentuated. The fix for this was supereasy. |
|
 |
| 14. We unbolted and removed the old caliper and then pulled
the battered rotor. The castlenut and washer would be reused, so we put
them in a safeplace. This was a good time to pull the old dust shield and
give it some fresh paint. We could have bought a replacement set from Cpp
for $49, but we opted to take the more wallet friendly route. |
|
 |
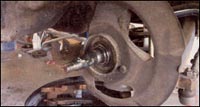
| 15. After installing the new bearings and seal, we packed
the hub with grease and slid the rotor onto the spindle. Once in place,
we secured it with the original castlenut and washer. We were careful not
to overtighten the castlenut. It needs to be snug, but free spinning Lastly,
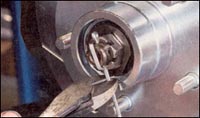
we dropped in the cotterpin and installed the new dustcap. |
|
 |
| 16. The front calipers included brakepads, but we decided
to upgrade to CPP's cer amic pads, According to Jim Ries of CPP, We want
our systems to offer smooth quiet braking capabilities under a wide range
of temperature and road conditions. And we certainly don't want annoying
brake-generated noise during our drive. Anotller characteristic that makes
ceramic materials attractive is the absence of noticeable dust All brake
pads produce dust as tlley wear. The ingredients in ceramic compounds produce
a light-colored dust that is much less notice able and less likely to stick
to the wheels. Consequently, wheels and tires maintain a cleaner appearance
longer. |
|
 |
| 17. The new front brakes look killer and will easily bring
the Camaro down from speed. Since the parts were designed to be a direct
replacement, the installation only took around 20 minutes per side. Costs
were $98 for the calipers, $95 for the rotors, and $39 for the new brakelines.
We upgraded the calipers with powder paint for $50, the rotors for $75,
and added ceramic brake pads for $39. Add it all up and we spent $39 for
these killer looking brakes. |
|
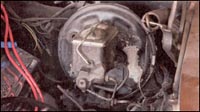 |
| 18. Technically, we could have gotten away with running the
same master cylinder, but the rear chamber's smaller fluid volume could
have caused us headaches down the line, According to Ries, The reason for
this is that disc brake calipers have much larger pistons than wheel cylinders,
so as. your brake pads wear, your fluid level drops dramatically If you
use a disc/drum master with the smaller rear chamber on a four-wheel disc
application, you run the risk of running the small reservoir side of the
disc/drum master cylinder dry before you wear out the brakepads, Not a safeway
to do a four-wheel disc conversion. The good news is that a replacement
wasn't expensive. |
|
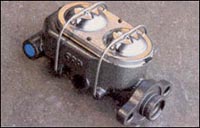 |
| 19. This 1 1/8-inch bore "large port" master cylinder
set us back $59, but the best part is that it's a direct replacement for
what was on the car. That meant we didn't need to hassle with cutting and
flaring brake lines. Upgrading the finish to match the calipers ran an additional
$30. They also offer chrome plating, or you can save the cash and just rattle-can
the master. |
|
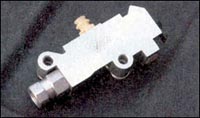 |
| 20. Like the master cylinder, this combination valve is a
direct replacement for the OEM unit in the Camaro. As Ries explained, Many
people use names like proportioning valve, distribution block, metering
valve, and combination valve, but they are usually all talking about the
same part. This is a combination valve. Most of these valves look the same,
but are different depending on the application. A disc/drum would be different
than a disc/disc valve in function, but they look almost exactly the same.
Our disc/disc valve provides two pounds of residual pressure front and rear.
It also meets federal safety standards by including the pressure differential
switch. |
|
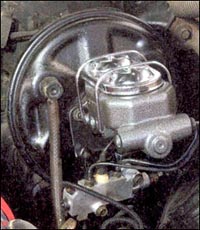 |
| 21. After bench bleeding the master, we installed it onto
the Camaro along with the new CPP proportioning block. The process was drama
free, and when we were done we were able to bleed the whole system and get
the Camaro back on the road. The total installation of the rear kit and
front parts took all day, with most of that time spent converting the rear
drums to disc. Now we just need to get the rest of the second gen looking
as good as the new brakes. |
|
|

