 |
| Classic Performance Products |
| CPP's Tubular Control Arms For '73-87 C-10s |
| By Grant Peterson |
|
|
|
Automotive manufacturers find the middle ground between
what works and what is economical for them to manufacture before placing
the order for hundreds of thousands of parts; the aesthetics of the suspension
aren't anywhere close to the top of their list. What does this mean for
us classic truckers? That we have ugly stock parts under our trucks that
were built to loose mass-production standards, and while they may be rugged,
years of wear and tear and the effects of time have taken their toll on
our Detroit iron.
So what are your choices, you ask? Find nice original parts
that are getting harder to locate and more expensive? Update the suspension
via a new front clip? Or in the case of Chevy C-10 trucks, bolt on some
brand-new control arms and go? Thanks to the aftermarket and the vast demand
for better/more versatile parts, say for lowered trucks, companies like
Classic Performance Products (CPP) have come to the rescue. Without cutting
into the stock frame (which is some people's worst nightmare), you can upgrade
your C-10's stamped-steel control arms to CPP's fully TIG-welded tubular
pieces in only a few hours, and still be able to return your truck to stock
should you ever choose to. They truly are bolt-ons! |
CPP's tubular control arms come in high-gloss black or
metallic-silver powdercoat, and are fully assembled on new chrome-moly billet
cross-shafts with bushings made from a patented plastic that will never
squeak, never need lube, and work at temperatures over 450 degrees. Their
new upper control arms are lengthened to work with all dropped coil springs,
while still compatible with the stock units. The lower arms feature a stamped
helical coil perch that doesn't "settle" like polyurethane spring
seats, and makes installing the springs even easier. The other benefit to
CPP's lower arms is the cross-shaft design has increased ground clearance
for lowered trucks or those with Air Ride, which if you are in either category,
you know what we're talking about.
On our test mule '79, we've already upgraded to CPP's rear
trailing arm conversion (Feb. '08). Now it's time for the frontend, which
already had a set of 2-inch dropped coils, an old small-diameter aftermarket
sway bar, and an upper shock mount that looked like it was starting to tear.
So while the truck was in the air, CPP installed one of its 1 1/4-inch sway
bars and its double-shear upper shock mount bracket. This bracket is similar
to what GM used on the four-wheel-drive trucks to fix this all too common
C-10 problem. |
CPP offers two sway bar brackets: a stock replacement,
or one for lowered trucks that sits closer to the frame, again gaining more
ground clearance. Many trucks weren't equipped with sway bars from the factory,
so you'll have to bust out two rivets and drill a couple of holes, but you'll
be glad you did. The aforementioned dropped coils were also swapped out
for 3-inchers to give the truck just the right amount of rake. CPP has coils
from the stock height on up to a 3-inch drop and in 1-inch increments to
get you down where you want to be.
Of course you'll need to have your alignment checked after
all this is said and done, but that is cheap insurance to make sure all
your new parts, not to mention tires, will last. For those of you ready
to take your C-10 to the next level-which may be closer to the pavement-call
CPP and see what it can do for you. |
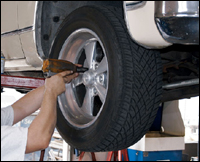 |
| First things first, take the front wheels off. Remember to
loosen the lug nuts with the truck on the ground if you don't have an impact
gun. |
|
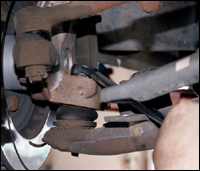 |
| Starting with the lower ball joint, remove the cotter pin,
nut, and separate it from the spindle. This may call for a ball joint separator
tool, which looks like a big two-pronged fork. |
|
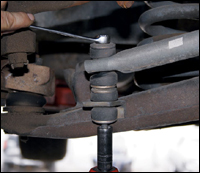 |
| If your truck has a sway bar on it already, disconnect where
it mounts to the lower control arms. Also disconnect or remove the shocks. |
|
 |
| Carefully remove the front coil springs. The truck already
had 2-inch dropped coils in the front. |
|
 |
| Now begin loosening and removing the lower control arm mounts
at the crossmember. Don't forget to squirt some WD-40 or penetrating fluid
on rusty hardware. |
|
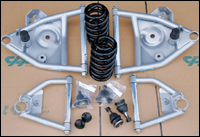 |
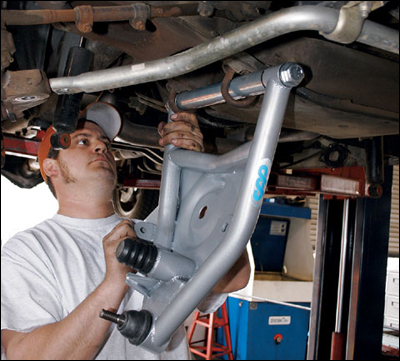
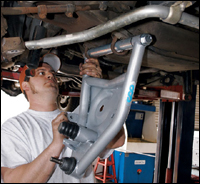
| Here are the new TIG-welded, powdercoated, tubular control
arms from CPP along with the included upper and lower ball joints. The upper
control arms are longer than stock to work well with dropped coils as well
as stock springs. We'll be installing 3-inch dropped springs in the '79,
too. |
|
 |
| The lower control arms are heavy, so be prepared to grunt
or have someone help. If you are going to detail the front of your chassis,
now would be a good time! |
|
 |
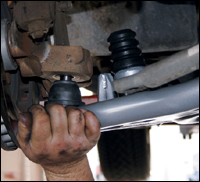
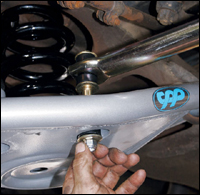
| CPP's new control arms mount to the crossmember using the
OE clamps to eliminate confusion. The design of the lower cross-shafts also
provides more ground clearance for the lowered crowd, which you'll appreciate.
Check out CPP's lower bump stomp; it is a progressive, closed-cell, foam
polyurethane design. |
|
 |
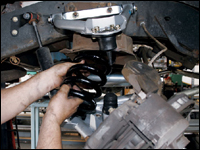
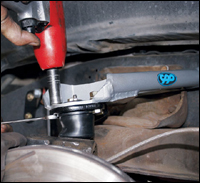
| With the crossmember mounts tightened up, position and install
the lower ball joint into the spindle. If you need spindles or want to go
to a dropped spindle, CPP has those, too. Don't forget to install the new
cotter key. |
|
 |
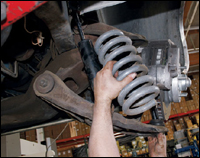
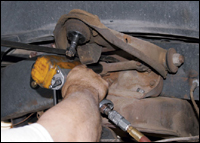
| Here's the CPP tubular upper control arm in place with the
original alignment shims. Snug up the bolts, but before attaching it to
the spindle, install the coil springs. Also notice the upper shock mount
here. GM used a single shear (one-sided) mount on light-duty trucks, and
many of you out there have broken them. CPP makes these double-shear upper
shock mount brackets to solve this problem; it also has new shock studs.
It's a smart and inexpensive upgrade. |
|
 |
| With the lower control arm installed and mounted to the spindle,
the upper can now come off. Doing it this way saves from having to mess
with the brakes. Also, before removing the upper control arm, count any
alignment shims that may be used and write it down. |
|
 |
| Next, tighten up the upper ball joint hardware and reconnect
the shocks. Always use Grade 8 hardware when replacing suspension components. |
|
 |
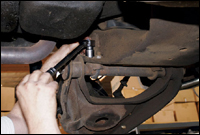
| With all that out of the way, it was time to reevaluate the
sway bar situation. Somewhere along the line, the '79 got a small-diameter
aftermarket sway bar that wasn't going to cut it now, plus it didn't line
up with the new lower control arms. |
|
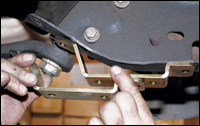 |
| CPP makes the shorter sway bar brackets, especially for lowered
trucks, to help keep the sway bar from scraping. The one to the right is
in the previous non-stock location. To use the CPP or a stock sway bar,
we needed to locate the brackets back a few inches. If your truck came stock
with a sway bar, it would've been riveted at the rear to the bottom side
of the radiator crossmember (upper left-hand corner), roughly where the
bracket on the left is shown. To install the brackets in the correct location,
that rivet needs to be removed. |
|
 |
| The whole assembly was removed from the truck, brackets and
all. Remember to have an extra set of hands to help lift heavy parts. |
|
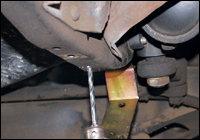 |
| With a bolt in the rear hole, it's easy to figure out where
to drill the front hole. Start with an 1/8-inch pilot hole and work your
way up. |
|
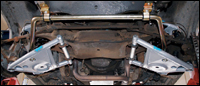 |
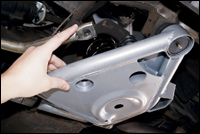
| When it's all said and done, it should look like this-a far
cry from the unsightly OEM pieces, huh? Not only that, but they are much
stronger than the old stamped-steel control arms. These parts are also engineered
to work with the '63-72 C-10 trucks as well, and should help all lowered
models gain some clearance on the blacktop. |
|
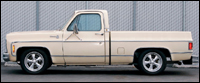 |
| The 3-inch coils brought down the nose another inch from the
before shot, and gave it just the right amount of rake... |
|
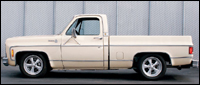 |
| ...Unfortunately, all of CPP's super cool suspension pieces
can't be seen from the road, but at least there's peace of mind knowing
they're there! Call CPP today, or log onto www.classicperform.com and see
what it can do for your truck. |
|
 |
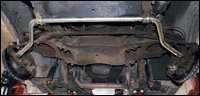
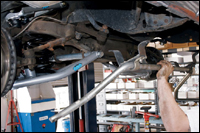
| Bingo. With the new CPP heavy-duty 1 1/4-inch sway bar secured
to the new brackets, the rear mounts nicely to the new control arms and
does so with a clean, almost custom appearance |
|
|

