 |
| Classic Performance Products |
| 1968 Ford F100 - Brake Plumbing |
| By Grant Peterson |
|
|
|
| Back at the Primedia Tech Center, I've been plugging away
at the '68 trying to git 'er done, as they say. Back in our July '07 issue
I installed ECI's 13-inch disc brakes at each corner, but I wasn't done
with some of the chassis fabrication and didn't want to jump the gun and
plumb the lines at the time, but now I think it's safe. I also want to opt
out of using power assist brakes. This may sound crazy to some (or many),
but most of my older vehicles had manual brakes, and when set up and maintained
properly, they can work well; you just have to know how to use them. And
contrary to or maybe because I'm using an EFI motor, I want to keep everything
else simple. We'll see. |
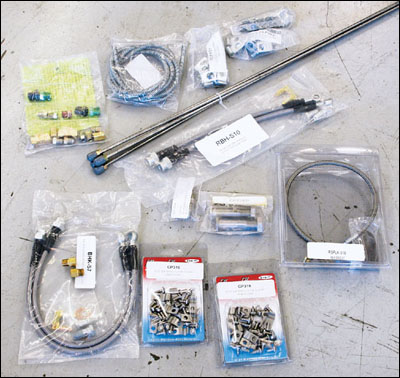
I called up Inline Tube and ordered their 30-foot straight
brake line set in 3/16-inch tubing; a disc/drum setup generally takes 1/4-
and 3/16-inch tubing. Inline Tube's straight line set comes with enough
tubing to plumb most vehicles, 20 fittings, five feet of spring wrap, and
sheetmetal brake line clamps. Inline can also custom-make just about any
brake or fuel line you can dream of out of steel or stainless steel. If
you want to do it yourself and need some plumbing tools such as professional-quality
tubing benders, which are worth the investment, Inline has a good selection.
It was love at first sight ever since I laid eyes on Classic Performance
Products' (CPP) new MCPV-1 master cylinder. |
CPP managed to squeeze proportioning and metering valves
into a master cylinder along with a brake light switch port and the capability
to hold almost a quart of brake fluid in one lightweight and good-looking
package. While at CPP, I also picked up the braided stainless steel brake
hoses I need to connect each caliper to the hardline tubing.
Before ordering parts from anyone, make sure you have your
specific brake information handy, like what brand and year your disc brake
calipers, drum brakes, and master cylinder are if you're going to use your
existing ones. Knowing this will help you order the right parts the first
time, but if you're not sure what you have or you need everything, call
the pros. They'll be happy to help! |
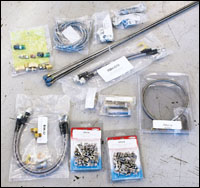 |
| Let's see, we need five brake hoses, a handful of fittings,
30 feet of 3/16-inch hard brake line, and a couple dozen brake clamps to
get started plumbing the brakes on the '68. These parts came from both Inline
Tube and CPP. |
|
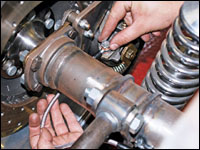 |
| We're going to start from the back of the truck and work up.
First, we need to install CPP's rear braided brake lines. If you have drum
brakes in the back of your truck, you'd obviously run the hardline to the
wheel cylinders. |
|
 |
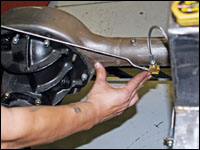
| The rearend T-fitting has this little bracket attached to
it, and to make it easy to mount, I tacked a 1/4-20 bolt to the rearend
that'll be permanently welded once I'm sure it's in the right spot. Now
we can bend up the hardline for the rearend since we know where it needs
to go. |
|
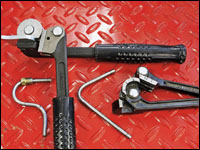 |
| Tubing benders can be a necessary evil to some, but if you
get a good one and learn how to use it, it can actually make bending tubing
fun! Seriously. On the right is a typical "cheapo" parts store
tubing bender that handles multiple sizes and can do the job in most cases,
but if you want to get serious and buy a bender that not only works well
but should last the rest of your life, get one like this "professional"
single-size bender from Inline Tube. |
|
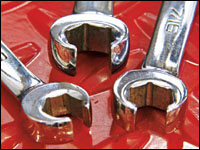 |
| Another critical tool when it comes to plumbing are high-quality
flare nut wrenches. A good flare nut wrench will fit snugly onto brake line
fittings, pretty much eliminating the chance of rounding off the fitting,
which is easily done with a regular open end wrench and is still possible
with inexpensive flare nut wrenches. These are my personal Snap-on flare
nut wrenches-money well spent. |
|
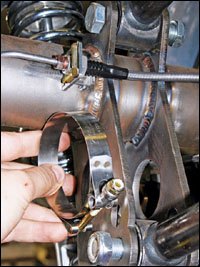 |
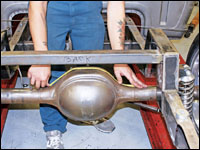
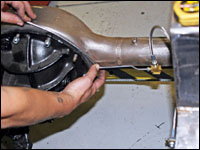
| My 9-inch rearend is still unpainted, so I'm going to weld
the brake line tabs to it, but CPP's unique tabs can also be clamped to
the rearend using these nice stainless clamps. |
|
 |
| Bending the hardline for the rearend is usually not an exercise
in grace. Since the hardline came in 6-foot pieces, I took a rough measurement
of what I needed and cut it a little longer so it was easier to work with. |
|
 |
| First, I added two 45-degree bends in opposite directions
coming out of the T-fitting, which puts the hardline right onto the housing.
Next, I marked where a 90-degree bend is needed to get the tube going up
the side of the third member. |
|
 |
| After making the 90-degree bend, I held the bend tightly to
the rearend and firmly bent the tube along the edge of the third member
by hand. Even though it sounds crude, this is about the easiest and best-looking
way to get the job done-just make sure you bend it once. |
|
 |
| After making the 90-degree bend, I held the bend tightly to
the rearend and firmly bent the tube along the edge of the third member
by hand. Even though it sounds crude, this is about the easiest and best-looking
way to get the job done-just make sure you bend it once. |
|
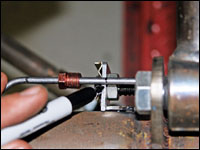 |
| Once at the brake hose and tab, the hardline will need to
be cut and reflared. Also, notice the red fitting on the tube. This has
7/16-20 threads that fit on a 3/16- inch tube. The rear brake calipers on
the truck have a 7/16-inch thread for the brake inlet, which GM used up
to '78. In '79 they switched to 10mm thread, so be sure to check what you
have before ordering. Normally, 3/16-inch tube fittings will have 3/8-24
threads, but the red fitting will match up to the 7/16-inch hoses without
the use of adapters. |
|
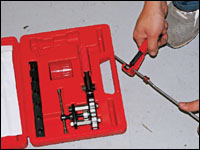 |
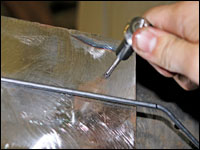
| Using my CPP flaring tool kit, I cut the tube on my mark.
Do not use a dull cutter, as it can harden the end of the tube. |
|
 |
| It is also very important to deburr the inside, outside, and
end of the tube to get a good flare. |
|
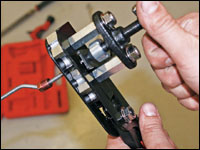 |
| There are two steps for inverted flares: making the first
flare that gives the end of the tube a bulb shape, and inverting the first
flare. Get it, inverted flare? Both CPP and Inline Tube can set you up with
flaring tools. |
|
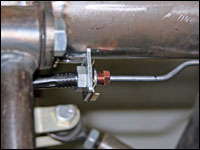 |
| Tada! Looks like it should, huh? Again, to meet up with the
brake hose, I made two 45-degree bends in opposite directions prior to reflaring. |
|
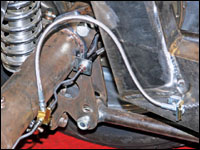 |
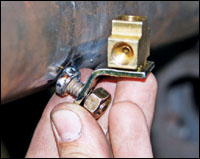
| With all the lines on the rearend bent and flared, it was
time to pick a spot for the braided flex line to go to the frame. Again,
you can weld the tab to the frame or drill and tap a hole for a bolt to
hold it. Make sure the hose has plenty of slack for full suspension travel. |
|
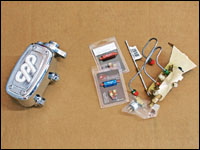 |
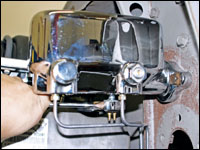
| Before going further, I wanted to get the master cylinder
situated since that was my next destination. CPP's slick MCPV-1 master cylinder
contains a double adjustable proportioning valve, a removable metering valve,
and a brake light switch port, all in a unit comparable in size to the popular
Corvette master, but 260 percent lighter. If you have a traditional master
cylinder and are upgrading to disc brakes, you will need a proportioning
valve set up like the one on the right that hangs under the master. If your
master cylinder is under the floor, you will also need the residual valves
shown in the middle. |
|
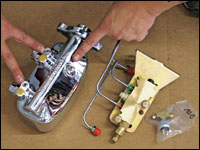 |
| CPP's MCPV-1 master cylinder has all the proportioning and
metering valve parts shown on the right built into the bottom of it. You
can also run the brake lines straight into the bottom of the master or on
the side like a traditional master. The single port is where the brake light
switch goes. For more details, go to CPP's Web site. Needless to say, this
really simplifies brake plumbing setup. Oh, and it also holds about a whole
quart of brake fluid, too. |
|
 |
| CPP's master bolts right up to the stock location on the F-100
as well as most vehicles. remember, I'm setting up the '68 with manual four-wheel
disc brakes,but the master can be used with a booster for trucks with power
assist brakes. |
|
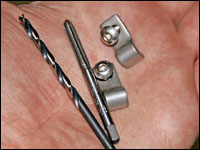 |
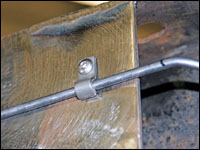
| Once the brake lines running alongside the frame are in place,
they need line clamps to make sure they stay there. Anyone who's dealt with
a custom brake system has probably used these simple stainless steel clamps,
and if you haven't, they really clean up the job. They come with 10-32 stainless
buttonhead Allens, but you will need a #21 drill bit and a 10-32 tap to
install them. |
|
 |
| Once you pick a spot, carefully drill a hole with the #21
drill bit, then carefully run a lubed 10-32 tap into the hole. Take your
time and don't force the tap, because if it breaks in the hole, removing
the hardened tap is not going to be fun. |
|
 |
| Generally, put one clamp at each end of each piece of tube
to hold it in place. When you're done running the rest of the lines, add
more evenly spaced clamps. |
|
 |
| To secure the front braided lines, I used CPP's tabs instead
of through-frame fittings. There's nothing wrong with through-frame fittings,
but they do require drilling at least a 1/2-inch hole all the way through
the frame. By drilling and taping a hole for a 1/4-28 stainless buttonhead
Allen, I'll be able to remove or replace the tab if need be. With the tab
far enough back to clear the front suspension, I used a test bend to see
what bends I needed to start the next piece. |
|
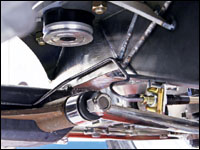 |
| The brake line spanning the front crossmember and joining
the front brakes together can be the most intricate and tricky line you'll
have to deal with. Because of confining spaces, once a few bends are made
it gets difficult to test-fit this piece until it's almost done. Measuring
and mapping out the bends helps, and bending up a sample out of a wire coat
hanger can aid in getting the basic shape. |
|
 |
| With the tube successfully bent around to the left side of
the frame, I ran into a tight spot under the T-fitting's motor mount. |
|
 |
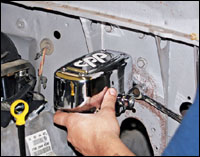
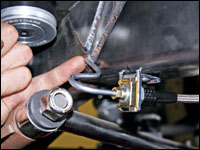
| Can't forget to install the brake light switch. From here,
if I wasn't going to tear the truck apart for paint, I'd fill and bleed
the system. Get on the horn or your computer today with Inline Tube and
CPP and round up the parts you need to release your inner plumber! |
|
|
| |
|
|

