 |
| Classic Performance Products |
| 1968 Ford F-100 Fuel System |
| By Grant Peterson |
|
|
|
| Why do many evils have to be necessary? I have no idea either,
but since they are indispensable, we must deal with them-shaving a gas filler
for instance. Detroit tried to conceal unsightly gas fillers for many years
behind taillights and license plates on automobiles, but not so much on
lowly, utilitarian pickup trucks. And while on a stock truck the simple,
in-cab gas tank filler neck works fine (albeit sometimes smelly), and later
model trucks with saddle tanks have fairly discrete gas filler doors on
their bedsides, all this does us no good when building a custom truck or
simply relocating a gas tank under the bed. Now what? Many opt for the easy
and effective solution of a straightforward bed fill style gas filler in
the middle of the bed floor. While this works just fine, the flat filler
is often hastily installed in a ribbed bed floor and usually looks like
an afterthought in the end. It also limits what you can have in the bed
when it comes time for a pit stop. |
The other option is to install a weld-in gas filler door somewhere
unobtrusive and effective. Obviously this is more time consuming/labor intensive
than the aforementioned bed fill option and it requires paintwork in the
end, but out of sight, out of mind is what we're looking to accomplish here.
A quick search of Hagan Street Rod Necessities Web page yielded gas filler
door options in many shapes, sizes, and configurations with one that was
bound to work. The idea I had for the Bumpside was to buifd a gas filler
door into the Inside of the driver side bedside, up off of the floor, and
to make it look like it's always been there as well as making it easy to
fill the large stainless gas tank. Once you choose your gas filler and which
side you want the door to open, you'll also need a way to connect the filler
to the gas tank via fuel safe hose and most likely some steel U-bends if
you are going to be turning any corners on the way. Just make sure to get
everything in the same diameters, mine was 2-inch. |
Once I started, I soon confirmed that there isn't much space
in the bedside panels on the '68. It turned out to be a delicate balancing
act of getting the perimeter of the gas door assembly to fit in the stock
sheetmetal (remember I did raise the bed floor 5 inches) and getting the
filler tube and the backside of the gas filler assembly to clear the exterior
bedside as it made the turn under the bed floor. In the end, the struggle
was well worth it because I got what I wanted and a way to fill the tank
that looks like it might have rolled off the line that way. Also this month
are a few items from Aeromotive to wrap up the actual fuel system goodies
from them that we dealt with last month. They should have a basic street
EFI fuel system kit for the Ford Modular Three Valve engines by the time
you read this. Of course they can also put together anything that you may
need, from mild to wild for just about any engine and induction combination.
It looks like we"ll be skipping next month's coverage of the Bumpside
Build-Off so I can wrap up many of the little things/loose ends that need
to be done as I gear up for paint and firing this sucker up finally. So
stay tuned for the good news as the end is finally insight. |
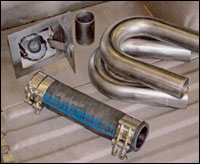 |
| Here is a 45 Series flat gas door from Hagan Street Rods,
a side fill hose kit from CPP, and a couple of 2-inch U-bends with a 6-inch
radius I picked up from a local company called B&C Industries that makes
mandrel-bent tubing. All of this will be used to create a new spot to fill
the new stainless gas tank from Rick's Hot Rod Shop. My intent is to make
the gas filler a bit more inconspicuous than the bed-fill option seen commonly
with under-bed tanks. |
|
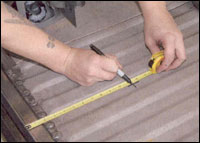 |
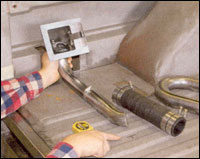
| First I needed to make a reference mark on the bed floor where
the filler neck is at the gas tank so I can make the filler tube from the
Hagan gas door travel a smooth downward slope to it. |
|
 |
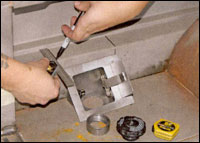
| This was my first idea about how to install the Hagan gas
door and utilize the U-bend tube to make the turn to go under the bed floor.
I was originally planning on building a removable reetmetal enclosure to
mount the door in, but.. |
|
 |
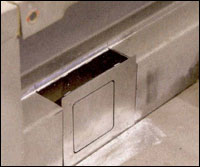
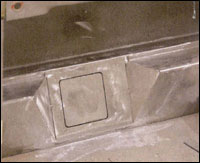
| It looked like it just might fit recessed inside the stock
bedside at a bit of an angle. I carefully marked the width of the gas door's
surrounding sheetmetal before cutting out the area. |
|
 |
| There isn't much room to spare behind the gas door until it
hits the bed side, but it just fit. |
|
 |
| Another thought was to mount it like so and weld in apiece
on the top, but there wasn't enough room behind for the U-bend to make the
transition without spending lots of time reworking the inside bedside. |
|
 |
| With the gas door angled and the U-bend cut to fit, we're
looking pretty good to be on target. I used the straight piece from the
remainder of the U-bend to extend it and once they are welded together and
the last bit of the curve cut off, the 2-inch fuel hose from CPP will slid
right on and join it to the tank. |
|
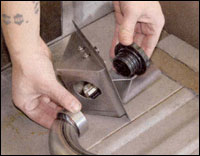 |
| The Hagan gas door comes with a threaded steel bung of sorts
that the gas cap screws into and the U-bend gets welded to bottom side. |
|
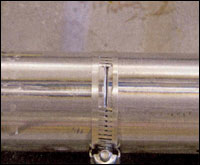 |
| An old trick for butt welding tubing together is to cut some
.windows. in a hose clamp like so to easily tack the pieces of tube together
without fumbling around. |
|
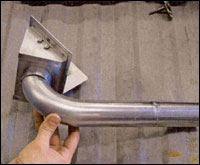 |
| Here's everything tacked tpgether and ready for the gas door
to be welded into the bed. I'll leave the tubing tacked until double checking
that it still fits and lines up correctly once the gas door is welded in
place. |
|
 |
| At the upper outside corner in the panel the gas door is recessed
into, I measured and made marks at 2 inches from the initial cut. Then,
using a straight-edge, I marked from the new opening to the mark on the
corner and cut out the pieces, made templates for new ones, cut them out,
and tacked them in place. The angled transition to the gas door makes it
look more natural, like it's supposed to be there, which was my initial
intention. |
|
|

