 |
| Classic Performance Products |
| Chevy Nova CPP Disc Brake Conversion |
| By Steven Rupp |
|
|
|
| A long time ago, when our now classic Chevys were new, people
didn't know any better when it came to braking performance. If your car
took 200 feet to stop from 60 mph, it wasn't a big deal, since that's just
how far it took back then. Disc brakes were still an option, just like many
of the widgets that are standard fare today. It was a simpler time. Fast-forward
to the 21st century, where things are different. We whiz around in our modern
cars and have grown accustomed to technology like four-wheel power disc
brakes and ABS. |
In a way, we've gotten soft; we like how nice our modern rides
drive and, more importantly, stop. It's almost shocking how bad our classic
feels when we hop in it for a drive. In reality, our classics don't stop
any worse than they did back in the day; we've just gotten used to better.
Well, thanks to the aftermarket, we no longer have to settle for sketchy
braking with a high pucker factor. With a few bucks and a couple of days
of wrench time, it's pretty easy to impart modern braking performance into
our old Chevys. |
Our plan was simple. We would find an old Chevy with stock
binders, test it, and then throw some high-tech parts at it. Also, to be
fair, we would upgrade the rolling stock before the test so we could get
accurate data on how much the new braking parts helped the stopping distance.
After all, tires play a big part in how quickly any car comes to a halt.
We also didn't want to mortgage our house to pay for it. With a plan in
mind and the keys to a buddy's '69 Nova, we headed over to Classic Performance
Products (CPP) in Anaheim, California, to see what they had to help slow
our aging Chevy. |
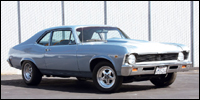 |
| Meet the star of our show. This '69 Nova is your typical street
machine. The owner dropped in a worked-over small-block topped with a small
Weiand blower, but the brakes weren't considered sexy enough to warrant
any attention. As such, it still ran the power-assisted four-wheel drums
that the General had given it at the factory. Initial testing yielded nail-biting
stopping distances from 60 mph-around 200 feet, with the best one being
196 feet. It was downright scary, and to make matters worse, it also had
a tendency to pull to one side. |
|
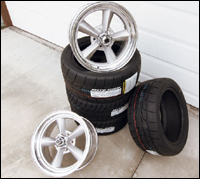 |
| We wanted modern performance for our Nova, so bigger binders
were in order. However, that meant we needed bigger wheels. Since the 15-inch
Welds currently on the car had seen better days, this wasn't an issue. Even
though we needed a big-brake-friendly size, we still wanted a classic look,
so we picked up a set of Vintage Wheel Works V40 rollers. The classic five-spoke
design looked great, and the guys at Vintage Wheel Works helped us choose
the right sizes, 17x8-inch (4.75-inch b.s.) front and 17x9-inch (5.75-inch
b.s.) rear. A car's interface to the asphalt is its tires, so we didn't
want to cheap out. Nitto 555s in 245/40/17 front and 555Rs in 275/40/17
in the rear will really help the new brakes do their thing. For a little
extra launch grip, we went with Nitto's drag radials in the rear. Hey, it's
not always about turning corners. |
|
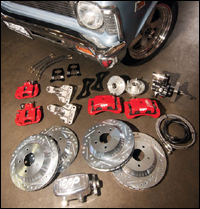 |
| For this install we chose CPP's big-brake front kit (PN 6472WBK-P13,
$799) and its matching rear kit (PN 6869RWBK-P12, $699). It should be noted
that if you buy both kits at the same time, CPP offers better pricing. Featuring
twin-piston front calipers and single-piston rears, this should stop our
Nova in a Bow Tie heartbeat and, as a bonus, look great doing it. Paired
with these calipers are slotted and drilled 13-inch front rotors and matching
12-inch rear rotors. For power assist, we wanted to try something different,
so we picked a Hydratech Hydraulic Brake Assist Systems system out of CPP's
parts bin. These kits include all the hardware, hoses, and trinkets you
need to get the install completed. |
|
 |
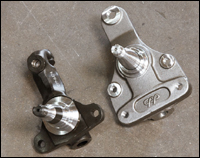
| When we saw the picture of the CPP calipers, we just thought
they were factory Vette calipers with the CPP name on them. We were wrong.
Turns out these PBR C15 front calipers are quite a bit better than the factory
stuff. Jim Ries of CPP explained, "Our calipers use 52mm pistons as
opposed to the 40mm units found in C5 Vette calipers. They also have larger
pad surfaces that offer about 50 percent more stopping power than the C5
calipers, and they cost half as much. In addition, they have iron bodies
that are far more rigid, resulting in a firmer pedal. |
|
 |
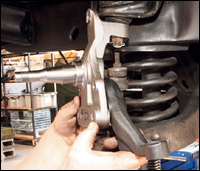
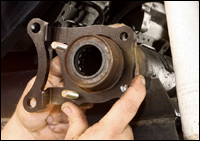
| Here you can see CPP's standard spindle alongside its two-inch
drop unit (PN CP30100, $249). The dropped version lowers the car without
affecting the steering or suspension geometry. Best of all, they accommodate
a wide array of brake options, from CPP's 11-inch standard brake kit to
the 13-inch big-brake kit we're installing. Made from 1050 forged steel
with CNC-machined chrome-moly axle pins, these units work with the factory
ball joints and stock steering arms. They also work with Wilwood and Baer
disc brake systems. |
|
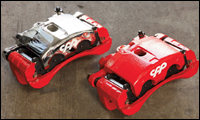 |
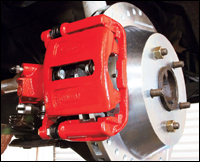
| CPP offers its calipers in a wide selection of colors. Choices
include red, black, gray, chrome, and even custom colors. We chose red because
they would look great behind the new Vintage Wheel Works wheels and would
hold up to the constant abuse heaped on brakes. The powder paint option
ran us $50 per pair, and the chrome option would have set us back $200 per
pair. |
|
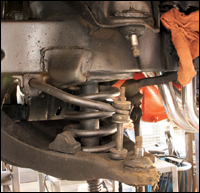 |
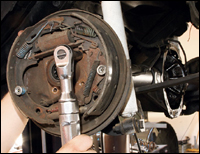
| We won't put you to sleep by giving you a blow-by-blow on
how to take off the old brakes; just remove all the old stuff until you
get to this point. You will need to reuse the steering arm, so put that
aside, but all the other parts can go in the circular file. One word of
caution when you remove the old spindle: Make sure to support the lower
control arm so that the spring doesn't try to launch itself across your
shop. This is also a good time to inspect your ball joints and other steering
parts for wear. |
|
 |
| With the new dropped spindle secured in place, we bolted on
the freshly painted OEM steering arm using the new bolts supplied by CPP. |
|
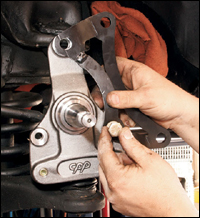 |
| We then bolted the new caliper bracket to the CPP spindle.
It should be noted that the CPP spindle works with both OEM-style aftermarket
and stock brakes. So if you want the two-inch drop but are happy with your
stock disc brakes, you can buy just the spindle. |
|
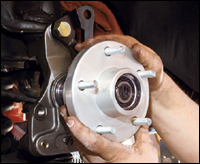 |
| After packing the hub with loads of bearing grease, we slid
it onto the greased spindle. Once in place, we secured it with the supplied
hardware and installed the dust cap. Don't overtighten the castle nut. You
want it snug, but free spinning. Also, remember the cotter pin. CPP also
offers a different hub that will pull the wheel in 7/16 inch if you need
the extra clearance. |
|
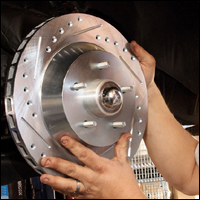 |
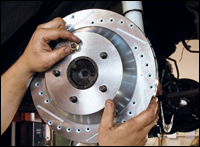
| Now it was time to slide on the beefy 13-inch rotor. The extra
mass of the larger rotor will really pay off in the braking department,
especially after repeated heavy action. The rotors are directional, so make
sure you have them on the correct side. The slots, like the venting, help
cool the rotors as well as provide a space for heat and gas to escape, thus
improving braking performance. The slots also help clean the area between
the pad and the rotor surface. The holes are mostly for looks, and the zinc
coating will keep rust out of the equation. |
|
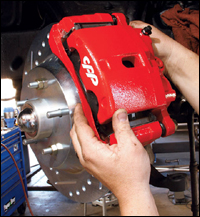 |
| Lastly, we bolted the CPP caliper to the bracket and then
attached the new brake lines that came in the kit. To save cash, we opted
for rubber, but for an additional $49 per pair, we could have upgraded to
braided lines. With the left side done, we repeated the installation on
the right side. Everything bolted together rather simply, and the front
install, not including bleeding, took us a leisurely three hours. |
|
 |
| Converting the rear drum brakes to disc on our Chevy was a
bit more work than the front since the axles needed to come out. Oh well,
at least it was a good excuse to change the old differential fluid. We pulled
the cover, removed the C-clips, then removed the drum assembly and the axle.
CPP provides new brake hard lines and rear e-brake cables, so remove those
as well. |
|
 |
| With the axletube bare, we could now bolt on our new caliper
bracket and reinstall the axle. Take a moment to check your axle bearings
for wear. |
|
 |
| We installed the new 12-inch CPP rotor and used a couple of
7/16-inch nuts to hold it in place. Having a rotor this big fall on your
foot would, for lack of a better word, suck. |
|
 |
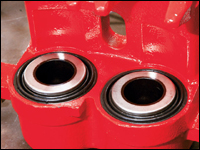
| Next up was bolting on the rear caliper. CPP includes several
shims with its kit so we could make sure the caliper properly lined up with
the rotor. In our case, the rotor was dead center with the caliper. It was
all sunshine and rainbows until we realized we forgot to install the new
wheel studs included in the kit. Since the rotor hat is 1/8-inch thicker
than the old drum, CPP feels that 1/8-inch-longer wheel studs are the safer
way to go, and who are we to argue. We pulled the caliper back off, removed
the axle, and installed the new studs. At least we caught it before buttoning
up the rear end. |
|
 |
| CPP also includes the proper e-brake cables for the install.
We mated it to the factory cable and then attached it to the caliper as
shown. Once everything is done we will adjust the cable to the proper tension. |
|
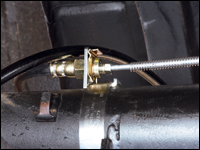 |
| In an effort to make this install something you could easily
do in your garage, CPP includes these cool little brackets for the brake
lines. By using the supplied band clamps, we didn't need to do any welding
during the install. Sweet! |
|
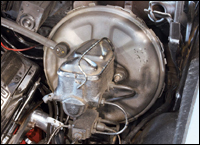 |
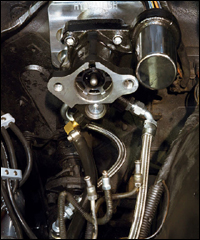
| With the brakes installed, we moved under the hood to tackle
the power booster and master cylinder. The factory stuff worked OK, but
the old master wasn't optimal for the new four-wheel disc arrangement. We
also wanted to try our hand at installing a Hydraulic Brake Assist Systems
unit. Our first step was to remove the booster and master from the firewall
after disconnecting the rod from the brake pedal under the dash. |
|
 |
| With the old booster gone, the Hydraulic Brake Assist Systems
unit simply attached to the firewall using the special long fasteners supplied
in the kit. |
|
 |
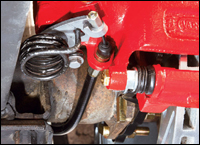
| Plumbing the Hydraulic Brake Assist Systems unit into the
power steering system wasn't rocket science, but it did take some work.
The high-pressure line from the pump went to the Hydraulic Brake Assist
Systems and then to the gearbox. There's also a low-pressure line from the
Hydraulic Brake Assist Systems that joined with the low-pressure return
line from the steering box (by an included T fitting) before going back
to the power steering pump. All the various fittings and hoses needed were
included in the kit. There were also adapters included if we were running
a newer-style Saginaw 600 box and more adapters if we decide to run AN-style
fittings on our return line. Remember that the Hydraulic Brake Assist Systems
unit is dependent on your power steering pump, so if your pump is sketchy,
toss on a new one. |
|
 |
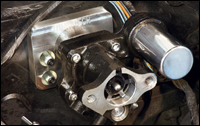
| With the Hydraulic Brake Assist Systems unit plumbed, we then
bolted on the CPP master cylinder. This billet beauty (PN CP31501-P, $189)
is fully adjustable with all the valving built into it. This keeps the area
uncluttered since there's no need for an external proportioning valve. With
two simple adjustments and a couple of test runs, it's easy to get the brakes
dialed in. We did need to cut and flare a couple of the factory lines for
this install, so have a flare kit on hand. |
|
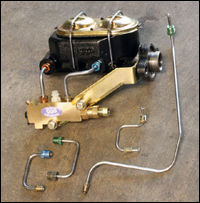 |
| If you want to save a few bucks, or if you prefer a more OEM
look, you can also go with this more traditional master cylinder (PN MCPVU-4,
$149). It also comes with the right hard lines so that you don't have to
cut and flare anything. |
|
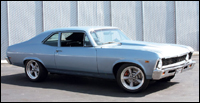 |
| The 2-inch drop and new rollers are just what this Nova needed
for an updated look. Even though CPP recommends at least a 16-inch wheel
for clearance, we opted for 17-inch Vintage Wheel Works wheels since it
greatly increased our options for tires. |
|
 |
| The big question was how well our Nova would stop with all
these new parts. Our first test on the original wheels was 197 feet. Just
by swapping on the new tires that number dropped to 188 feet, but the drums
were toast after only one hard stop. With the new Hydraulic Brake Assist
System and Nitto tires, we managed a best stopping distance of 128 feet!
That's an improvement of 60 feet. More importantly, we made 10 max-effort
stops over the course of only 7 minutes and didn't experience any brake
fade. In fact, the last stop was better than the first. The peak deceleration
g-force was .73 g with the old parts, .89 g with the new tires, and a whiplash-inducing
1.12 g with the new brakes and tires. The Nova also lost its tendency to
randomly pull to the right or left during braking. The Hydraulic Brake Assist
Systems has a different feel compared to a traditional booster, but after
a few stops we were confidently slinging the Nova to a halt. The entire
install, from start to finish, took us around 12 hours. Time well spent
to bring our '60s Nova into the 21st century. |
|
|

