 |
| Classic Performance Products |
| 1955 Chevy Truck Dropped Axle Kit |
| By Grant Peterson |
|
|
|
It's been more than a few years, shall we say, since the
old trucks we love rolled off the showroom floor, and many have lived their
lives and passed on, been resurrected, or just managed to survive the scrapper
to live another year. Over the course of time, many trucks were "upgraded"
to suit the owner's work/driving needs, restored, or maybe customized, but
regardless which scenario, things like these were usually done on the cheap
to get by or to work within the owner's budget.
There will always be the debate about I-beam axles versus
IFS clips, and the biggest argument for or against the issue is cost. The
second factor is "how low do you wanna go?" and it's quite well-known
that an IFS will net the best ground-hugging results. But what if you still
can't afford to, or you can't bring yourself to cut up your stock frame?
I-beam axle trucks that have taken a more custom turn have seen their fair
share of botched lowering jobs over the years, with most ranging from dreadful
to dangerous, but to do it "right" and safely, you need to start
over with parts made to do the job. Flipping the axle on top of the springs,
removing leaves, and making spacers will only get you a treacherous, rough,
frame-on-axle ride with the potential of breaking important parts-possibly
causing an accident-not to mention bumpsteer and bad steering geometry. |
We knew someone with such a precarious frontend setup on
his '55 Chevy truck. It's an in-the-works custom inspired by the '50s Barris-built
Kopper Kart with a lowering job that could have dated back to those very
days. Besides the fact that the front suspension setup in the truck was
a bit dodgy, to say the least, there was no axle travel, which is pointless
and hazardous, so we consulted with the folks at Classic Performance Products
(CPP) in Anaheim, California, about the issue. They said they had the parts
to do the job right and end up with a decent ride in the end while keeping
the 'beam axle setup.
CPP offers a new 3-inch dropped axle, 3-inch dropped monoleaf
springs, new shackles complete with bushings and pins, U-bolts, short bumpstops,
shock mounts, shocks, and a beefy 1-inch replacement tie-rod bar to cure
your '55-59 Chevy suspension woes. All or part of this list can be used
depending on your needs or desires, but one thing is for sure, you won't
be able to get your non-IFS truck much lower than this and retain any sort
of decent ride without cutting the frame and opening up another can of worms. |
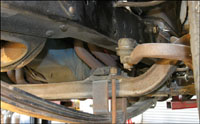
Of course, doing any amount of major lowering is a give-and-take
process, but one of the most important issues when it's all said and done
with these trucks is the drag link angle. The drag link connects the pitman
arm on the steering box to the steering arm on the spindle, and when there
is too much of an angle in the drag link, you get bumpsteer. To rectify
the situation after a dropped axle and/or leaves have been installed, the
steering arm needs to be heated with a torch and bent, usually down, to
level out the drag link. Obviously, this needs to be done right, or you
could not only hurt yourself, but could do something like set your truck
on fire and ruin parts, so ask for help or hire a pro when it comes time
for this portion. Everything else with this job is pretty straightforward.
So if you're tired of losing fillings while driving down the road or just
want to lower your stock truck, give CPP a call today and get down! |
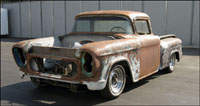 |
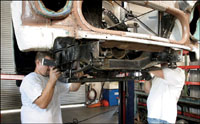
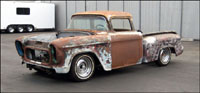
| This custom '55 Chevy truck is the long-term project of a
local upholsterer and was inspired by the Barris Kopper Kart. Unfortunately,
it was lowered the way it might have been done back in the 1950s, which
doesn't cut it today. Using a new dropped axle and monoleaves from Classic
Performance Products (CPP), we're going to show you how to lower a truck
with an axle-the right way! |
|
 |
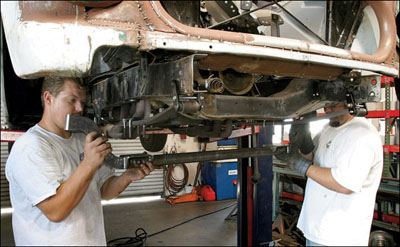
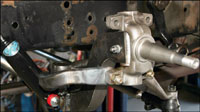
| While there is the chance that nothing would ever happen with
a lowering job like this, there is always "what if." The leaf
packs had many leaves removed, the axle was flipped to the top of the leaf
packs, and hollow spacers in conjunction with long U-bolts left this '55-59
Chevy truck sitting in the weeds. With the weight of the truck at ride height,
the frame was resting on the axle! |
|
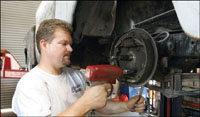 |
| With the truck in the air, the wheels, brake drums, and backing
plates need to be removed so we can get to the spindles. If you are keeping
your stock brakes, take care to retain all their parts; CPP has disc brake
upgrade kits for your truck-stay tuned for a six-lug disc upgrade on this
truck. |
|
 |
| Before trying to beat out the kingpin, make sure the tapered
cross-pin is removed. Once you have the spindles off, give them a thorough
cleaning and set them aside for later. |
|
 |
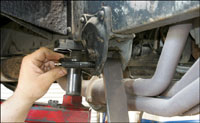
| The remainder of the front suspension can come off as a unit
by disassembling the shackles at the end of each leaf spring. Make sure
to support everything before removal since this stuff is heavy. |
|
 |
| With the frontend stripped from the Chevy, now would be a
good time to degrease the rest of the frame and clean up what might be hard
to get at later. Even though this truck is slated to be a wild '50s-style
custom, the same rules apply to a stocker. |
|
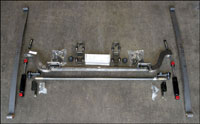 |
| CPP can provide all these parts as a kit or individual pieces
depending on your lowering needs. Here is their 3-inch dropped axle, 3-inch
dropped monoleaves, new shackles (including bushings), bumpstops, kingpin
kit, shock mounts, shocks, and last but not least, a beefy tie-rod bar and
tie-rod ends. |
|
 |
| With the rear of one of the monoleaves in place, install the
special rear shackle bolt from the outside in. A bit of grease on new parts
will help things slide into place. |
|
 |
| Install these threaded pins in the front eyes of the monoleaf. |
|
 |
| Depending on the state of repair-or disrepair-of your truck,
you might have a tough time replacing the front shackle bushings that go
through the frame. The dimples on the outside of the new pins help keep
the bushing from spinning once driven into place. |
|
 |
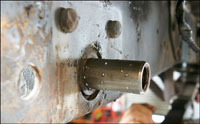
| After drilling a hole in the center of the frame where the
OE axle bumpstop would contact, this new shorty bumpstop from CPP can be
installed. In a situation like this where every inch counts, these short
stops do just the trick. |
|
 |
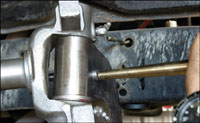
| The CPP dropped axle can now be held in place and cinched
down using the new U-bolts. Make sure to install the lower shock mounts
on the front side of the axle. |
|
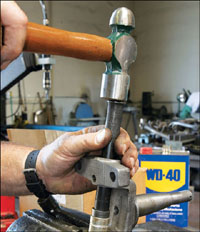 |
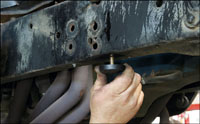
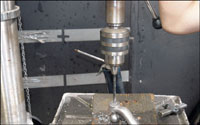
| Now comes rebuilding the spindles. The old kingpin bushings
need to be carefully driven out and the new ones installed. If you don't
have the tools or would rather not mess with this, most automotive machine
shops should be able to handle it. |
|
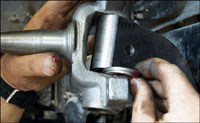 |
| Now that the spindles are as good as new, place them on the
dropped axle and hold it by inserting a greased kingpin. Next, the lower
bearing can be greased and installed between the bottom of the axle and
the spindle. |
|
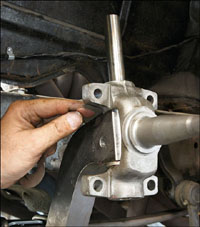 |
| After handling the previous step, check the gap between the
axle and spindle by trying to slide in one or more of the provided shims.
If you need shims, pull out the kingpin and install them before replacing
the kingpin. Any remaining play in this area will lead to oblong kingpin
bores in the axle, which is bad. |
|
 |
| Once everything is up to snuff, drive in the tapered cross-pin.
This keeps the kingpin in place. Don't forget to install and grease the
new grease zerks. |
|
 |
| Shock mounts take lots of abuse over the years, and the stock
upper mounts on this truck were nonexistent. Luckily, CPP has new ones to
fill the void. After this, the new shocks can be installed. |
|
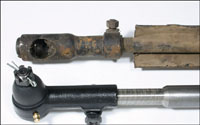 |
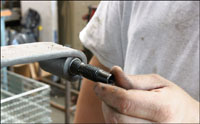
| Like many old trucks, these have an integrated ball on the
lower steering arms for old-style, screw-in tie-rod ends like the one on
top. Unfortunately, the stock tie-rod bars are also kind of wimpy by today's
standards and have been subject to reinforcements like the one on this '55.
CPP realized this long ago and makes these beefy tie-rod bars that taper
from the original thread size to 1 inch in diameter, and use either a stock
or modern tapered tie-rod end like the one shown, which we'll be installing. |
|
 |
| The tie-rod/steering ball needs to be removed from the lower
steering arms to convert them to a modern tie-rod end. Flip the steering
arm over and start by carefully grinding the backside of the arm where the
ball end is. |
|
 |
| Next, drill through the center from the backside so the ball
can be driven out with a big punch. This will leave the factory hole where
the ball end was installed and make it possible to insert the tapered end
of the new tie-rod in its place. |
|
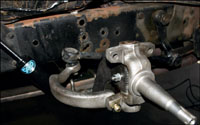 |
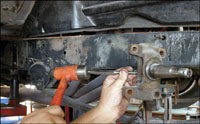
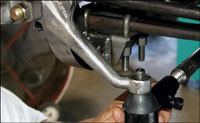
| OK, let's look at one of the biggest issues you must deal
with when lowering a truck with a solid axle-drag link angle. The drag link
is the piece that connects your pitman arm on the steering box to the upper
steering arm on the left spindle. Look behind the spindle in this picture
and you can see that the drag link is at a drastic up angle from back to
front. There is also a binding angle where the front end of the drag link
goes into the upper steering arm. All of this misalignment is the major
cause of bumpsteer, which can be annoying, if not downright dangerous. |
|
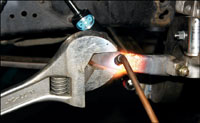 |
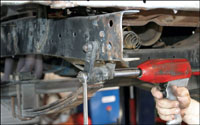
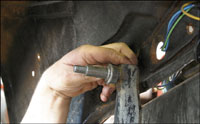
| The heat wrench is the answer here. This is not for the faint
of heart, but must be done if you want to avoid the perils of bumpsteer
and premature failure of steering components. Before bending any part of
the steering arm, it must be heated cherry red all the way through with
a rosebud torch. Use a large, adjustable wrench to do the bending chores,
which should be done slowly. Remember, safety first! You can seriously burn
yourself doing this, or start a fire! |
|
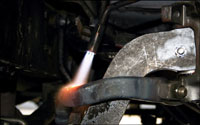 |
| We can see the first bend at the right, which brings the upper
steering arm-and consequently the drag link-down, closer to being level.
The arm needs to be bent again near the drag link to flatten out the end
where the drag link goes, which will eliminate that misalignment we saw
earlier. |
|
 |
| The lower you go, the more work needs to be done. The drag
link needed a little bend to the left to clear the axle when turning all
the way left; this was done in a hydraulic press, and done slowly so it
wasn't overbent. |
|
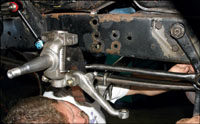 |
| After the steering arm has completely air-cooled-never use
water or compressed air-the drag link is put back in and is quite level,
which is just what we wanted! You may have to go back and regrease the kingpin
since that much heat can melt the fresh grease. Also, notice the shock has
been installed. |
|
 |
| Now the new tie-rod bar can be put in place. This can be done
from either the top or the bottom, depending on what works best to clear
other suspension or engine components. We're pretty sure this new one won't
need any angle iron reinforcements like the old one ... |
|
|
| Well, there you have it-an old-school lowering job done right!
So those of you diehards who aren't ready to take the IFS plunge, call CPP
to get set up closer to the ground without cutting up your frame. If you
are using your stock/existing brakes, go ahead and reinstall them and get
back on the road. For this truck, we're going to finish with a six-lug disc
brake kit from CPP next month-stay tuned! |
|
|

