Replace Your Drums With Discs
|
|
 |
|
Classic Performance Products
Replace Your Drums With Discs
Then Add A Drop.
Upgrade you '67-'70 Chevy/GMC
Suspension

|
Customizing an early model pickup can entail thousands
of different options, all of which suit our needs or cosmetic desires.
Generally though, the mission of personalization revolves around
upgrading along with the addition of Luxury. On the '67-70 Chevy
and GMC pickups, there is one enhancing option that most people fail to
take into consideration or don't have the resources or guidance to accomplish.
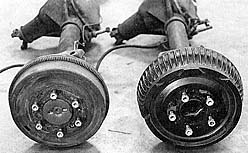
This task I'm speaking of is the conversion from front drum brakes to disc
brakes using OEM products. Many enthusiasts desire the option of disc brakes
over drums, mainly for improved stopping performance, but also because
this conversion will allow them to install dropped spindles and other bolt-on
lowering products. Let's face it, front drum brakes on the '67-70
Chevy trucks limits our personalizing options.
|
By converting to disc brakes, you have a better selection
of wheels to choose from, a larger selection of suspension modifications,
and improved performance with power brakes being a big bonus. The power
brake portion of the installation uses all OEM components and some trick
new brackets to really make this installation successful and complete.
Until lately, it was difficult to tackle this job because no one had a
kit available that would make the installation easy. Classic Performance
Products, suppliers of a variety of classic Chevy and GMC components, have
recently assembled a kit that allows enthusiasts to convert their '67-70
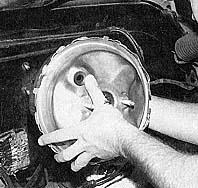
pickups over to power disc brakes while also creating the option for incorporating
dropped spindles and short coil springs to lower the front suspension to
a road hugging height.
|
In addition to simply adding disc brakes and a lowering
kit to the front of your truck, YOU must remember that your wheel bolt
pattern will now be five-lug instead of the original truck type six-lug
pattern. You can either re-drill the rear axle plates of the truck to the
five-on-five lug pattern, install a matching rear end with the same
five-lug pattern or do what we did in this case which was to call Wheel
Vintique and ordered a set of traditional rally wheels with the trick beauty
rings and center caps for a clean look. The wheels were ordered with a
five-lug pattern up front and the original stock pattern in the rear so
that the project wouldn't get to expensive. Remember, you are converting
your brake system over to disc in the front and are maintaining drums in
the rear. A power brake assembly conversion such as what we will
show you should be considered. All of the parts you would need are OEM.
In fact any assembly from '71-'83 can be installed depending upon your
resources.
|
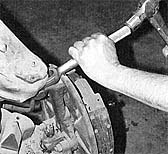
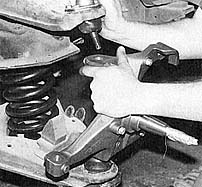
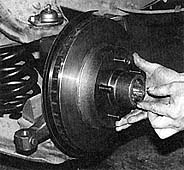
1. To make the installation a little easier, we
removed the front sheet metal but you don't have to. To begin, loosen (but
do not remove) the stock ball joint nuts holding the spindle on. You will
probably have to use a fork bar to get the spindle loose. For safety, release
the coil pressure by keeping a jack under the lower control arm, using
the truck's weight to hold the spring in place. Warning! you can injured
if this isn't done right.
2. Now the original spindle and brake assembly
can be removed.
3. Let the jack down slowly to release the original
coil spring.
|
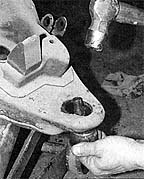
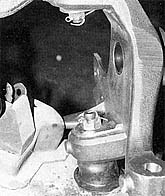
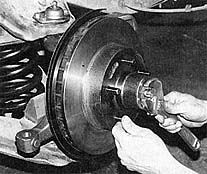
4. If your truck has the original lower ball joints,
you will probably have to use a hammer to remove them.
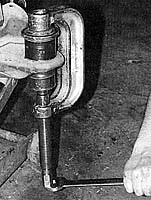
5. Now press the new ball joints which are a '73-'80
version into the lower control arm.
6. The upper ball joint is attached with factory
rivets and requires an air chisel or comparable tool to remove.
|
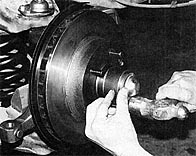
7. After the old ball joint is removed, install
the new version. The nuts and bolts are provided in the kit.
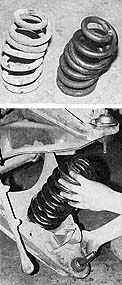
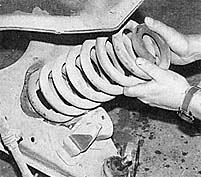
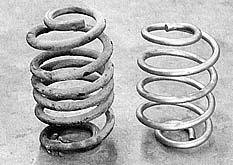
8. The lowered coil spring can now be installed between
the control arms. It just so happens that we had a set of what we call
welfare springs. That means that the owner of the truck that these springs
came out of was too cheap to lower his truck the right way so he used a
torch to heat the springs. This is the result. Folks, don't even think
about it! Get yourself some lowered coil springs.
|
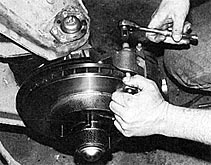
9. You will have to rely on the floor jack once
again to press the coil spring together so that the new dropped spindle
can be installed. Make sure that the coil spring is set properly into the
control arm before you continue.
10. After you bolt the new spindle on, insert
the cotter pins and be sure to bend one end over the nut so that the nut
will have no chance of backing off.
|
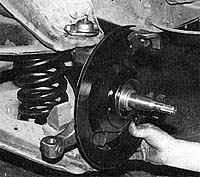
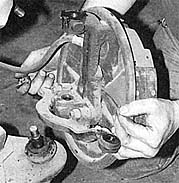
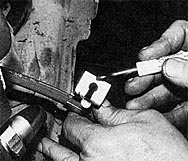
11. Since you are going have disc brakes, it is advisable
to install dust shields. The kit doesn't provide them but you can get them
from any GM parts stores. The GM part numbers are 14054937 for the left
and 14054938 for the right.
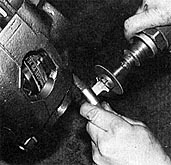
12. Now you can grease-up the wheel bearings and
install them into the rotor.
|
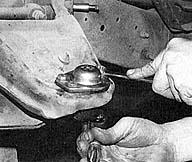
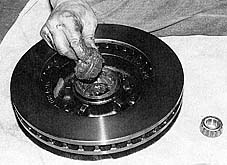
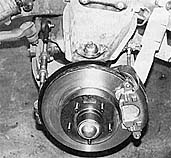
13. Install the new rotor and the outer bearings
with plenty of grease.
14. Use the original nut and washer from the old spindle,
which matches the bearing and axle, to tighten down the rotor. A cotter
pin should be installed here as well.
|
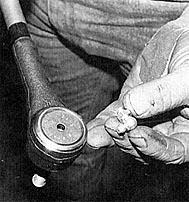
15. A hammer will be needed to install the bearing
cover. It is important that you don't forget to put the cover on because
any dirt or metal shavings can severely damage the bearings.
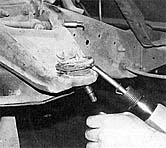
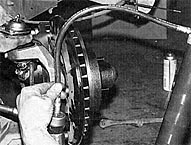
16. Now the calipers can be bolted-up. Installation
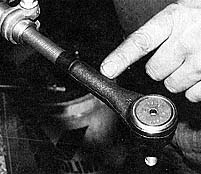
of the brake calipers requires an allen wrench.
|

17. To attach the new brake line to the caliper,
be sure that there is a copper washer on both sides of the fitting. In
same instances, the fitting may have to be bent slightly to clear the spindle.
18. The brake fluid hose bracket that attaches
to the spindle should be trimmed for a perfect fit.
19. A cutting wheel works best to trim the edges
off.
|
20. When enough excess is trimmed-off, bolt the
bracket to the spindle.
21. Here is where you must pay close attention
to the instructions. The kit provides a new outer tie-rod end and custom
made sleeve. The old outer tie-rod end will now become the inner tie-rod
end if it is still useable.
|
22. Because of the positioning of the old outer
tie-rod end when placed on the inside, the kit provides
a 90 degree zerk fitting to make lubing access much
easier.
23. Use the new tie-rod end sleeve provided in the kit
and install as pictured.
|

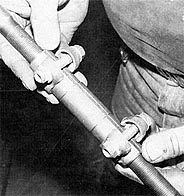
24. Both of the tie-rod ends require joint
sleeves to retain the lubing grease.
25. When the tie-rod assembly is complete, it can be
installed with cotter pins to secure the nuts.
|
26. Be sure to lube-up all of the joint areas of
the suspension before you take off down the road.
Both of the ball joints and tie-rod ends require grease.
27. The kit doesn't include them but it is advisable
to install new shocks. In this case, a gas-magnum
version is used.
|
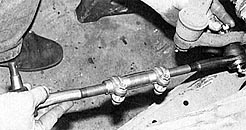
28. There you have it, disc brakes, and a lowered suspension.
The suspension is actually lowered about 3 1/2 inches from stock.
Now head to an alignment shop to insure proper tire wear and tracking.
29. To lower the rear suspension to meet the new
lowered height of the front, a set of C.P.P lowered coil springs
are installed in place of the stockers. You can see the difference which
is measureable to a four-inch drop.
30. If you chose to ditch the stock six-lug rear end
to go with a five-lug rear end, a 1971 or '72 half-ton truck will
provide you with a good donor rear end.
|
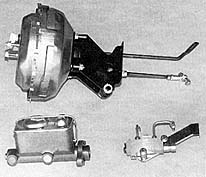
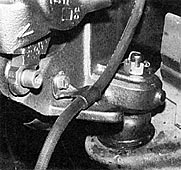
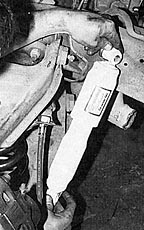
31. It is important that you consider installing
a power brake booster, master cylinder and proportioning valve. A
'73-80 version bolts-up nicely as does a '71-72 version. The only difference
is that the '71-72 version requires a slightly longer thrust rod. This
is Classic Performance Products' new power brake kit that comes complete
with everything you need to complete the conversion. Trust me, this
setup will stop your truck very effectively!
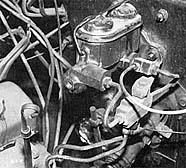
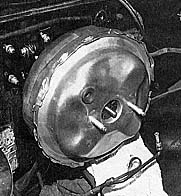
32. The 1967-'70 truck fans will recognize this;
it's the manual brake master cylinder from the stock brake system. After
this truck was converted to disc brakes, we opted to convert the system
over to power.
|
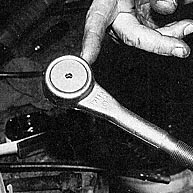
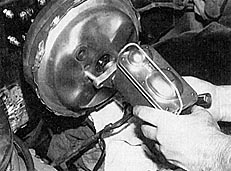
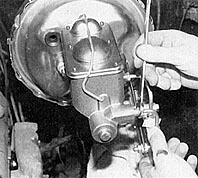
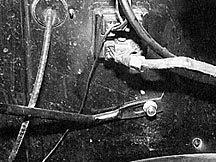
33. The manual master cylinder is attached only
to the lower two bulkhead studs. Remove the master cylinder and the nuts
attached to the upper bulkhead studs.
34. Slide the thrust rod through the firewall and attach
the power booster bracket to the bulkhead studs.
35. At this point, you should have the power booster
firmly mounted to the firewall in preparation for the master cylinder to
be installed.
|
36. Making sure that the pressure pin is still inside
the power booster (it likes to fall out if you're not careful), the new
power master cylinder can be installed.
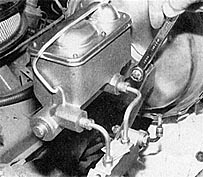
37. The new proportioning valve comes completely
assembled with required hardlines, fittings and installation bracket assembled.
The mounting bracket simply slides onto the booster stud between the booster
and the master cylinder.
38. The hardlines have been pre-bent to precisely
fit the master cylinder parts. Make sure that the fittings are good and
tight.
|

39. There is a "T" fitting on the cross
member that allows the brake lines from the proportioning valve to connect
with the front and rear lines. You will probably have to replace the stock
lines to the "T" fitting with new hardlines that you can bend
up, or with a braided steel kit that Classic Performance Products has.
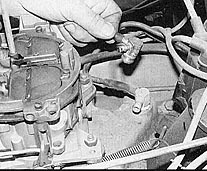
40. You will also need to locate a vacuum source
somewhere on your engine. Many carburetors have vacuum ports on their base
plates or you may want to plumb your intake with a multi-port fitting.
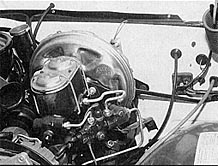
41. This is what the power brake assembly looked
like from the factory in 1972. You will notice that there is a support
bracket extending from the power booster bracket over to the firewall.
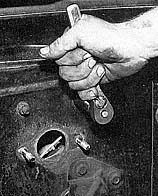
Now, the 1971 and '72 firewall designs are different from 1967-'70. The
fuse block, parking brake and speedometer cable are located in different
places.
|
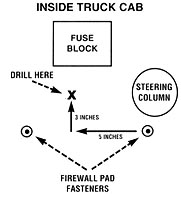
42. This diagram shows you how to drill the bracket hole
precisely where you will need to for the 1967-'70 Chevy trucks. Looking
from the inside at the firewall, measure over five inches from the pad
fastener closest to the steering column, then measure upwards three inches
and drill.
43. The support bracket can now be attached as shown.
If you have drilled the hole properly, it should be no problem mounting
the bracket.
|
|
| Classic Performance Products 378 E Orangethorpe
Ave., Placentia CA 92870 Tech Line 714-522-2000 |
 |
TECH
| BOOKS | SUSPENSION
| BRAKES | STEERING | CONTACT
US | HOT PRODUCTS |

|
| © Classic Performance Products. This "website"
and all contents are property of Classic Performance Products.
Prices subject to change without notice. Not responsible for
errors or omissions. Please note that kits & prices
may vary between certain applications. |
|
|
|
|
|
|
|