- Classic Performance Products
- Brake Upgrade
-
Without a doubt, converting from front drum brakes
to front discs is one of the most worthwhile upgrades for making your
classic safer and more enjoyable to drive. And with a good after market
kit, the conversion is a fairly simple afternoon operation.
|
When it comes to making upgrades on a vintage Chevy, bolting
on better brakes is (or at least should be) high on the priority list for
a lot of enthusiasts. After all, braking systems on production cars have
improved dramatically over the past couple of decades, and it only makes
sense to take advantage of such advances and back up your car's horsepower
with adequate stopping forces. This is especially true if you drive your
classic much, since you're sharing the road with drivers who don't know
what it takes to stop a two-ton car with drum brakes and often won't leave
you enough room to bring your classic to a halt safely. For enthusiasts
who have had a few too many close calls with their drums (or who are just
plain tired of sluggish stopping and front end wandering during panic stops),
the after market has succeeded in producing a host of front disc brake conversion
kits for vintage Chevys. In fact, several companies now offer brake
kits with all kinds of options everything from dropped spindles to extra-large,
cross-drilled rotors. In other words, upgrading to disc brakes can be a
super simple or somewhat complicated endeavor, depending on how far you
want to go. Sticking to our theme of simple winter upgrades, we decided
to focus on one of the most basic brake swaps around converting a '64-72
Chevelle from manual drum front brakes to power discs.
|
We contacted Classic Performance Products, in Buena Park,
California, a company that specializes in supplying brakes and suspension
components not only for Chevelles, but for Camaros, Tri-fives, Novas and
trucks. Proprietor Jim Ries knew just what we meant when we said we
wanted to do a "bare bones" brake upgrade, and suggested the company's
standard spindle disc brake kit. The Classic Performance Products
kit is about as straightforward as you're likely to find, and comes with
virtually everything you'll need to make the swap. It starts with reconditioned
and powder coated spindles, which come assembled with the correct steering
arm and brand new wheel bearings, seals, dust caps, rotors, calipers, pads
and the flexible brake lines. Controlling the brakes are a new dual-reservoir
master cylinder, a proportioning valve and a seven, nine or eleven-inch
power booster. These parts come assembled as well, and for '64-66 A-bodies
that originally came with single-reservoir master cylinders, CPP also includes
pre-bent brake lines and correct fittings to connect the proportioning valve
to your car's existing brake plumbing. Furthermore, the complete kit (minus
wearables like the brake pads) comes with a lifetime warranty. While the
kit sounded like it fit the bill perfectly for our story, we asked Jim if
we could make things even more "bare bones" by opting for manual
disc brakes and eliminating the power booster.
|
While technically possible, Jim didn't recommend that
approach. For disc brakes to operate efficiently Jim said, they need a lot
more line pressure than drums, pressure which is easier to produce with
a booster. For example, it takes about 450 pounds of pressure to lock up
drum brakes at speed, whereas disc brakes require more like 900 pounds.
That much pressure is much easier (and safer) to build with a booster than
it is with your right leg alone. Really, the difference in money is not
that much," Jim said, "and the difference in comfort is quite
a bit." He added that if you look at factory applications, it was generally
only the lightest cars that came with manual disc brakes from the manufacturer.
Clearly, power discs are the way to go so that's what we went with.
As you'll see in the following photos, the disc brake swap is pretty straightforward
it's basically a remove-and-replace procedure that only took a few hours
to perform on our guinea pig '65 El Camino. However, we do recommend
having an extra set of hands around to make things go a little smoother.
And of course, extra caution should always be exercised when working with
potentially dangerous components like coil springs. You'll also have to
be careful removing your old drum brakes and spindles if you want to save
your ball joints and tie rod ends (the photos show some tips for doing this).
With that said, let's move on to the actual operation and get that A-body
braking better!
|
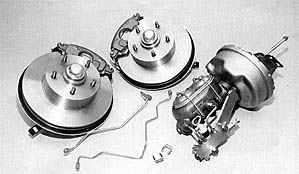
This Chevelle disc brake conversion kit from Classic Performance
Products comes complete with spindles, rotors, calipers, brake pads, proportioning
valve, master cylinder, power booster and all the hardware and fasteners
you'll need. The brake assemblies and master cylinder assembly come
pre-assembled. For '64-66 cars with single-reservoir master cylinders, CPP
also includes pre-bent brake lines to connect the proportioning valve to
the factory brake lines.
|
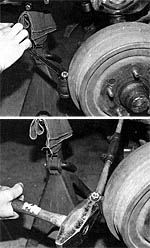
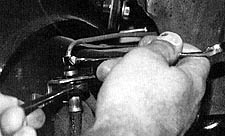
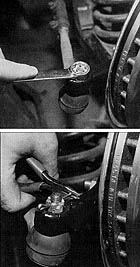
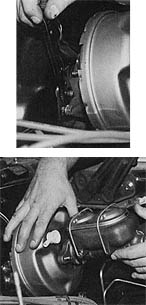
With the car securely supported on jack stands, the first
order of business is to disconnect the tie rod end from the steering arm.
If you don't want to ruin your tie rod end boot, a few smacks to the side
of the steering arm with a heavy hammer should break things loose.
|
Before breaking the stock spindle loose from the ball
joints and control arms, it's a good idea to disconnect the flexible brake
line at the junction where it meets the hard line.
|
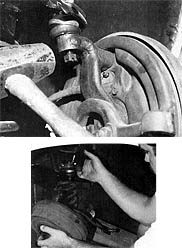
Then you can loosen the castle nuts that secure the spindle
to the ball joints. Don't remove them yet, though. Leaving the nuts on should
prevent the control arms from springing apart (and the spring from flying
out) once you break the spindle loose. For added safety, you should also
secure the spring with a coil spring compressor, or at least support the
lower control arm with a floor jack. After double checking your safely precautions,
you should be able to break the spindle free with a few smacks from a heavy
hammer to the side of the mounting boss. With the spindle loose, the old
brake assembly can be lilted out.
|
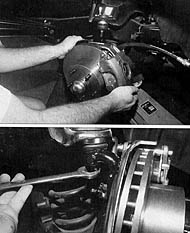
Unless you need to replace your ball joints or make any
other changes, little preparation is needed before the pre assembled spindle
and brake assemblies can be lifted onto the control arms and bolted in place.
Then the brake line can simply be connected again.
|

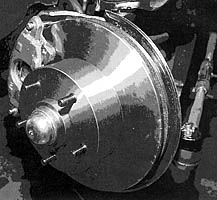
Here's what the new spindle and brake assembly look like
after initial installation. From the back side it doesn't appear much different,
but the difference in operation and performance is night and day.
About the only thing left on the steering end of things
is to reconnect the tie rod ends. Once everything is where you want it,
don't forget to torque all the fasteners to proper specifications and slip
the cotter pins back in place.
|
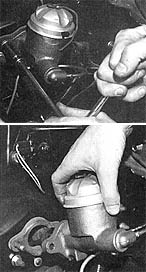
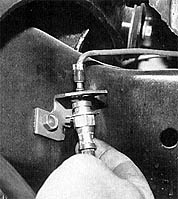
Moving to the engine compartment, the next step is to
disconnect and remove the original master cylinder
|
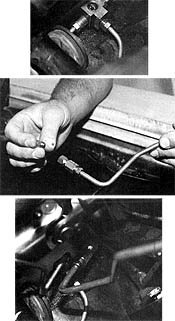
On earlier Chevelles that originally came with single-reservoir
master cylinders, it's sometimes easier to get the brake lines plumbed
and routed before installing the new master cylinder. On our '65,
the stock distribution block was retained although the lines were re-arranged
a little. The line for the rear wheels, which comes off the back side
of the block, was disconnected and an adapter was used to plumb it
into the pre-bent line leading to the proportioning valve. The new line
for the front brakes plumbs into the original outlet on the top of the distribution
block.
|
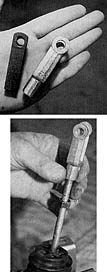
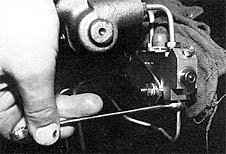
The new master cylinder and power booster come with a
new push rod, although you will need to reuse your old clevis. On our car,
however, the clevis was so worn that the hole for the pin was oblong. We
obviously had to get a new one.
|
After your brake line situation has been figured out,
it's time to install the master cylinder and power booster. while those
items come already assembled, we found that, for clearance reasons, it's
often easier to remove the master cylinder and install the booster first.
Once everything is bolted to the firewall, the new brake
lines can be secured to the proportioning valve.
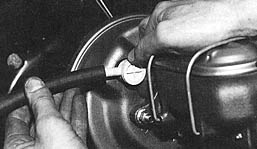
And finally, a vacuum hose needs to be routed from the
power booster to a vacuum port on your intake manifold.
|
|
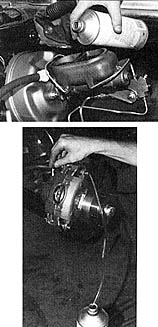
Once the booster, master cylinder and proportioning valve
have been installed and connected, you have two final chores before the
test drive. Add fluid and bleed the entire brake system.

Now it's time for the moment of truth remounting the wheels
and going for a test drive. Installer Jim Chaddick noted that the calipers
barely cleared our aluminum 14-inch wheels (most of the time you'll need
15-inchers in order to use discs), but most everything else checked out
just fine. And the difference in braking performance? Night and day! While
our drum brakes always seemed okay, the power discs have a lot more stopping
authority especially when we're traversing the fast-moving (and jam-packed)
Southern California freeway system.
|
|
| Classic Performance Products 378 E Orangethorpe
Ave., Placentia CA 92870 Tech Line 714-522-2000 |
 |
TECH
| BOOKS | SUSPENSION
| BRAKES | STEERING | CONTACT
US | HOT PRODUCTS |

|
| © Classic Performance Products. This "website"
and all contents are property of Classic Performance Products.
Prices subject to change without notice. Not responsible for
errors or omissions. Please note that kits & prices
may vary between certain applications. |
|
|
|
|
|
|
|