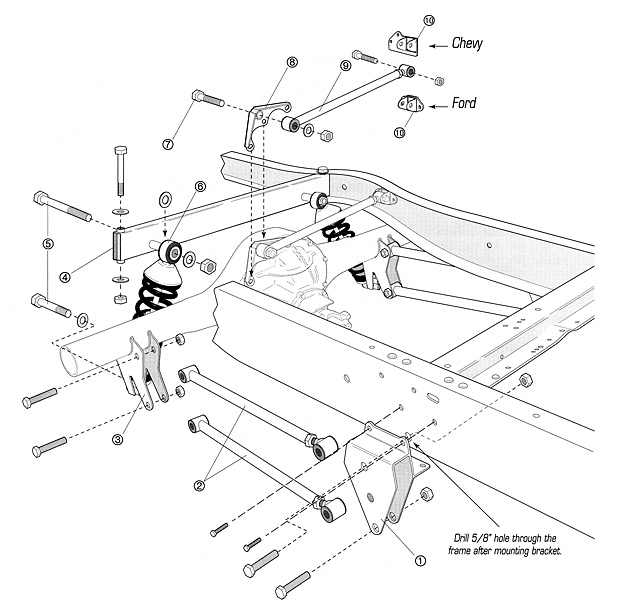
| Installation Notes: |
| 1. |
Before removing the stock rearend and springs, mark the frame
and take measurement as to where the axle centerline should be so that the
tires will be centered in the wheel wells. |
| 2. |
Remove front spring mounts by grinding off rivet heads and
punch rivet body through the frame. Drill out rivet holes to 7/16". |
| 3. |
Install the 4-link frame brackets (part No. 1) to the frame
where the original front spring perch used to be. To determine left and
right side bracket, the lower 4-link holes on the frame brackets have to
be further forward than the upper holes. |
| 4. |
After tightening all of the 7/16" bolts on the frame
bracket, drill out the frame, through the upper holes of the frame brackets
to 5/8". |
| 5. |
Weld on the axle brackets (part No. 3) on the axles (36"
apart), making sure that they are centered on the housing and that the rear
side of the brackets (where the three holes for the coilover shocks are
located) are parallel with the mounting surface for the 3rd member. |
| 6. |
Adjust the 4-links (part No. 2) so that they have 1/2"
of the threads showing on the adjuster and install them on the rearend and
frame. Install the lock nut for the front, upper 4-link mounting bolt on
the inside of the frame rail. |
| 7. |
Raise the rearend to the ride height. Check your wheelbase
and axle location. |
| 8. |
Install coilover shocks (part No. 6) to the rearend (with
the threaded adjuster on the bottom), making sure that there is a spacer
between the lower coilover mount and axle bracket. |
| 9. |
Remove the stock shock absorber crossmember and install the
new coilover crossmember (part No. 4) on to the frame with the tube extension
on the lower side of the crossmember and pointing forward. Line up the coilover
upper mount to the end of the tube extension so that the coilover shock
in not leaning forward or backward. Mount the coilover crossmember to the
frame by drilling some 5/8" holes if there aren't any existing holes
available. |
| 10. |
Install panhard bar axle bracket (part No. 8) to the rearend
(on the top, passenger side) and install the panhard bar (part No. 9), with
the adjuster on the frame side, on the axle mount. |
| 11. |
Install panhard bar frame bracket (part No. 10) on the driver
side, inside rail by drilling two, 7/1 6" holes. Make sure that the
panhard bar is perpendicular to the side of the frame as viewed from top.
On certain Chevy trucks, you can use the existing three holes that are used
to mount the axle rubber snubber. |